5.1.3 Scikit-learn 跟做:fit、transform、Pipeline
Scikit-learn 是经典机器学习最常用的 Python 库。本页刻意压短:先看流程图,再跑一个完整脚本。
先看工作流
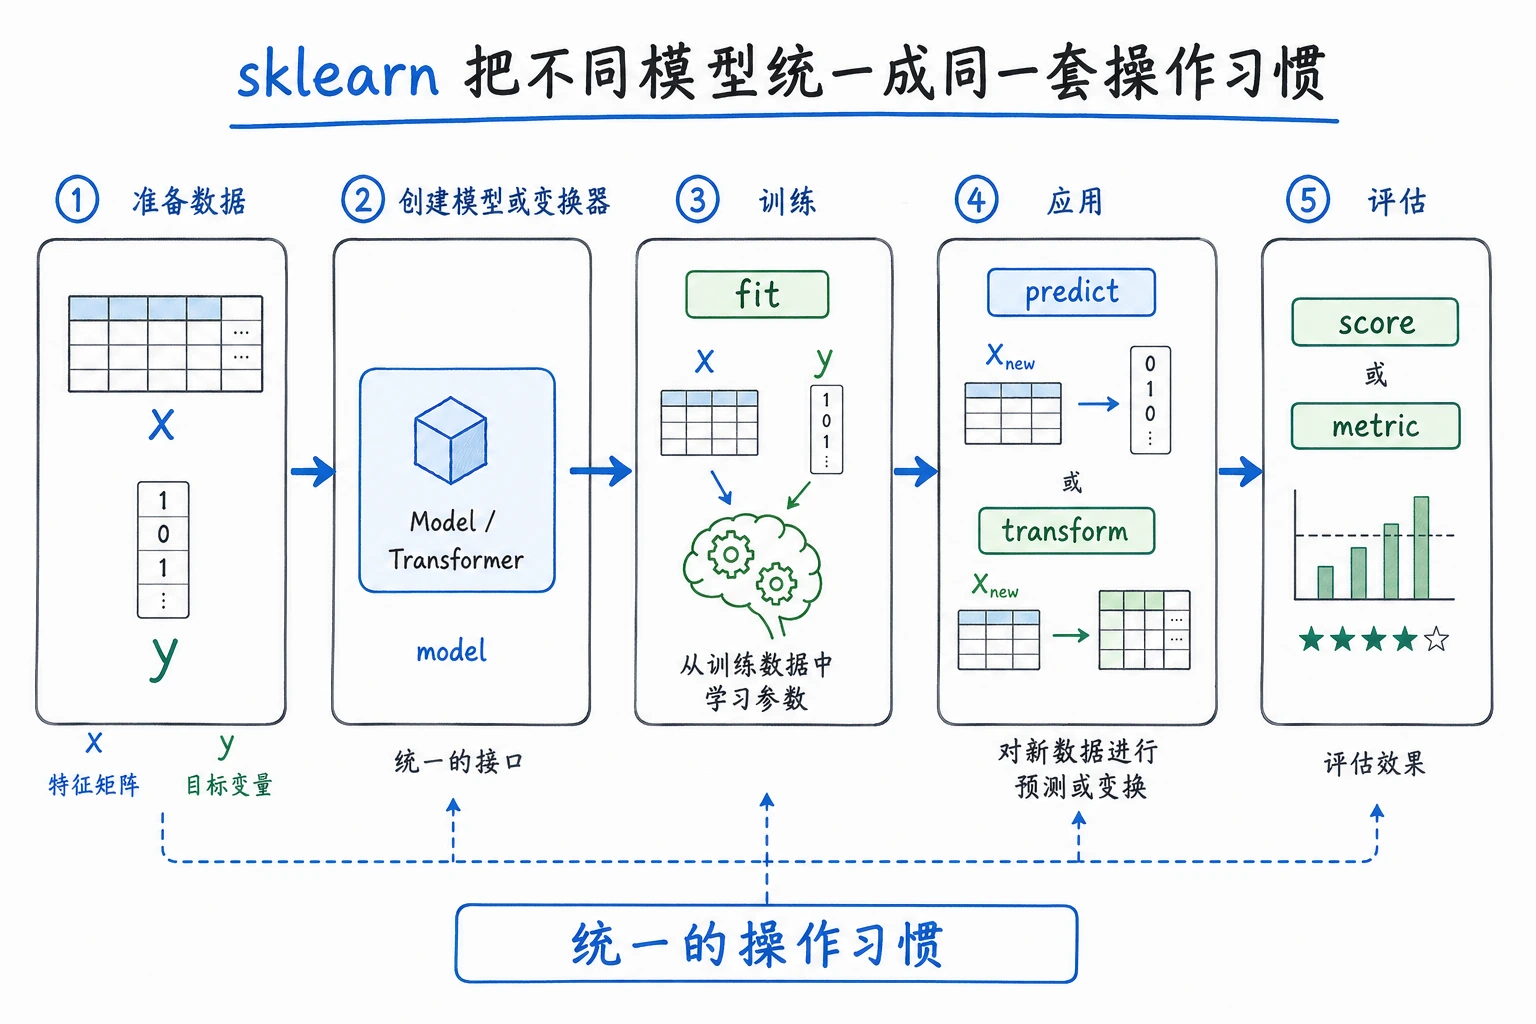
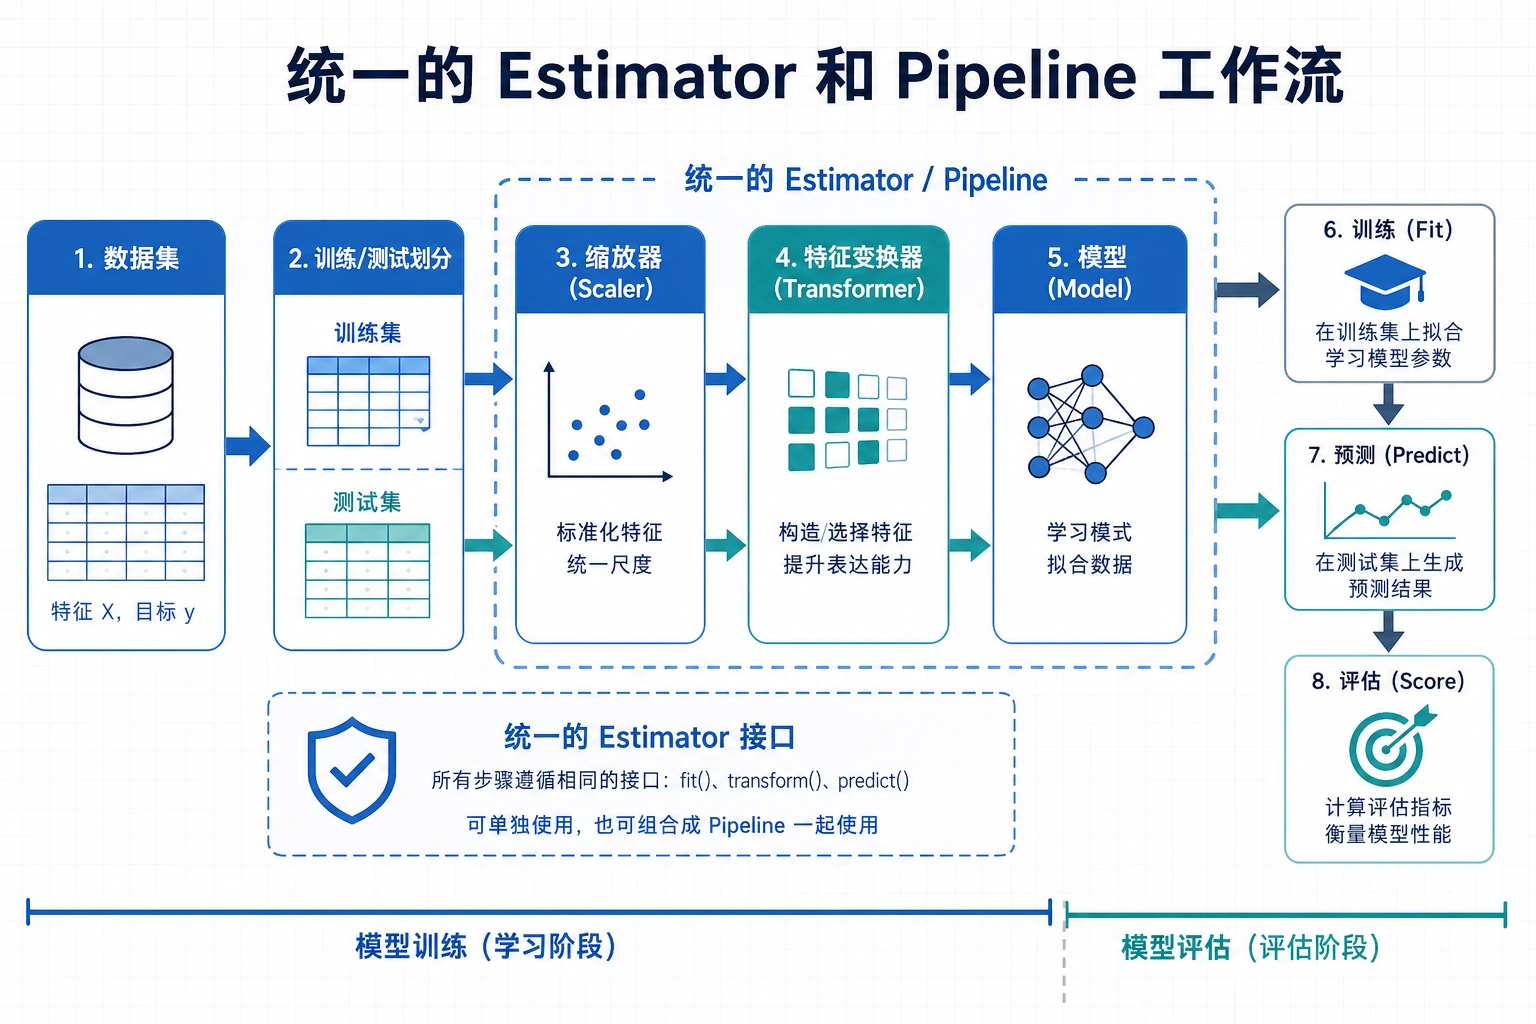
大多数 sklearn 工作都是这个闭环:
加载数据 -> 划分训练/测试 -> 在训练集 fit -> 在测试集 predict -> score -> 保存证据
先记住四个动词:
| 动词 | 含义 | 常见对象 |
|---|---|---|
fit | 从训练数据学习参数 | estimator 或 transformer |
transform | 应用学到的预处理 | transformer |
predict | 产出标签或数值 | estimator |
score | 返回一个快速指标 | estimator 或 pipeline |
三个角色
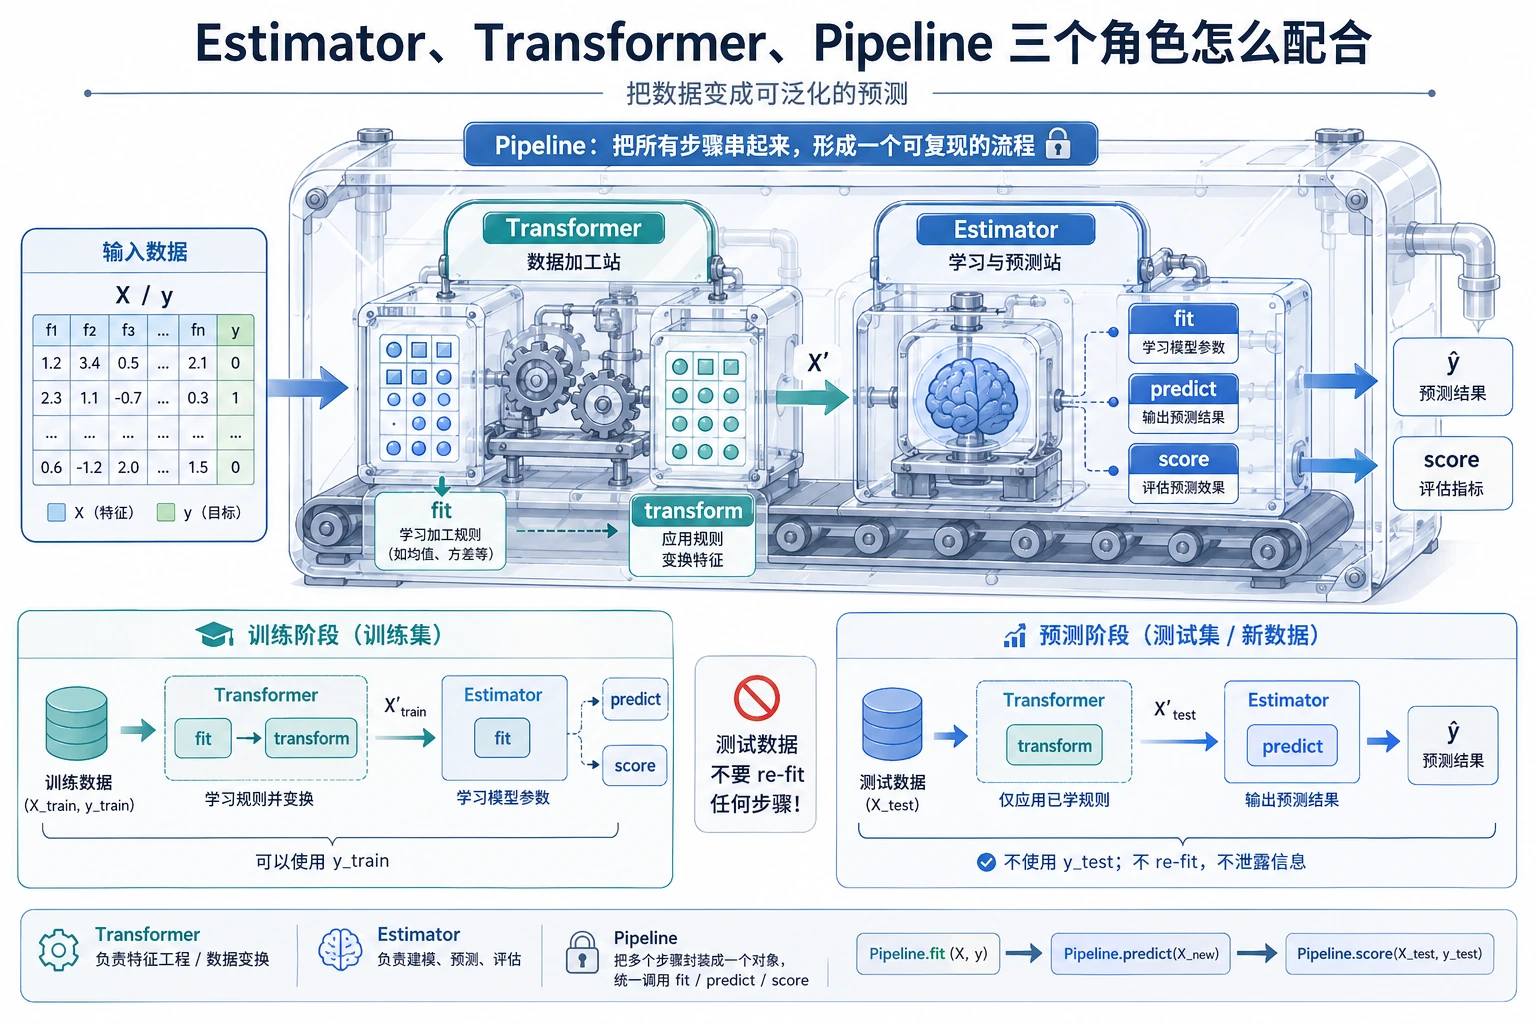
| 角色 | 做什么 | 例子 |
|---|---|---|
| Estimator | 学习并预测 | LogisticRegression、DecisionTreeClassifier |
| Transformer | 改变数据形状、尺度或表示 | StandardScaler、OneHotEncoder、PCA |
| Pipeline | 把预处理和模型串成可复用流程 | scaler -> classifier |
新手规则:预处理只能在训练集上 fit。Pipeline 可以自动帮你遵守这个顺序。
安装与检查
python -m pip install --upgrade scikit-learn joblib
python - <<'PY'
import sklearn
print(sklearn.__version__)
PY
预期输出是版本号,例如:
1.8.0
scikit-learn 是安装包名,sklearn 是 Python 里的导入名。
跑完整流程
新建 ch05_sklearn_workflow.py。
from pathlib import Path

from joblib import dump, load
from sklearn.datasets import load_iris
from sklearn.linear_model import LogisticRegression
from sklearn.metrics import accuracy_score, classification_report
from sklearn.model_selection import train_test_split
from sklearn.neighbors import KNeighborsClassifier
from sklearn.pipeline import Pipeline
from sklearn.preprocessing import StandardScaler
from sklearn.tree import DecisionTreeClassifier

iris = load_iris()
X_train, X_test, y_train, y_test = train_test_split(
    iris.data,
    iris.target,
    test_size=0.25,
    random_state=42,
    stratify=iris.target,
)

models = {
    "logistic": Pipeline([
        ("scale", StandardScaler()),
        ("model", LogisticRegression(max_iter=1000, random_state=42)),
    ]),
    "tree": Pipeline([
        ("model", DecisionTreeClassifier(max_depth=3, random_state=42)),
    ]),
    "knn": Pipeline([
        ("scale", StandardScaler()),
        ("model", KNeighborsClassifier(n_neighbors=5)),
    ]),
}

scores = {}
for name, pipe in models.items():
    pipe.fit(X_train, y_train)
    pred = pipe.predict(X_test)
    scores[name] = accuracy_score(y_test, pred)
    print(f"{name:<8} accuracy={scores[name]:.3f}")

best_name = max(scores, key=scores.get)
best_model = models[best_name]
print(f"best={best_name}")
print("first_prediction=", iris.target_names[best_model.predict(X_test[:1])][0])
print("report_for_best:")
print(classification_report(
    y_test,
    best_model.predict(X_test),
    target_names=iris.target_names,
    zero_division=0,
))

output_path = Path("iris_pipeline.joblib")
dump(best_model, output_path)
reloaded = load(output_path)
print("reloaded_prediction=", iris.target_names[reloaded.predict(X_test[:1])][0])
运行:
python ch05_sklearn_workflow.py
预期输出:
logistic accuracy=0.921
tree     accuracy=0.895
knn      accuracy=0.921
best=logistic
first_prediction= setosa
report_for_best:
              precision    recall  f1-score   support

      setosa       1.00      1.00      1.00        12
  versicolor       0.86      0.92      0.89        13
   virginica       0.92      0.85      0.88        13

    accuracy                           0.92        38
   macro avg       0.92      0.92      0.92        38
weighted avg       0.92      0.92      0.92        38

reloaded_prediction= setosa
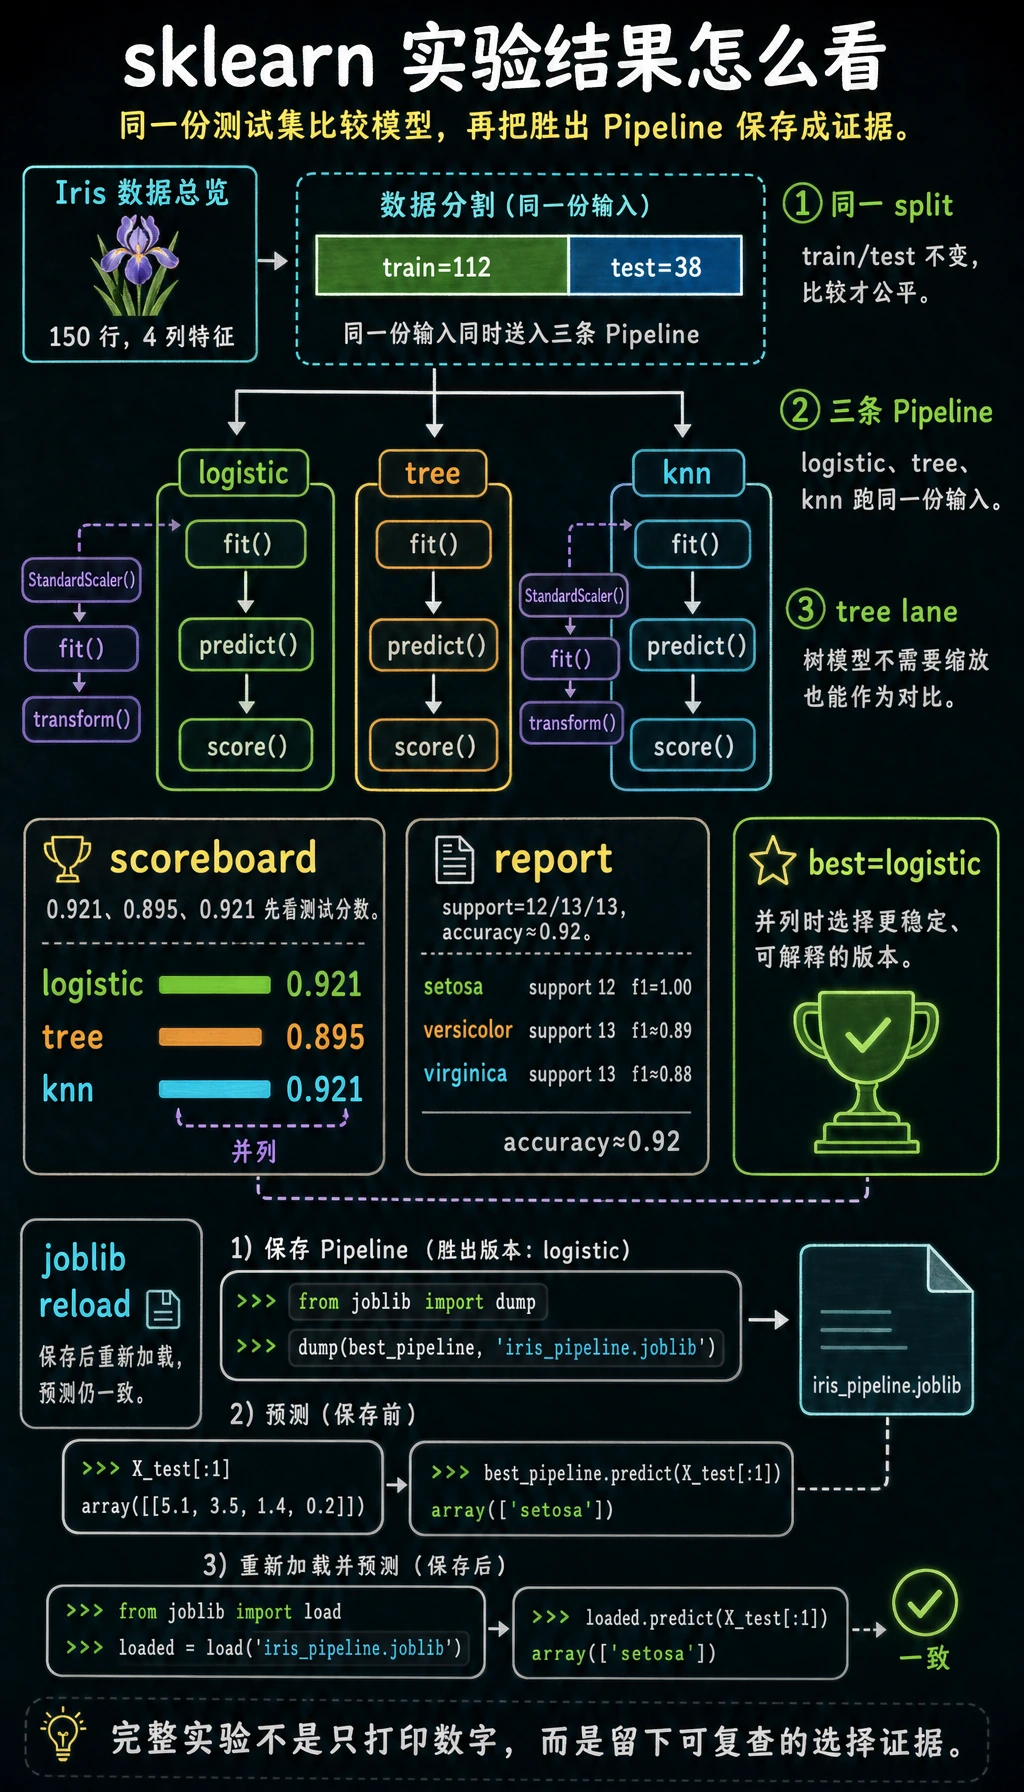
不同 sklearn 版本在分数相同的时候,可能选择不同的最佳模型。这没关系。关键证据是:每个模型都能 fit、predict、score,并且保存后的 Pipeline 重新加载后仍能预测。
Pipeline 为什么能避免常见错误
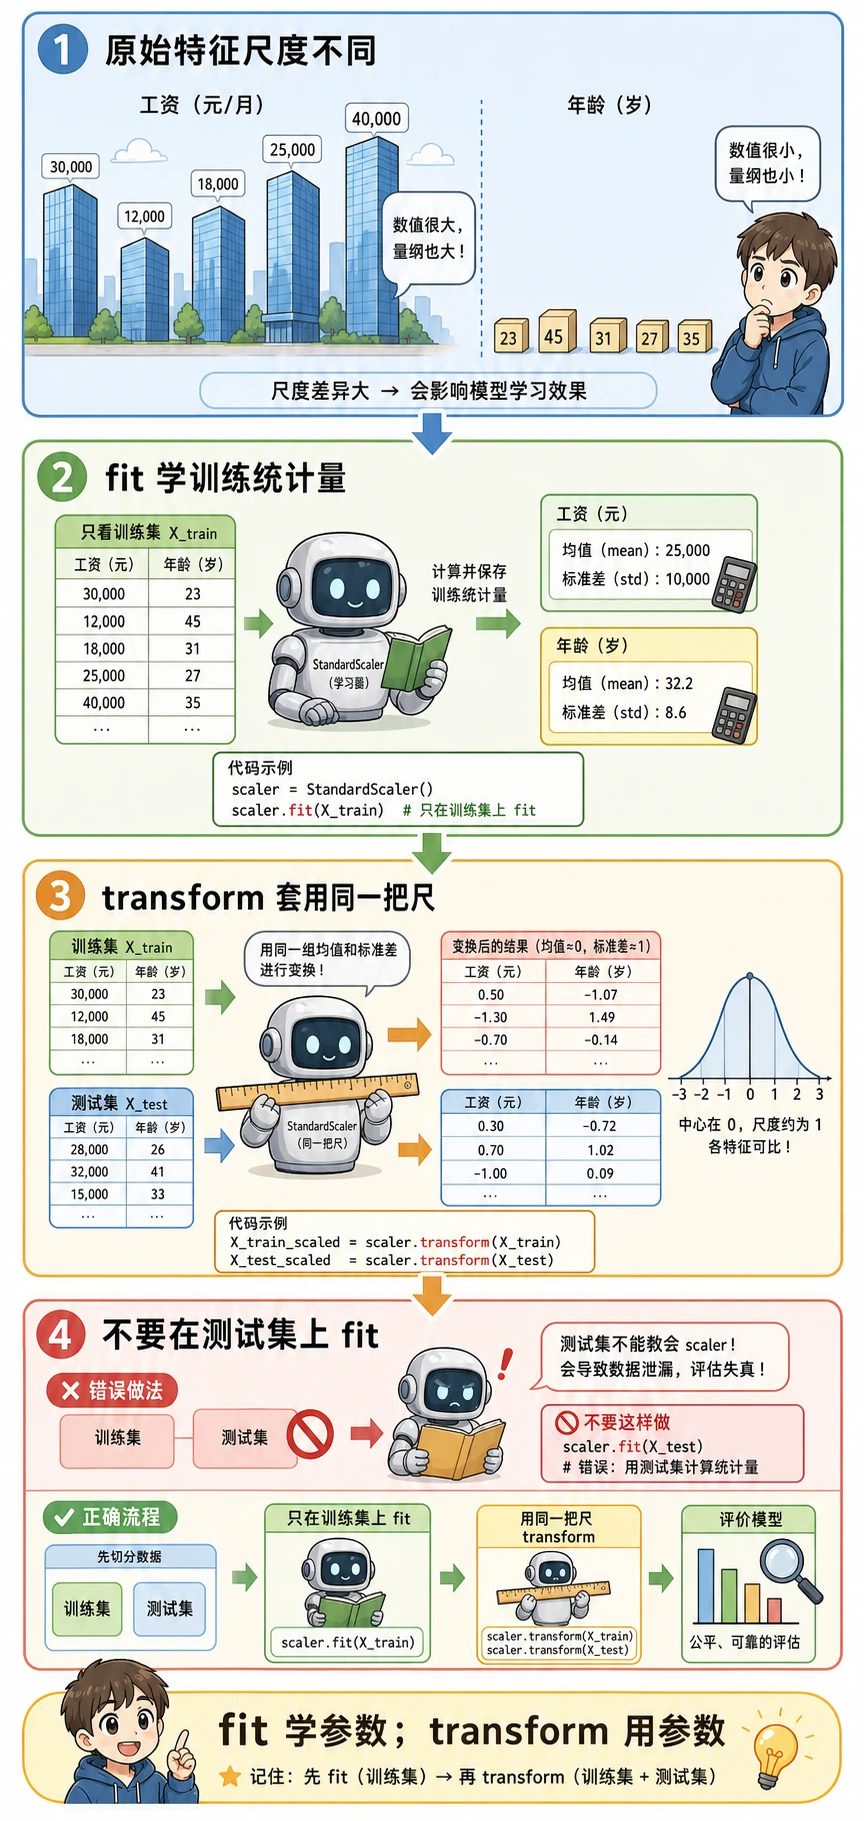
错误流程:
在全部数据上 fit scaler -> 再切分 -> 评估
为什么错:测试集已经影响了预处理,所以分数会偏乐观。
正确流程:
先切分 -> 只在训练集 fit scaler -> transform 测试集 -> 评估
用 Pipeline([("scale", StandardScaler()), ("model", ...)]) 可以让训练和预测都走同一条安全路径。
常见错误
| 现象 | 先检查 | 常见修复 |
|---|---|---|
ModuleNotFoundError: sklearn | 当前 Python 环境 | 用 python -m pip install scikit-learn 安装 |
| 每次分数不同 | 没有固定 random_state | 给数据切分和支持的模型设置 random_state=42 |
| 测试分数很好,真实效果差 | 数据泄漏 | 用 Pipeline,并先切分再 fit 预处理 |
| 保存或加载模型失败 | 缺少 joblib 或路径不对 | 安装 joblib,打印 Path.cwd() |
| 模型对比不公平 | 预处理路径不同 | 把每个模型都放进可比较的 Pipeline |
练习
- 把
test_size从0.25改成0.2,记录分数变化。 - 把
KNeighborsClassifier(n_neighbors=5)改成n_neighbors=3。 - 按同样 Pipeline 模式再加入一个模型,比如
SVC。 - 保存终端输出和
iris_pipeline.joblib作为证据。
通关检查
能解释下面五件事,就可以继续下一节:
fit、transform、predict、score分别做什么;- 为什么预处理只能从训练数据学习;
- 为什么
Pipeline比手动预处理更安全; - 如何用同一份 train/test split 对比两个模型;
- 如何保存并重新加载最终模型。