1.1.2 Basic Terminal Operations
Where this section fits
This is the section where you start using the terminal in a hands-on way. First, you’ll learn how to tell “which directory am I in right now?”, then you’ll master the most common operations for files, directories, paths, pipes, and environment variables. This will prepare you for running Python, managing dependencies, and using Git later on.
Learning objectives
- Master 10+ core commands, covering 90% of everyday tasks
- Understand absolute paths and relative paths
- Learn how to use pipes and redirection
- Understand the concept of environment variables
Open the terminal
First, find and open your terminal:
| Operating system | How to open |
|---|---|
| Windows | Search for "PowerShell" or "Windows Terminal" and click to open |
| macOS | Press Command + Space, search for "Terminal", and press Enter |
| Linux | Ctrl + Alt + T |
You’ll see a window with a blinking cursor waiting for your command. That is the terminal.
Windows has multiple terminal options. We recommend Windows Terminal (free to install from the Microsoft Store), then selecting the PowerShell tab inside it. The commands in this tutorial are mainly for macOS/Linux. Most commands are the same on Windows, and any exceptions will be noted clearly.
Part 1: Paths — where are you?
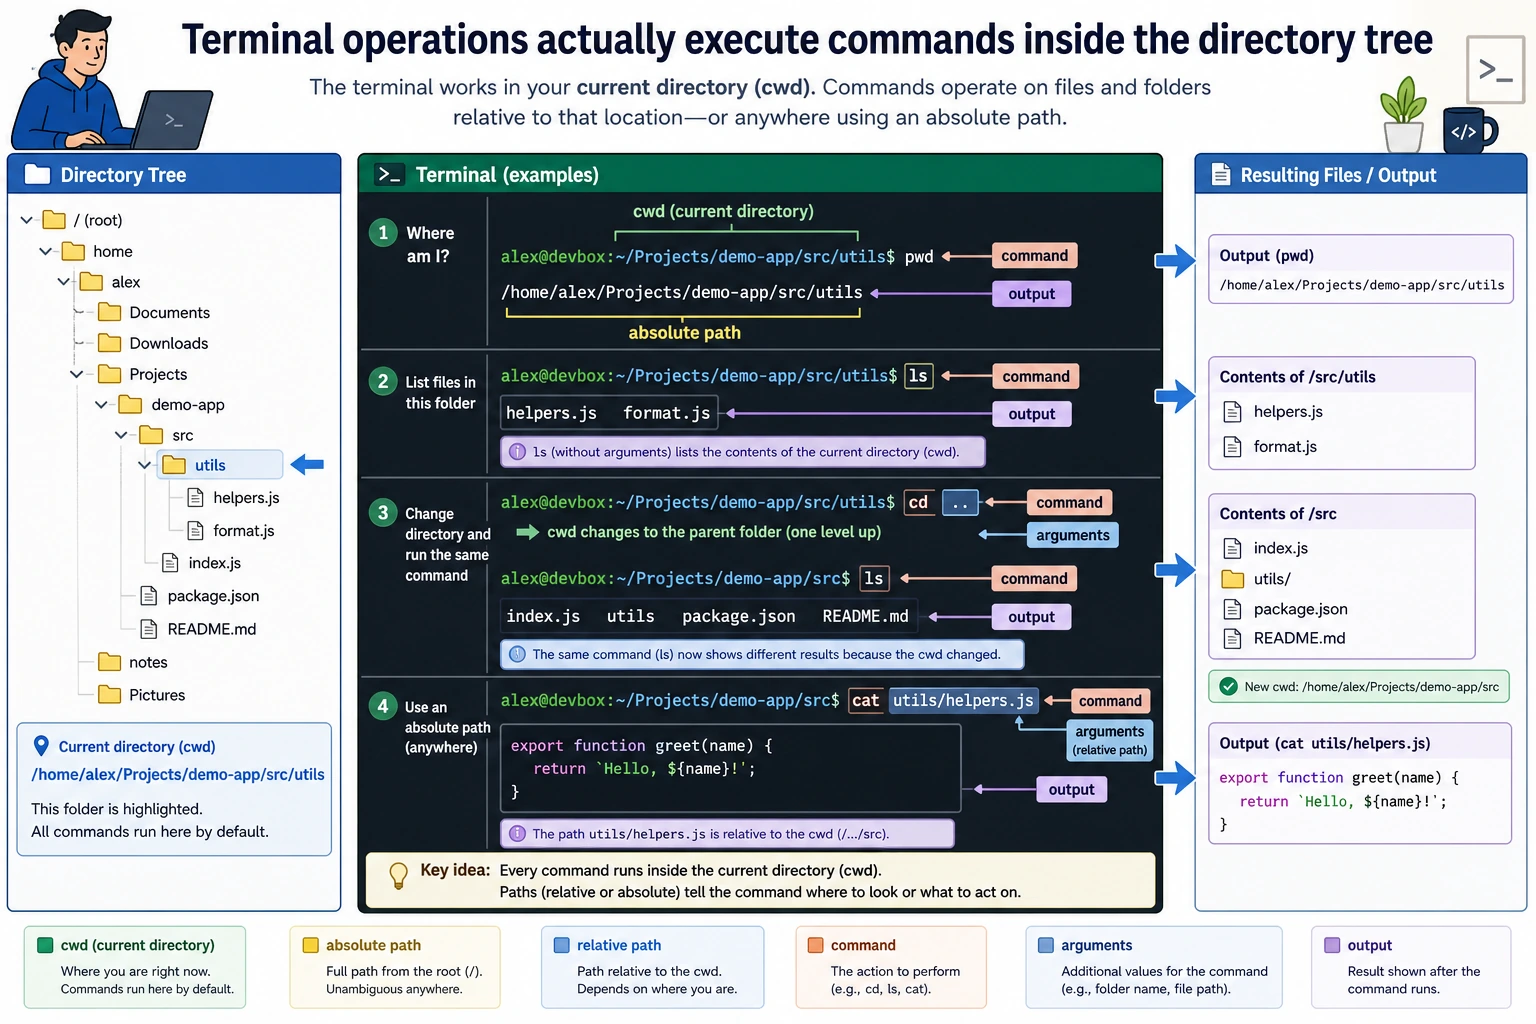
The command line has no graphical interface, so you need to tell the computer in text which folder you want to work in. That is called a path.
Where are you now?
pwd
pwd = Print Working Directory
The output might look like this:
/Users/zhangsan          # macOS
/home/zhangsan           # Linux
C:\Users\zhangsan        # Windows PowerShell
This is the folder you are currently in, called the working directory.
Absolute path vs. relative path
/Users/zhangsan/projects/ai-course/data/train.csv
This is an absolute path — it starts from the root directory / and fully describes the file’s location. It’s like a complete street address in real life.
data/train.csv
This is a relative path — it depends on the folder you are currently in. If you are in /Users/zhangsan/projects/ai-course/, then data/train.csv refers to the same file as the absolute path above. It’s like saying “the second floor of the building next door.”
Special symbols in paths
| Symbol | Meaning | Example |
|---|---|---|
/ | Root directory (the starting point of all files) | cd / |
~ | The current user’s home directory | cd ~ is the same as cd /Users/zhangsan |
. | Current directory | ./run.py means run.py in the current directory |
.. | Parent directory | cd .. goes up one level |
Here’s a small exercise to help you understand:
# Suppose you are in /Users/zhangsan/projects/ai-course

pwd                    # Output: /Users/zhangsan/projects/ai-course
cd ..                  # Go up one level
pwd                    # Output: /Users/zhangsan/projects
cd ~                   # Return to the Home directory
pwd                    # Output: /Users/zhangsan
cd ~/projects/ai-course  # Go back using an absolute path
pwd                    # Output: /Users/zhangsan/projects/ai-course
Part 2: Core commands
These are commands you will use every day. Type them along with the tutorial first—you don’t need to memorize them. The more you use them, the more natural they’ll become.
Navigation commands
cd — change directory
cd projects        # Enter the projects folder
cd ..              # Go back to the parent directory
cd ~               # Return to the Home directory
cd ~/Desktop       # Go to the Desktop
cd -               # Go back to the previous directory (very useful!)
ls — list files
ls                 # List files and folders in the current directory
ls -l              # Detailed list (shows size, date, permissions)
ls -a              # Show hidden files (files starting with .)
ls -la             # Combine both
ls projects/       # List the contents of the projects folder
In PowerShell, ls also works (it is an alias for Get-ChildItem). ls -la does not work; use ls -Force to show hidden files.
File and folder operations
mkdir — create a folder
mkdir my-project               # Create a folder
mkdir -p a/b/c                 # Create nested folders in one go
touch — create an empty file
touch hello.py                 # Create an empty Python file
touch README.md                # Create an empty Markdown file
PowerShell does not have touch; use New-Item hello.py instead.
cp — copy
cp file.txt file_backup.txt          # Copy a file
cp file.txt ~/Desktop/               # Copy to the Desktop
cp -r my-folder/ my-folder-backup/   # Copy an entire folder (`-r` means recursive)
mv — move / rename
mv old_name.py new_name.py       # Rename a file
mv file.txt ~/Desktop/           # Move to the Desktop
mv project/ ~/projects/          # Move a folder
rm — delete
rm file.txt                  # Delete a file
rm -r my-folder/             # Delete a folder and everything inside it
Files deleted with rm do not go to the Recycle Bin—they are gone immediately. Please double-check before deleting. Build the habit of using ls to look first before removing anything.
View file contents
cat file.txt          # Display the entire file contents (good for small files)
head file.txt         # Show the first 10 lines
head -20 file.txt     # Show the first 20 lines
tail file.txt         # Show the last 10 lines
tail -f log.txt       # Follow file updates in real time (very useful for logs)
Search
grep "error" log.txt              # Search for lines containing "error" in a file
grep -r "import torch" ./         # Search all files in the current directory
grep -n "def train" model.py      # Search and show line numbers
grep will become a great debugging helper in the future — it helps you quickly find where a function or variable is used across dozens of files.
Other useful commands
clear              # Clear the screen (or press Ctrl + L)
history            # View all the commands you’ve run before
which python       # Show the path of the python command (often used to diagnose environment issues)
echo "hello"       # Print some text
Part 3: Pipes and redirection
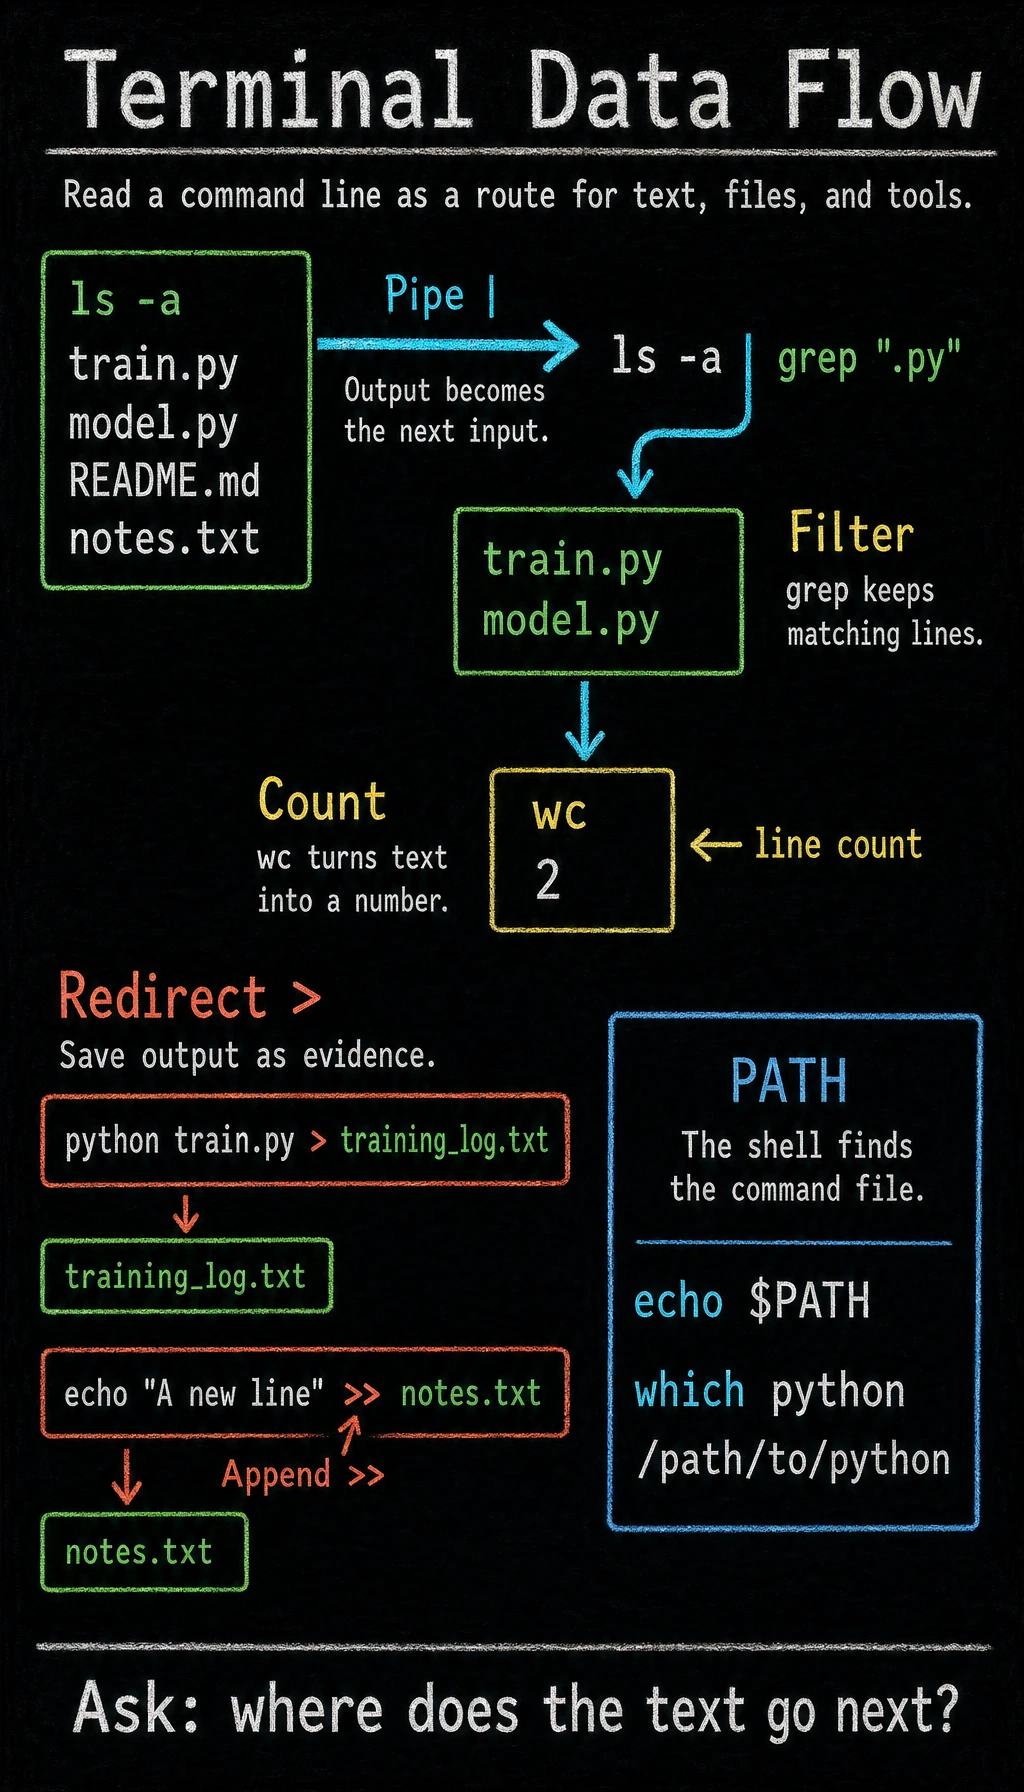
These two concepts are where the command line becomes truly powerful.
Pipe |
A pipe means: take the output of the previous command and use it as the input of the next command.
# List all files, then find .py files among them
ls -la | grep ".py"

# Check the command history for git commands
history | grep "git"

# Count how many Python files are in the current directory
ls *.py | wc -l
You can think of a pipe as an assembly line in a factory: the output of one step becomes the input to the next.
Redirection > and >>
Save a command’s output to a file instead of showing it on the screen:
# Save the output of ls to filelist.txt (overwrite)
ls -la > filelist.txt

# Append output to the end of a file (do not overwrite)
echo "A new line" >> notes.txt

# Save the output of a Python script to a file
python train.py > training_log.txt
> overwrites, while >> appends. In practice, these are often used to save training logs.
Using them together
# Run a script and save both normal output and error output to a log file
python train.py > log.txt 2>&1

# Count how many lines of code are in a Python file
cat model.py | wc -l

# Find all files containing "TODO" and count them
grep -r "TODO" ./ | wc -l
Part 4: Environment variables
Environment variables are some “global settings” stored in the system. Many programs read them to decide how to behave.
View environment variables
# View all environment variables
env

# View the value of a specific environment variable
echo $PATH
echo $HOME
The most important environment variable: PATH
PATH determines which directories the system searches when you type a command in the terminal.
echo $PATH
# Output might look like: /usr/local/bin:/usr/bin:/bin:/Users/zhangsan/miniconda3/bin
These paths are separated by :. When you type python, the system looks for a file named python in each of these directories in order, and runs the first one it finds.
If you get command not found, it usually means the program is not in any directory listed in PATH.
Set environment variables
# Set temporarily (only valid in the current terminal window)
export MY_API_KEY="your_api_key_here"
echo $MY_API_KEY    # Output: your_api_key_here

# Verify: close the terminal and reopen it, and MY_API_KEY will be gone
# Set permanently (write to a configuration file)
# For macOS/Linux with zsh:
echo 'export MY_API_KEY="your_api_key_here"' >> ~/.zshrc
source ~/.zshrc    # Take effect immediately

# If you use bash:
echo 'export MY_API_KEY="your_api_key_here"' >> ~/.bashrc
source ~/.bashrc
In later lessons, you will often use environment variables to store API keys (for example, an OpenAI key). This is much safer than writing secrets directly in your code:
import os
api_key = os.environ.get("OPENAI_API_KEY")
Hands-on practice
Open your terminal and complete the following steps in order:
# 1. Confirm where you are
pwd

# 2. Go to the Home directory
cd ~

# 3. Create a study project folder
mkdir -p ai-study/ch01-tools/terminal-practice

# 4. Enter this folder
cd ai-study/ch01-tools/terminal-practice

# 5. Create a few files
touch hello.py notes.txt data.csv

# 6. Check the files you created
ls -la

# 7. Write some content into the files
echo "print('Hello, AI!')" > hello.py
echo "Day 1 study notes" > notes.txt

# 8. View the file contents
cat hello.py
cat notes.txt

# 9. Copy notes.txt to make a backup
cp notes.txt notes_backup.txt

# 10. Confirm the backup was created successfully
ls

# 11. Append more content to notes.txt
echo "Learned the cd, ls, mkdir, touch, cp, and cat commands" >> notes.txt
cat notes.txt

# 12. Search for files containing "AI"
grep -r "AI" ./

# 13. Go back to the parent directory
cd ..
pwd
If everything worked, congratulations — you’ve already mastered the most essential command-line operations.
Quick reference for common commands
| Command | Purpose | Common options |
|---|---|---|
pwd | Show current directory | |
cd | Change directory | .. parent, ~ Home, - previous |
ls | List files | -l detailed, -a hidden files |
mkdir | Create a folder | -p create multiple levels |
touch | Create an empty file | |
cp | Copy | -r copy folders |
mv | Move / rename | |
rm | Delete | -r delete folders |
cat | View file contents | |
head / tail | View the beginning / end | -n number specify line count |
grep | Search text | -r recursive, -n line numbers |
echo | Print text | |
clear | Clear the screen | |
history | Command history | |
which | Show command path |
You do not need to memorize this table. The more you use these commands, the more you’ll remember naturally. In the beginning, you can print it out and keep it next to your screen, or save it on your phone for quick reference. For most commands, typing command --help will show usage instructions.