1.2.1 Git Basics
Where This Lesson Fits
This lesson first helps you understand why code needs version control. You will start from real pain points like “file-naming hell,” “I broke it and can’t go back,” and “team collaboration is difficult,” and build a basic understanding of repositories, the staging area, commits, and branches.
Learning Objectives
- Understand why version control is needed (through real pain-point scenarios)
- Master Git’s four core concepts: repository, staging area, commit, and branch
- Complete Git installation and initial configuration
A World Without Git
Before learning Git, let’s look at how developers managed code without it:
Pain Point 1: File-Naming Hell
You write an AI model training script and keep modifying and saving it:
train.py
train_v2.py
train_v2_final.py
train_v2_final_really_final.py
train_v2_final_really_final_fixed_bug.py
train_v2_final_really_final_fixed_bug_boss_said_change_it_again.py
A week later, you want to go back to the version “before the first bug fix” — which file was it?
Pain Point 2: You Broke It and Can’t Go Back
You enthusiastically refactor model.py and change 200 lines of code. You run it — error. You change it again — even more errors. You want to restore the previous version, but you’ve already hit Ctrl+S countless times, and now you can’t go back.
Pain Point 3: Team Collaboration Is a Disaster
You and a coworker are editing the same file at the same time. You change the first half; they change the second half. You each save your version, then send files back and forth through WeChat. Who merges them? How do you merge them? What if you overwrite each other’s changes?
Git solves these three problems:
| Pain point | How Git solves it |
|---|---|
| File-naming hell | Automatically records versions for each change, so you don’t need to rename files manually |
| You broke it and can’t go back | You can roll back to any previous version at any time |
| Team collaboration is difficult | Everyone works on their own branch, then merges automatically at the end |
What Is Git?
In one sentence: Git is a code version control tool. It records every change to your code, so you can view history, roll back versions, and collaborate with others at any time.
A few key points:
- Git is free and open source
- Git is a local tool — it works without an internet connection (GitHub is Git’s online hosting service, not Git itself)
- Git is an industry standard — almost all software companies and open-source projects use Git
- Git was created in 2005 by Linus Torvalds, the father of Linux
Git’s Four Core Concepts
Think of Git as an intelligent archive system. When you’re playing a big game (writing code), Git helps you save and load at any time.
Concept 1: Repository
Repository = a project folder managed by Git.
The difference between a normal folder and a Git repository is like the difference between an ordinary notebook and a magic notebook with a record of “all changes.”
# Turn a normal folder into a Git repository
cd my-project
git init
After running git init, a hidden .git directory appears in the folder. This is where Git stores all version records. You don’t need to open it; just know it’s there.
Concept 2: Staging Area
This is one of Git’s most unique designs. The staging area is an intermediate place for “preparing to commit.”
Use moving house as an analogy:
- You have lots of things in your room (working directory — the files you are editing)
- You choose some things to place by the door (staging area — the files you selected and are preparing to record)
- The moving company arrives and loads the items at the door onto the truck (commit — formally recording this change)
# You modified 3 files: model.py, train.py, notes.txt

# Put only model.py and train.py at the "door" (staging area)
git add model.py train.py

# notes.txt stays in the "room" and will not be committed this time
Why do we need a staging area? Because you may have changed 5 files, but only want to record changes to 2 of them this time. The staging area lets you precisely control which changes are included in each commit.
Concept 3: Commit
Commit = one formal version record. It’s like a save point in a game.
Each commit includes:
- Which files were changed
- What changed specifically (what was added or deleted on each line)
- When it was committed
- Who committed it
- A description message (explaining what this change did)
git commit -m "Fix the bug where the learning rate was too high during model training"
The text in quotes after -m is the commit message, which explains what this change did. A good commit message should let other people (including your future self) know immediately what changed.
A project’s commit history might look like this:
Commit #5: "Add data augmentation"               ← latest
Commit #4: "Fix the bug where the learning rate was too high during model training"
Commit #3: "Add CNN model definition"
Commit #2: "Complete data loading module"
Commit #1: "Project initialization, add README"  ← earliest
You can return to any commit point at any time, just like loading a game save.
Concept 4: Branch
Branch = an independent development line. It’s like a parallel universe.
Imagine your project is a main road (main branch). You want to try a new feature (for example, changing the model architecture), but you’re not sure it will work. You don’t want to make changes directly on the main road — what if you break it?
At this point, you can “branch off” into a new road (a new branch) and make any changes you want there. If it works, merge the new road back into the main road; if it fails, just delete the new road, and the main road stays completely unaffected.
main branch:    ● ─── ● ─── ● ─── ● ─── ●  (stable code)
                              \         ↗
feature branch:                 ● ─── ●    (trying a new feature)
Branches will be explained in detail in later chapters. For now, you only need to know that they exist.
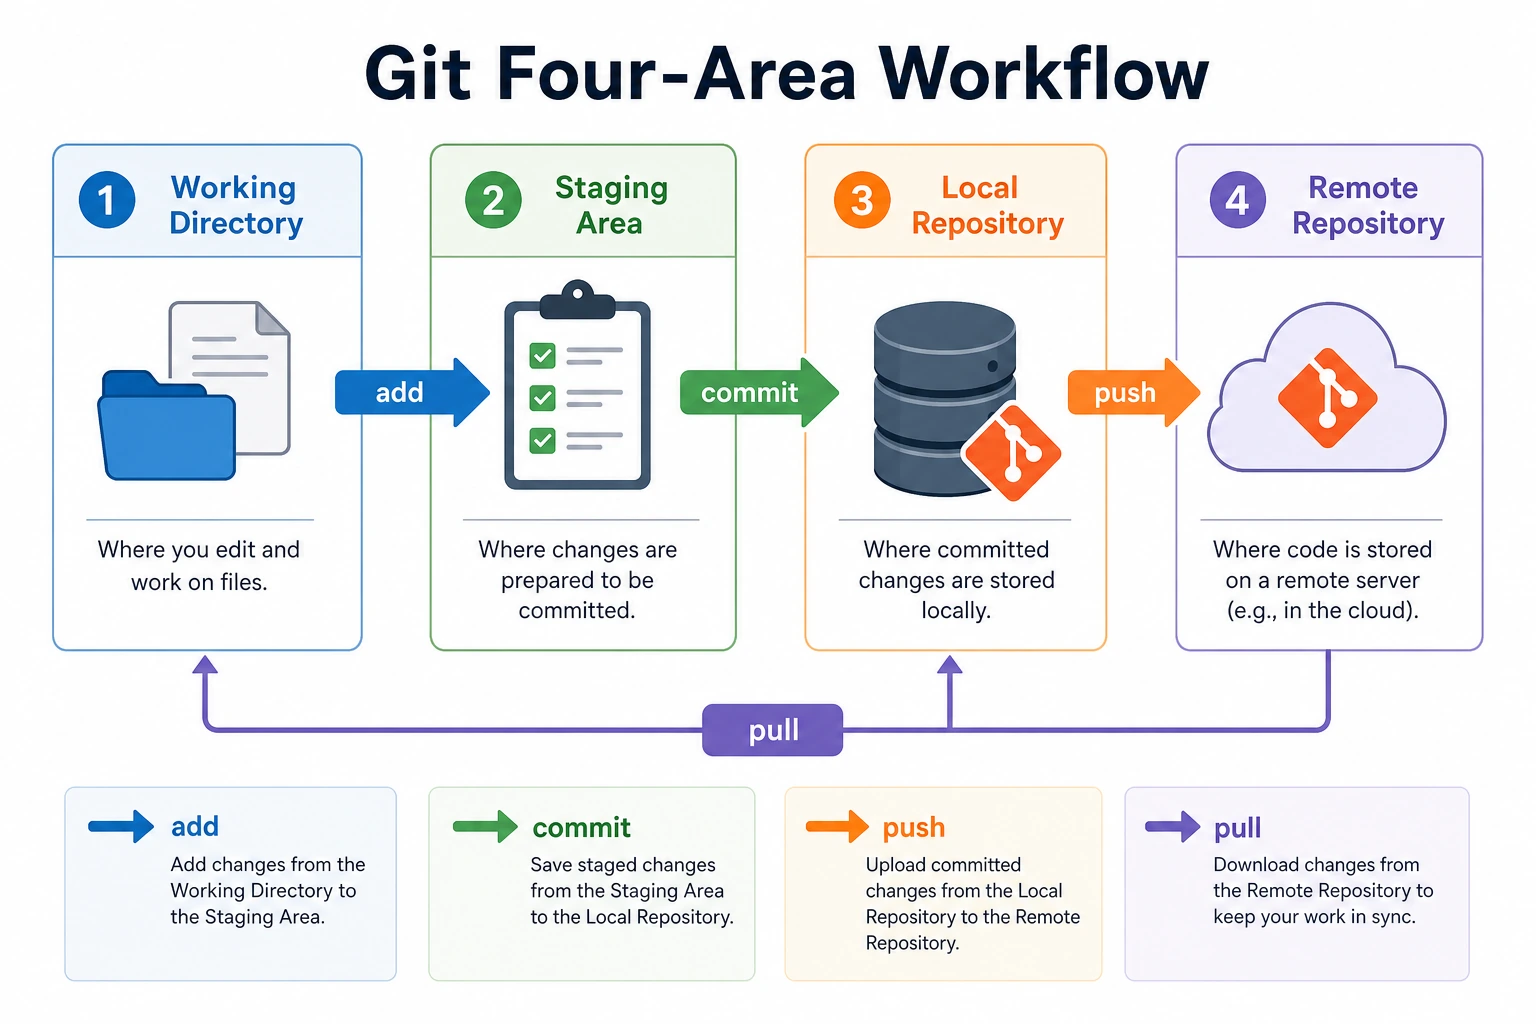
Complete Workflow (See the Big Picture First)
The full Git workflow for managing code is:
You modify files  →  Select files to record (add)  →  Record formally (commit)  →  Push to the cloud (push)
  Working directory     Staging area                  Local repository         Remote repository (GitHub)
A concrete example:
# 1. You write a new model file
#    (At this point, the file is in the "working directory"; Git knows you changed something, but it hasn’t been recorded yet.)

# 2. Put it into the staging area
git add model.py

# 3. Commit formally (record this change)
git commit -m "Add ResNet model definition"

# 4. Push to GitHub (so the cloud also has this record)
git push
Install Git
macOS
# Method 1: Use Homebrew (recommended)
brew install git

# Method 2: Type git directly in the terminal; macOS will prompt you to install Xcode Command Line Tools
git --version
Ubuntu / Debian
sudo apt update
sudo apt install git
Windows
# Using winget
winget install Git.Git

# After installation, restart the terminal, then verify
git --version
You can also download the installer from git-scm.com. During installation, you can keep the default options.
Verify the Installation
git --version
# Output looks like: git version 2.43.0
If you see a version number, the installation was successful.
Initial Configuration
After installing Git, you need to tell it who you are. This information will appear in every commit record.
# Set your name (use English; this will be shown on GitHub)
git config --global user.name "Zhang San"

# Set your email (recommended to use the same email you registered with GitHub)
git config --global user.email "[email protected]"

# Set the default branch name to main (the standard in newer Git versions)
git config --global init.defaultBranch main

# View the configuration to confirm it worked
git config --list
--global means this is a global configuration that applies to all Git repositories on your computer. If a specific project needs a different configuration (for example, a company project using a company email), you can set it separately in that project without --global.
Try It Out
Now let’s create your first Git repository and experience the full workflow:
# Create a new project
mkdir my-first-repo
cd my-first-repo

# Initialize the Git repository
git init
# Output: Initialized empty Git repository in .../my-first-repo/.git/

# Create a file
echo "# My First Git Repository" > README.md
echo "print('Hello Git!')" > hello.py

# Check status — Git will tell you which files have changed
git status
# You will see README.md and hello.py shown in red (untracked files)

# Add the files to the staging area
git add .
# "." means all files in the current directory

# Check status again — the files turn green (staged, ready to commit)
git status

# Commit!
git commit -m "Project initialization: add README and hello.py"
# Output: [main (root-commit) abc1234] Project initialization: add README and hello.py

# View commit history
git log --oneline
# Output: abc1234 Project initialization: add README and hello.py
Congratulations, you’ve completed your first Git commit!
Now try modifying a file and committing again:
# Modify hello.py
echo "print('Hello Git! I am learning AI.')" > hello.py

# See what changed
git diff
# Your changes will be highlighted in red/green

# Add and commit
git add hello.py
git commit -m "Update greeting"

# View history — now there are two records
git log --oneline
# Output:
# def5678 Update greeting
# abc1234 Project initialization: add README and hello.py
Two commits, two save points. You can return to either one at any time.
Summary
| Concept | One-sentence explanation | Analogy |
|---|---|---|
| Repository | A project folder managed by Git | A magic notebook with “undo history” |
| Staging area | The intermediate place for preparing a commit | Things placed at the door during a move, waiting to be loaded |
| Commit | One formal version record | A game save |
| Branch | An independent development line | A parallel universe |
| Working directory | The files you are currently editing | The draft you are writing |
Git’s workflow is only three steps: modify files → add (stage) → commit. All later Git operations are built on top of this foundation.