10.1.3 OpenCV Basics
Learning Objectives
After completing this section, you will be able to:
- Use OpenCV to create, read, and save images
- Perform basic transformations such as resizing, cropping, and flipping
- Understand common color order issues in OpenCV
- Draw rectangles, circles, and text on images with OpenCV
Why do almost every CV beginner course start with OpenCV?
Because OpenCV is like the “Swiss Army knife” of computer vision:
- It can read and write images
- It can resize, rotate, and crop
- It can do filtering and edge detection
- It can do face detection and video processing
And it is very suitable for beginners to build an engineering mindset.
The following code can run directly:
pip install opencv-python numpy
First create an image instead of relying on an external file
To make the code run directly, let’s generate a blank image ourselves first.
import cv2
import numpy as np

# Create a black canvas: height 240, width 320, 3 color channels
img = np.zeros((240, 320, 3), dtype=np.uint8)

print("shape:", img.shape)
print("dtype:", img.dtype)

cv2.imwrite("opencv_blank.png", img)
print("Saved opencv_blank.png")
Expected output:
shape: (240, 320, 3)
dtype: uint8
Saved opencv_blank.png
Here, shape = (240, 320, 3) means:
- Height: 240
- Width: 320
- 3 color channels
The color order in OpenCV is BGR, not RGB
This is a very classic pitfall.
OpenCV uses:
BGR
by default, not the RGB we are more familiar with.
import cv2
import numpy as np

img = np.zeros((100, 100, 3), dtype=np.uint8)

# This color is BGR, not RGB
img[:, :] = (255, 0, 0)

cv2.imwrite("opencv_blue.png", img)
print("Saved a blue image opencv_blue.png")
Expected output:
Saved a blue image opencv_blue.png
If you think (255, 0, 0) is red, you will end up with a “wrong color” image.
Convert to RGB
import cv2
import numpy as np

img_bgr = np.zeros((2, 2, 3), dtype=np.uint8)
img_bgr[:, :] = (255, 0, 0)

img_rgb = cv2.cvtColor(img_bgr, cv2.COLOR_BGR2RGB)

print("BGR pixel:", img_bgr[0, 0].tolist())
print("RGB pixel:", img_rgb[0, 0].tolist())
Expected output:
BGR pixel: [255, 0, 0]
RGB pixel: [0, 0, 255]
Common basic operations: resizing, cropping, flipping
import cv2
import numpy as np

img = np.zeros((200, 300, 3), dtype=np.uint8)
img[:, :] = (40, 180, 240)

# Resize
small = cv2.resize(img, (150, 100))

# Crop: rows first, then columns, i.e. [y1:y2, x1:x2]
crop = img[50:150, 80:220]

# Flip
flip_horizontal = cv2.flip(img, 1)

print("Original image:", img.shape)
print("After resizing:", small.shape)
print("After cropping:", crop.shape)
print("After horizontal flip:", flip_horizontal.shape)

cv2.imwrite("opencv_small.png", small)
cv2.imwrite("opencv_crop.png", crop)
cv2.imwrite("opencv_flip.png", flip_horizontal)
Expected output:
Original image: (200, 300, 3)
After resizing: (100, 150, 3)
After cropping: (100, 140, 3)
After horizontal flip: (200, 300, 3)
Why is cropping written as [y1:y2, x1:x2]?
Because an image is essentially a 2D array, and array indexing follows this order:
- Rows first (height direction,
y) - Then columns (width direction,
x)
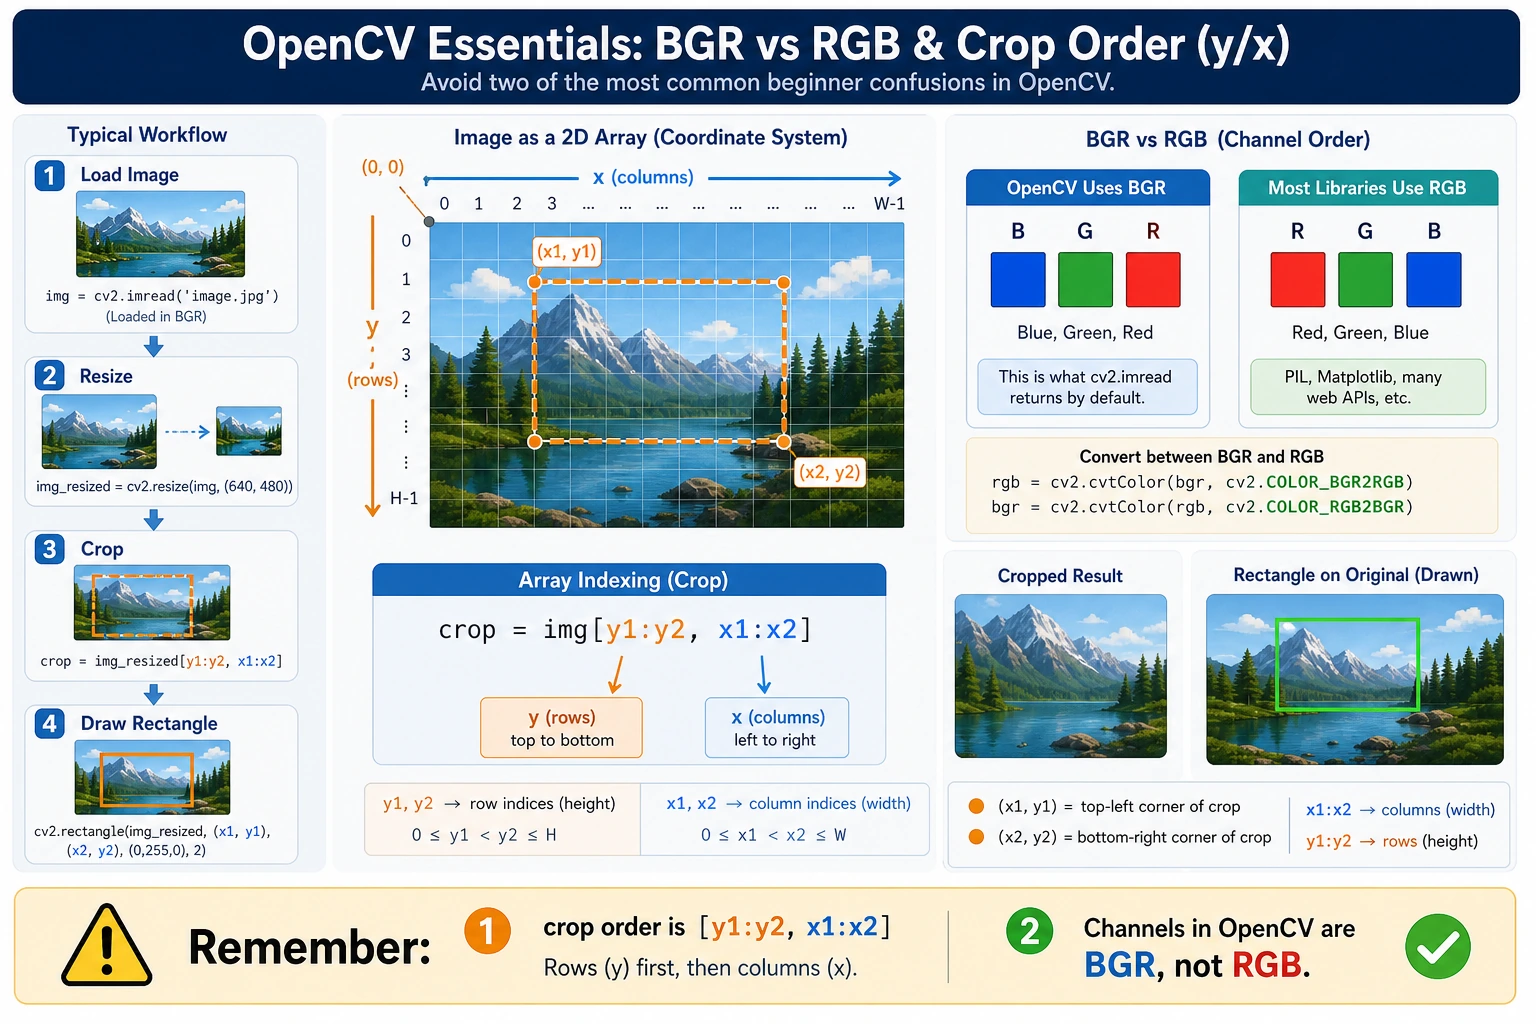
Two of the most common beginner mistakes in OpenCV are: the default color order is BGR, not RGB; and array cropping uses y before x. When reading this diagram, think of the image as a “row-column array” rather than a flat coordinate plane.
Drawing on images
Many computer vision tasks need results marked on the image, such as:
- Drawing bounding boxes
- Labeling class names
- Marking center points
import cv2
import numpy as np

canvas = np.ones((300, 400, 3), dtype=np.uint8) * 255

# Draw rectangle
cv2.rectangle(canvas, (50, 50), (180, 180), (0, 255, 0), 2)

# Draw circle
cv2.circle(canvas, (280, 120), 40, (255, 0, 0), -1)

# Draw line
cv2.line(canvas, (30, 250), (350, 250), (0, 0, 255), 3)

# Write text
cv2.putText(
    canvas,
    "CV Demo",
    (120, 40),
    cv2.FONT_HERSHEY_SIMPLEX,
    1,
    (0, 0, 0),
    2
)

cv2.imwrite("opencv_draw_demo.png", canvas)
print("Saved opencv_draw_demo.png")
Expected output:
Saved opencv_draw_demo.png
Convert to a grayscale image
Many classic vision operations first convert a color image to grayscale because:
- It is faster to compute
- It removes color distractions
- It keeps only brightness information
import cv2
import numpy as np

img = np.zeros((100, 100, 3), dtype=np.uint8)
img[:, :50] = (0, 0, 255)      # Red
img[:, 50:] = (0, 255, 0)      # Green

gray = cv2.cvtColor(img, cv2.COLOR_BGR2GRAY)

print("Original image shape:", img.shape)
print("Grayscale image shape:", gray.shape)
print("First 5 pixels of grayscale image:", gray[0, :5].tolist())

cv2.imwrite("opencv_gray.png", gray)
Expected output:
Original image shape: (100, 100, 3)
Grayscale image shape: (100, 100)
First 5 pixels of grayscale image: [76, 76, 76, 76, 76]
A small project: make an “info card” image
This example combines the knowledge from above: creating an image, drawing shapes, writing text, and saving the result.
import cv2
import numpy as np

card = np.ones((220, 420, 3), dtype=np.uint8) * 245

cv2.rectangle(card, (20, 20), (400, 200), (60, 120, 200), 2)
cv2.circle(card, (80, 85), 35, (60, 120, 200), -1)

cv2.putText(card, "AI Fullstack", (140, 75), cv2.FONT_HERSHEY_SIMPLEX, 0.9, (30, 30, 30), 2)
cv2.putText(card, "Chapter 10: CV Basics", (140, 115), cv2.FONT_HERSHEY_SIMPLEX, 0.7, (60, 60, 60), 2)
cv2.putText(card, "OpenCV starter demo", (40, 170), cv2.FONT_HERSHEY_SIMPLEX, 0.7, (20, 20, 20), 2)

cv2.imwrite("opencv_info_card.png", card)
print("Saved opencv_info_card.png")
Expected output:
Saved opencv_info_card.png
Common beginner mistakes
cv2.imshow() does not open a window
In many remote environments, notebooks, and server environments, imshow() is not convenient to use.
For teaching and script-based scenarios, it is recommended to use cv2.imwrite() to save the result first.
Treating BGR as RGB
This is one of the most common bugs for OpenCV beginners.
Reversing the x and y order when cropping
Image array indexing is [y, x], not [x, y].
Summary
The key point of this lesson is not to memorize every OpenCV API, but to build the feeling that “I can already manipulate images”:
- I can create images
- I can transform images
- I can annotate images
- I can save the results
With these basics, the next lesson on filtering, edge detection, and morphological operations will be much smoother.
Exercises
- Change the canvas color to another color and generate a new card image.
- Draw multiple rectangles and circles on the same image to practice the coordinate system.
- Try resizing the image to different resolutions and then save the results.