6.3.2 Convolution Basics
Convolution is how CNNs look at images without flattening away spatial structure. This page starts with a picture, then computes a convolution by hand, then verifies the same ideas with nn.Conv2d.
Learning Objectives
- Explain why flattening an image too early is wasteful.
- Compute one convolution output value by hand.
- Understand kernel, stride, padding, channel, and feature map.
- Verify output shapes with PyTorch.
- Explain why stacking convolutions grows the receptive field.
Look at the Sliding Window First
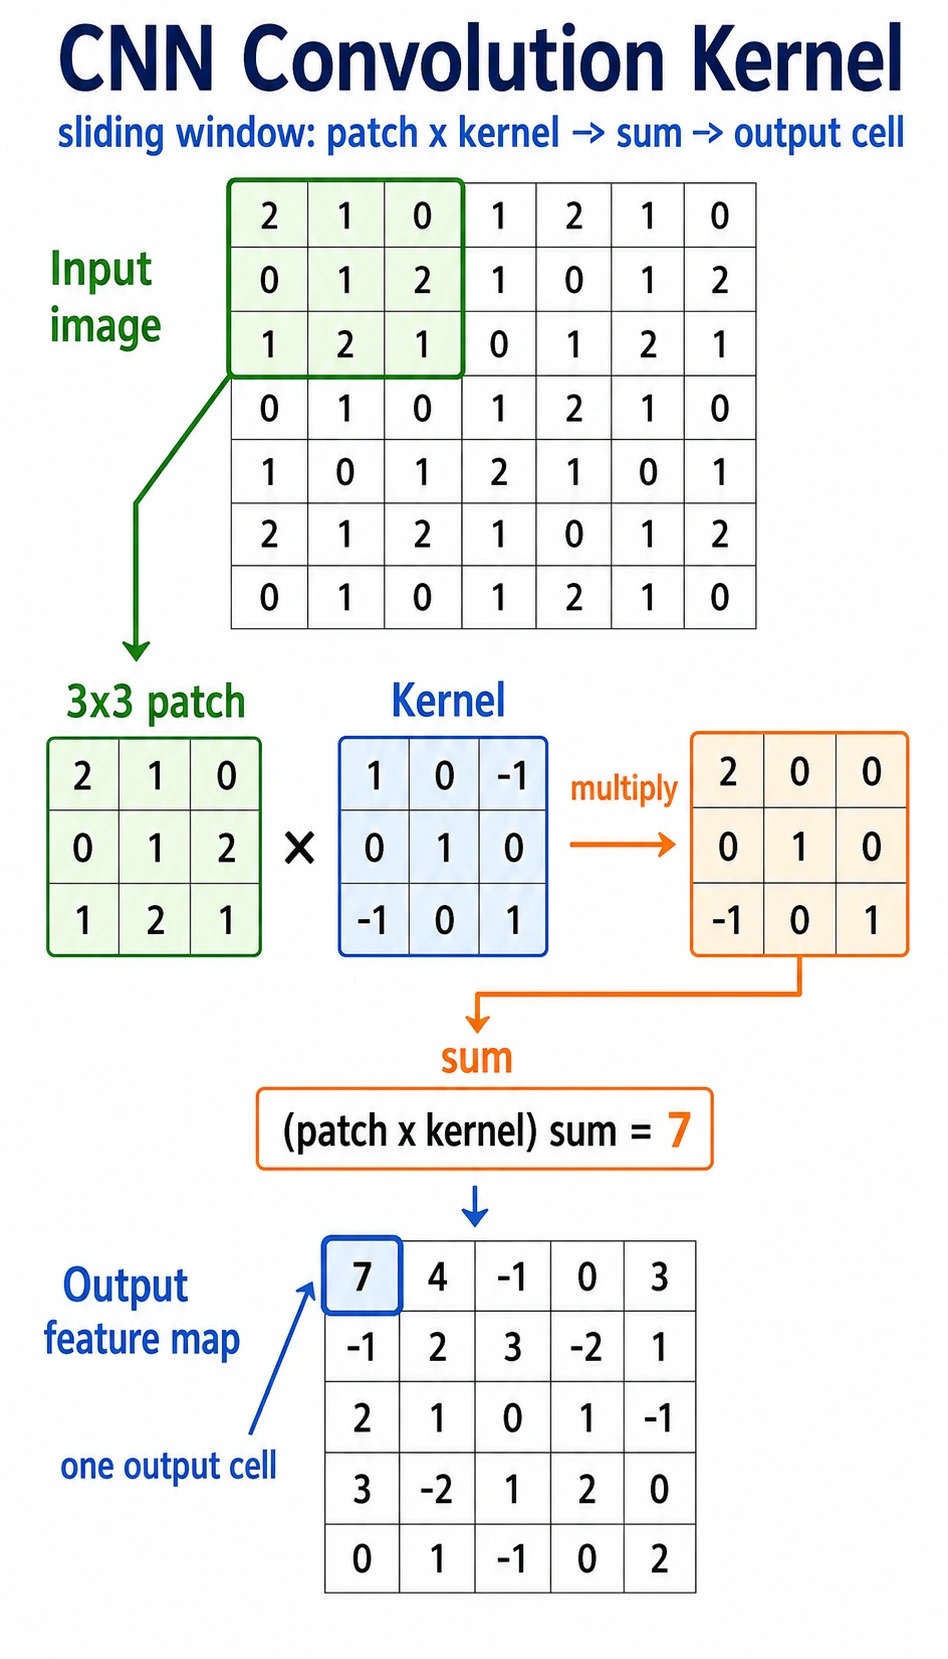
Read the picture like this:
small window -> multiply by kernel -> sum -> one output value -> slide and repeat
A convolution kernel is a small pattern detector. It does not look at the whole image at once. It scans local regions and writes a score into a feature map.
Why Not Flatten the Image First?
A 32 x 32 grayscale image has 1024 pixels. A fully connected layer with 512 outputs would need:
1024 * 512 = 524288 weights
A 224 x 224 x 3 color image has 150528 input values. A naive fully connected layer explodes in parameters and ignores where pixels are located.
Convolution fixes two problems:
| Problem with early flattening | Convolution idea |
|---|---|
| nearby pixels lose their spatial relationship | look at local windows |
| every position needs separate weights | reuse the same kernel everywhere |
| parameter count grows quickly | share parameters across the image |
The two core terms are:
- local connection: each output looks at a small area;
- parameter sharing: the same kernel scans many positions.
Lab 1: Compute Convolution by Hand
import numpy as np

image = np.array(
    [
        [1, 2, 0, 0],
        [5, 3, 0, 4],
        [2, 1, 3, 1],
        [0, 2, 1, 2],
    ],
    dtype=np.float32,
)

kernel = np.array(
    [
        [1, 0],
        [0, -1],
    ],
    dtype=np.float32,
)

out = np.zeros((3, 3), dtype=np.float32)
for i in range(3):
    for j in range(3):
        patch = image[i : i + 2, j : j + 2]
        out[i, j] = np.sum(patch * kernel)

print("manual_conv_lab")
print(out)
Expected output:
manual_conv_lab
[[-2.  2. -4.]
 [ 4.  0. -1.]
 [ 0.  0.  1.]]
Top-left output value:
patch = [[1, 2],
         [5, 3]]

kernel = [[ 1,  0],
          [ 0, -1]]

score = 1*1 + 2*0 + 5*0 + 3*(-1) = -2
That is the whole core of convolution.
Lab 2: Use a Kernel as an Edge Detector
This horizontal kernel compares neighboring pixels from left to right.
import numpy as np

image = np.array(
    [
        [0, 0, 0, 0, 0],
        [0, 0, 1, 1, 1],
        [0, 0, 1, 1, 1],
        [0, 0, 1, 1, 1],
        [0, 0, 0, 0, 0],
    ],
    dtype=np.float32,
)

kernel = np.array([[-1, 1]], dtype=np.float32)

out = np.zeros((5, 4), dtype=np.float32)
for i in range(5):
    for j in range(4):
        patch = image[i : i + 1, j : j + 2]
        out[i, j] = np.sum(patch * kernel)

print("edge_lab")
print(out)
Expected output:
edge_lab
[[0. 0. 0. 0.]
 [0. 1. 0. 0.]
 [0. 1. 0. 0.]
 [0. 1. 0. 0.]
 [0. 0. 0. 0.]]
The 1 values appear where the image changes from 0 to 1. That is why early CNN layers often learn edge-like filters.
Stride, Padding, and Output Size
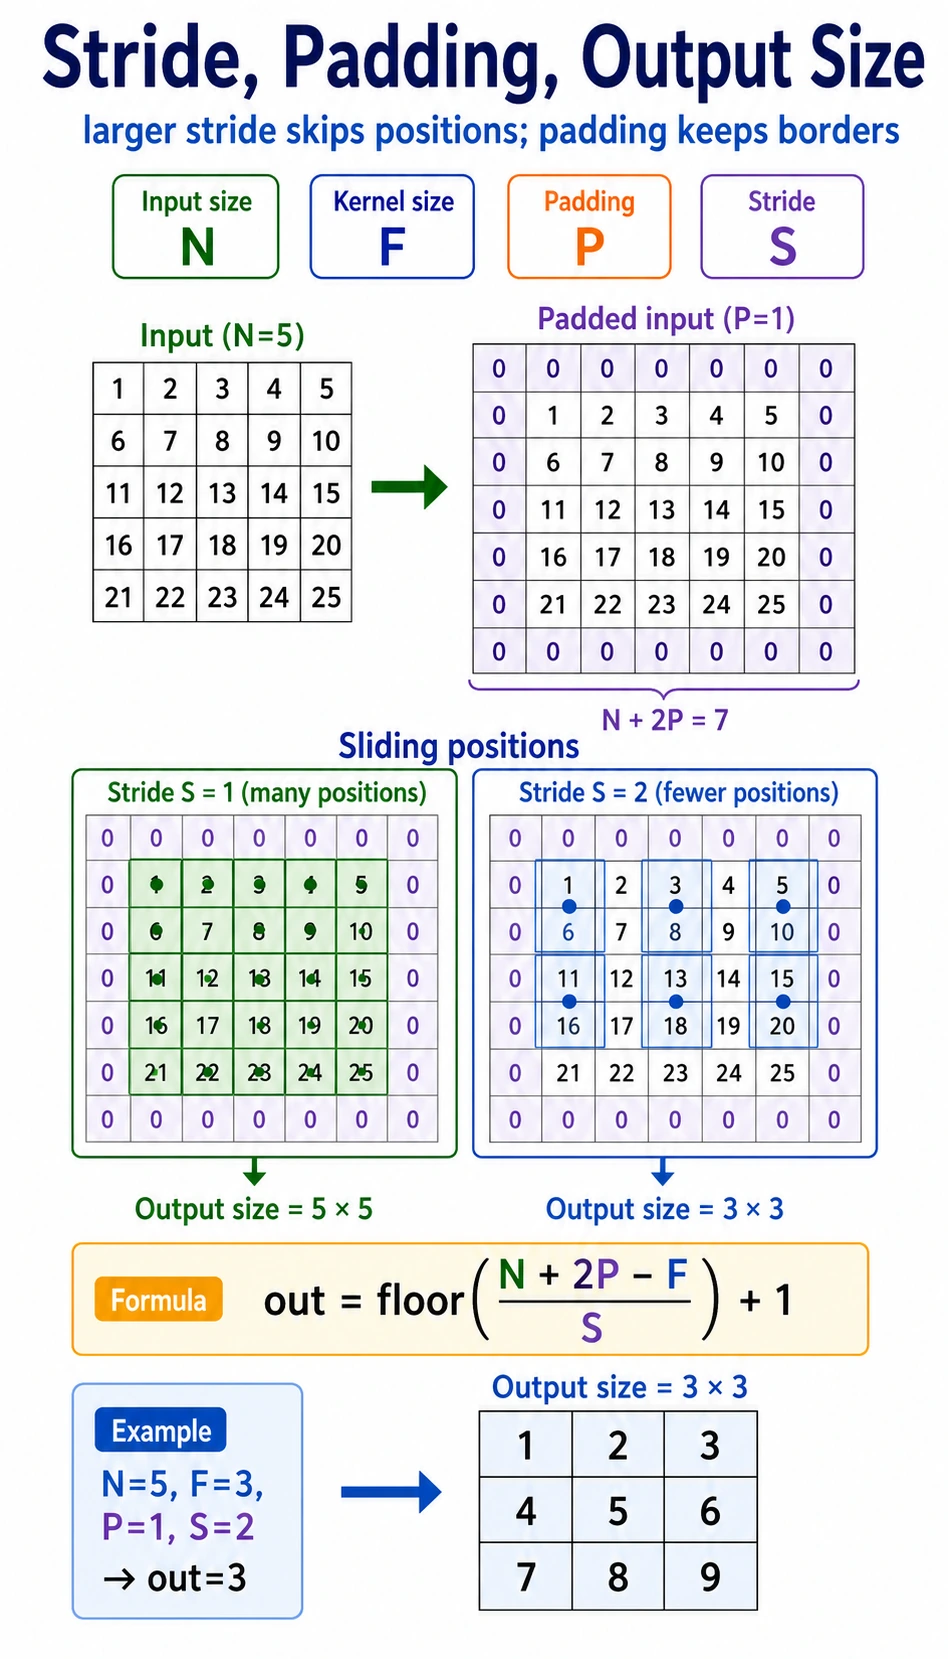
| Term | Meaning | Effect |
|---|---|---|
kernel_size | window size | larger kernel sees more local area |
stride | how far the kernel moves each step | larger stride makes output smaller |
padding | border added around input | preserves edge information and controls size |
Output size for one spatial dimension:
output = floor((input + 2*padding - kernel_size) / stride) + 1
Example:
input=6, kernel_size=3, padding=1, stride=2
output = floor((6 + 2*1 - 3) / 2) + 1 = 3
Verify in PyTorch:
import torch
from torch import nn

x = torch.randn(1, 1, 6, 6)
conv = nn.Conv2d(
    in_channels=1,
    out_channels=2,
    kernel_size=3,
    stride=2,
    padding=1,
)
y = conv(x)

print("size_lab")
print("input:", tuple(x.shape))
print("output:", tuple(y.shape))
Expected output:
size_lab
input: (1, 1, 6, 6)
output: (1, 2, 3, 3)
Read the shape as [batch, channels, height, width].
Multi-Channel Convolution
Color images have three input channels: red, green, and blue. In PyTorch, a batch of RGB images usually has shape:
[batch, 3, height, width]
A 3 x 3 convolution over an RGB image actually has kernel shape:
[out_channels, in_channels, kernel_height, kernel_width]
Run it:
import torch
from torch import nn

x = torch.randn(2, 3, 32, 32)
conv = nn.Conv2d(in_channels=3, out_channels=8, kernel_size=3, padding=1)
y = conv(x)

print("channel_lab")
print("input:", tuple(x.shape))
print("output:", tuple(y.shape))
print("weight:", tuple(conv.weight.shape))
print("bias:", tuple(conv.bias.shape))
Expected output:
channel_lab
input: (2, 3, 32, 32)
output: (2, 8, 32, 32)
weight: (8, 3, 3, 3)
bias: (8,)
Interpretation:
2: two images in the batch;3: RGB input channels;8: eight learned output feature maps;(8, 3, 3, 3): eight kernels, each looking across three input channels.
Receptive Field: How CNNs See More Over Depth
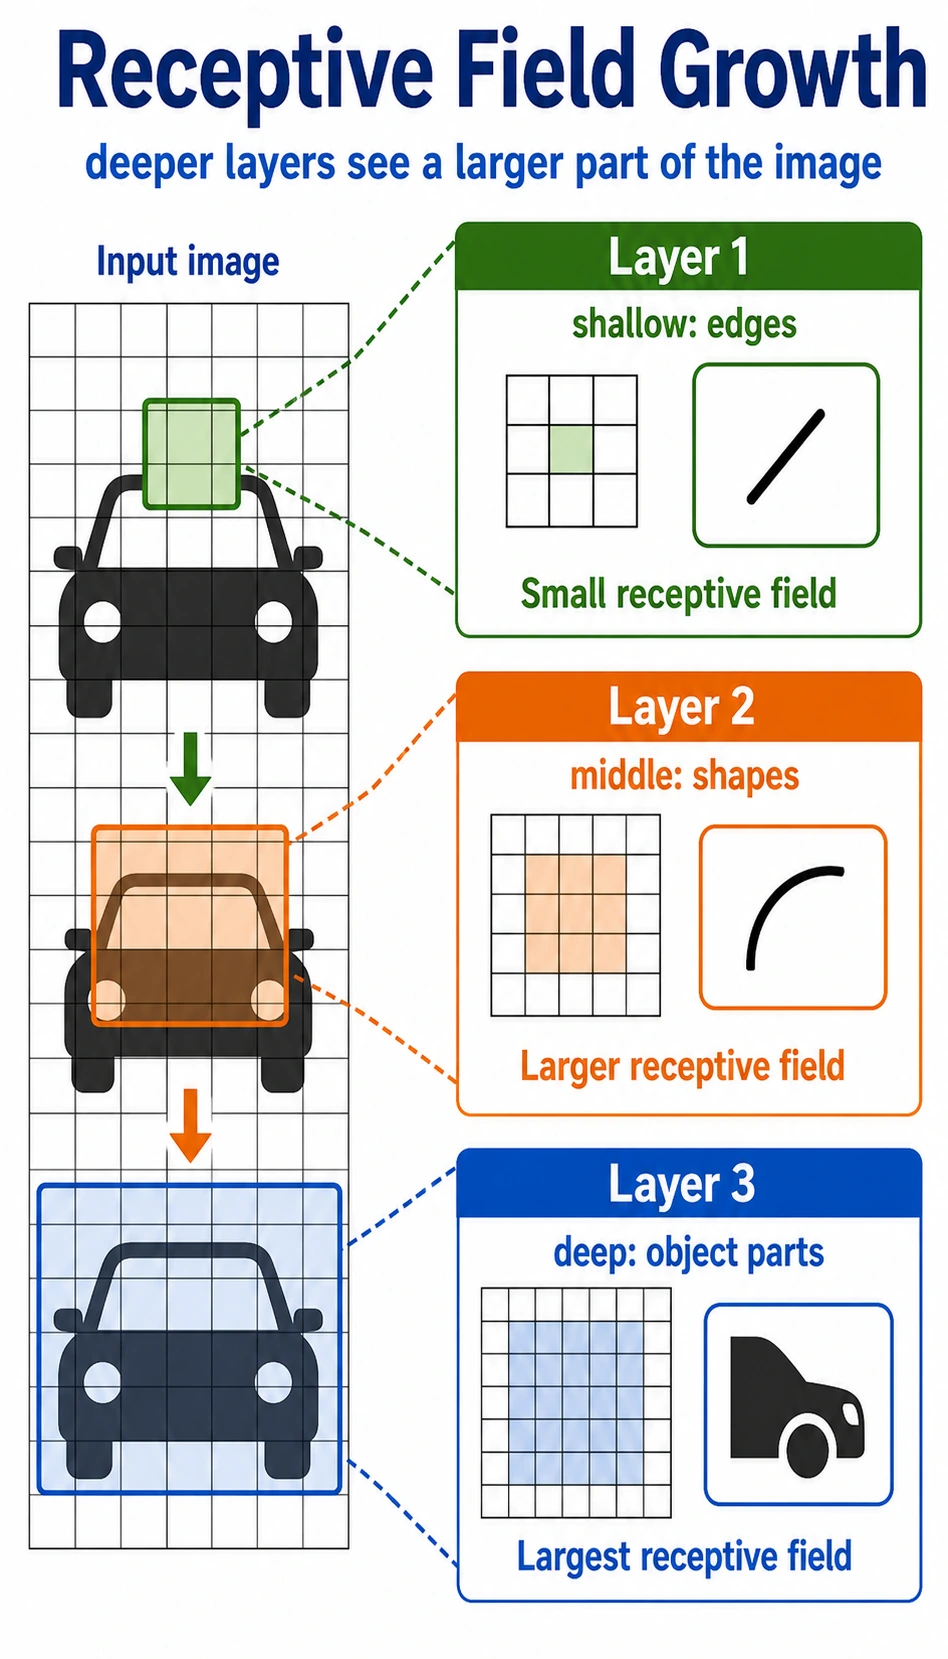
One 3 x 3 convolution sees a small local region. If you stack layers, later features indirectly depend on larger regions of the original image.
Intuition:
| Layer depth | What it often learns |
|---|---|
| shallow | edges, color changes, textures |
| middle | corners, simple shapes, parts |
| deep | larger object parts and semantic patterns |
This hierarchy is why CNNs work well for images: small local clues can be composed into larger visual ideas.
Basic Conv2d Checklist
import torch
from torch import nn

x = torch.randn(1, 1, 8, 8)
conv = nn.Conv2d(
    in_channels=1,
    out_channels=4,
    kernel_size=3,
    stride=1,
    padding=1,
)
y = conv(x)

print("conv2d_lab")
print("input:", tuple(x.shape))
print("output:", tuple(y.shape))
print("weight:", tuple(conv.weight.shape))
print("bias:", tuple(conv.bias.shape))
Expected output:
conv2d_lab
input: (1, 1, 8, 8)
output: (1, 4, 8, 8)
weight: (4, 1, 3, 3)
bias: (4,)
When you read any Conv2d, ask:
- What is the input shape
[N, C, H, W]? - Does
in_channelsequal the inputC? - How many feature maps does
out_channelscreate? - How do
kernel_size,stride, andpaddingchangeHandW?
Common Mistakes
| Mistake | Why it hurts | Fix |
|---|---|---|
using image shape [H, W, C] in PyTorch | PyTorch expects [N, C, H, W] | use permute when converting from image libraries |
wrong in_channels | Conv2d cannot match the input | print x.shape before the layer |
| forgetting padding | feature maps shrink unexpectedly | calculate output size or print shapes |
| treating convolution as magic | hard to debug features | remember patch * kernel -> sum |
| flattening too early | spatial structure is lost | use conv blocks before classifier head |
Exercises
- Change the hand-written
2 x 2kernel and observe how the output changes. - Manually compute
out[1, 0]in Lab 1 and compare with the printed output. - Change
stride=1in the size lab. What output shape do you get? - Change
out_channels=16in the channel lab. Which shapes change? - Convert an image-like tensor from
[N, H, W, C]to[N, C, H, W]withpermute.
Key Takeaways
- Convolution preserves local spatial structure better than early flattening.
- A kernel is a small pattern detector shared across positions.
strideandpaddingcontrol how the kernel moves and how output size changes.- Multi-channel convolution combines information across input channels.
- Stacked convolution layers grow receptive field and build visual hierarchy.