
7.1.5 Hugging Face クイックスタート
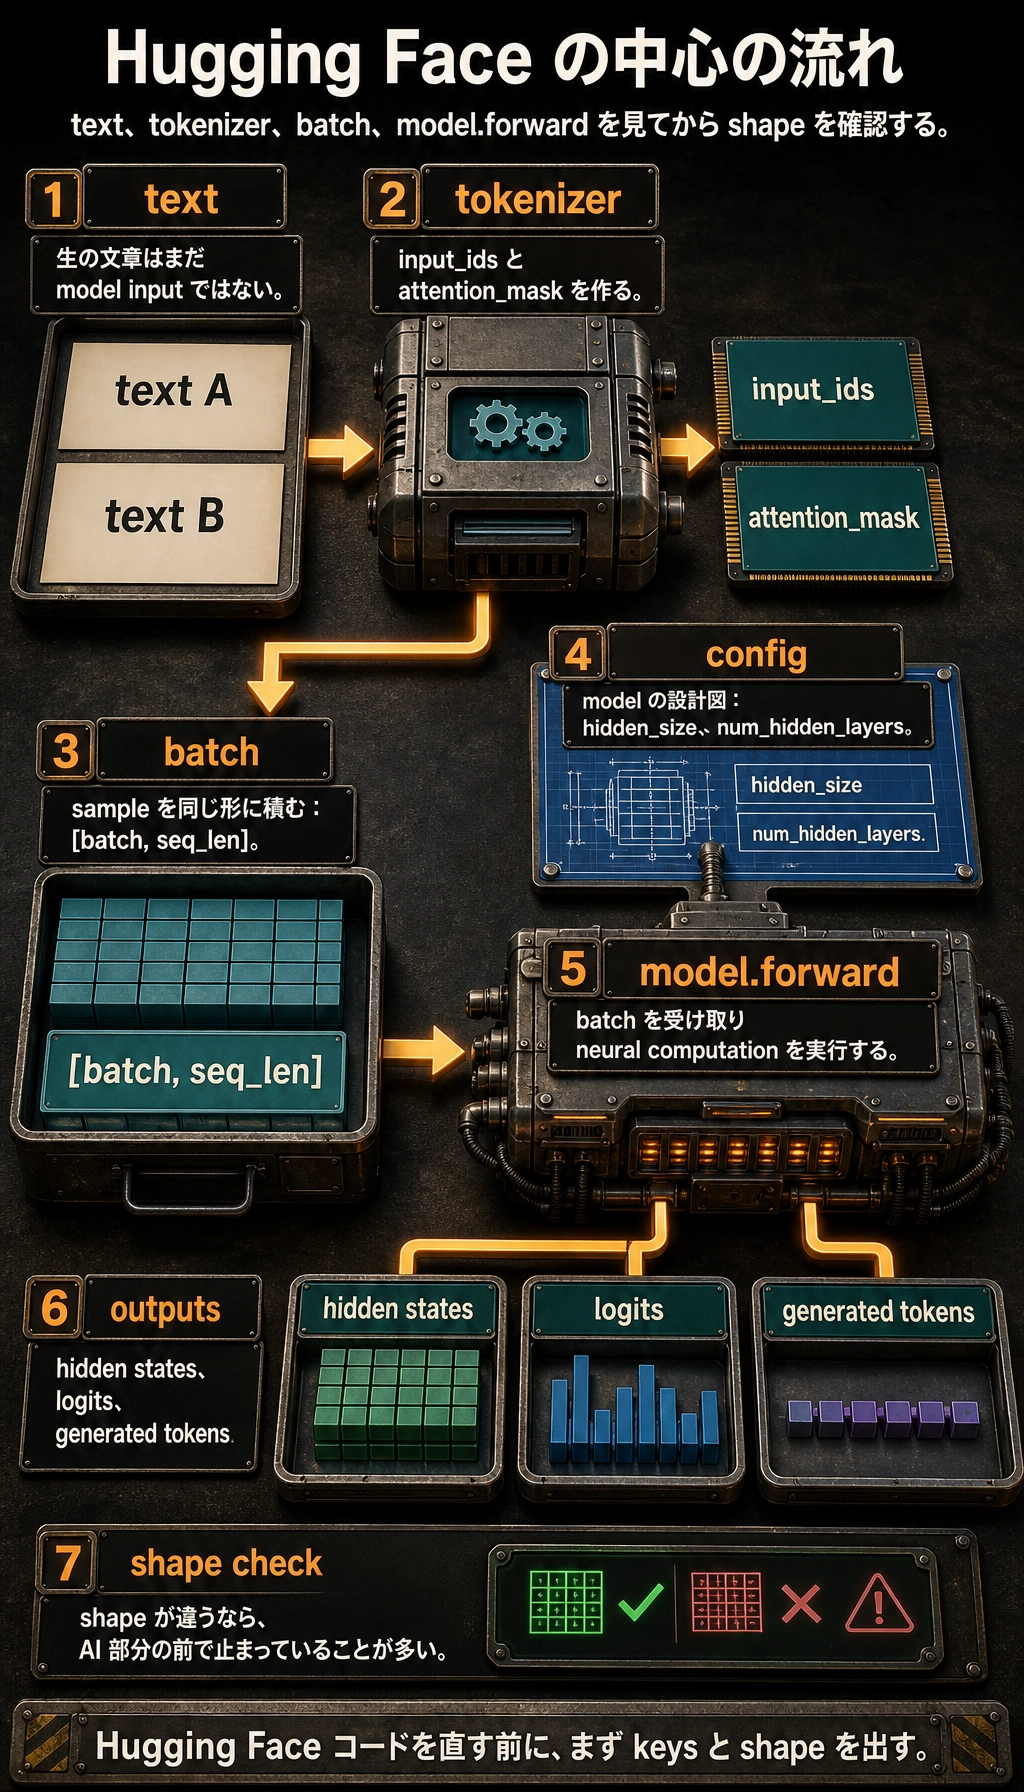
4 つのオブジェクト
Section titled “4 つのオブジェクト”| オブジェクト | 役割 | よく見るフィールド |
|---|---|---|
| tokenizer | テキスト前処理と token から ID への変換 | input_ids, attention_mask |
| config | モデル構造の設計図 | hidden_size, num_hidden_layers, vocab_size |
| model | ニューラルネットワーク計算 | last_hidden_state, logits, generated IDs |
| batch | 同じ shape に積まれた tensor 群 | [batch, seq_len] 入力 |
大事な習慣は shape を確認することです。shape が違う場合、モデルはまだ「AI らしい処理」に入る前で止まっています。
実験 1:重みをダウンロードせずに流れを動かす
Section titled “実験 1:重みをダウンロードせずに流れを動かす”依存関係を入れます。
python -m pip install torch transformersこの例では BertConfig から小さなランダム BERT を作ります。言語能力はありませんが、pretrained weights をダウンロードせずに基本の呼び出し経路を確認できます。
import torchfrom transformers import BertConfig, BertModel
vocab = {    "[PAD]": 0,    "[CLS]": 1,    "[SEP]": 2,    "[UNK]": 3,    "reset": 4,    "password": 5,    "refund": 6,    "order": 7,    "please": 8,    "help": 9,}

def encode(text, max_length=6):    tokens = ["[CLS]"] + text.lower().split() + ["[SEP]"]    input_ids = [vocab.get(token, vocab["[UNK]"]) for token in tokens][:max_length]    attention_mask = [1] * len(input_ids)
    while len(input_ids) < max_length:        input_ids.append(vocab["[PAD]"])        attention_mask.append(0)
    return input_ids, attention_mask

texts = ["please help reset password", "refund order"]encoded = [encode(text) for text in texts]
input_ids = torch.tensor([item[0] for item in encoded], dtype=torch.long)attention_mask = torch.tensor([item[1] for item in encoded], dtype=torch.long)
config = BertConfig(    vocab_size=len(vocab),    hidden_size=32,    num_hidden_layers=2,    num_attention_heads=4,    intermediate_size=64,)
model = BertModel(config)outputs = model(input_ids=input_ids, attention_mask=attention_mask)
print("input_ids shape        :", tuple(input_ids.shape))print("attention_mask shape   :", tuple(attention_mask.shape))print("last_hidden_state shape:", tuple(outputs.last_hidden_state.shape))print("pooler_output shape    :", tuple(outputs.pooler_output.shape))
期待される出力:
input_ids shape : (2, 6)attention_mask shape : (2, 6)last_hidden_state shape: (2, 6, 32)pooler_output shape : (2, 32)shape はこう読みます。
2は batch に 2 文あるという意味。6は各文が長さ 6 に padding または truncation されたという意味。32はhidden_size=32から来る。last_hidden_stateは token ごとに 1 vector を持つ。pooler_outputはこの BERT 風モデルで、文ごとに 1 vector を返す。
実験 2:本物の pretrained model を使う
Section titled “実験 2:本物の pretrained model を使う”ネットワークがある場合は from_pretrained を使います。
from transformers import AutoModel, AutoTokenizer
model_name = "bert-base-uncased"tokenizer = AutoTokenizer.from_pretrained(model_name)model = AutoModel.from_pretrained(model_name)
batch = tokenizer(    ["please help reset password", "refund order"],    padding=True,    truncation=True,    return_tensors="pt",)
outputs = model(**batch)
print(batch.keys())print(batch["input_ids"].shape)print(outputs.last_hidden_state.shape)
期待される形状レベルの出力:
dict_keys(['input_ids', 'token_type_ids', 'attention_mask'])torch.Size([2, 6])torch.Size([2, 6, 768])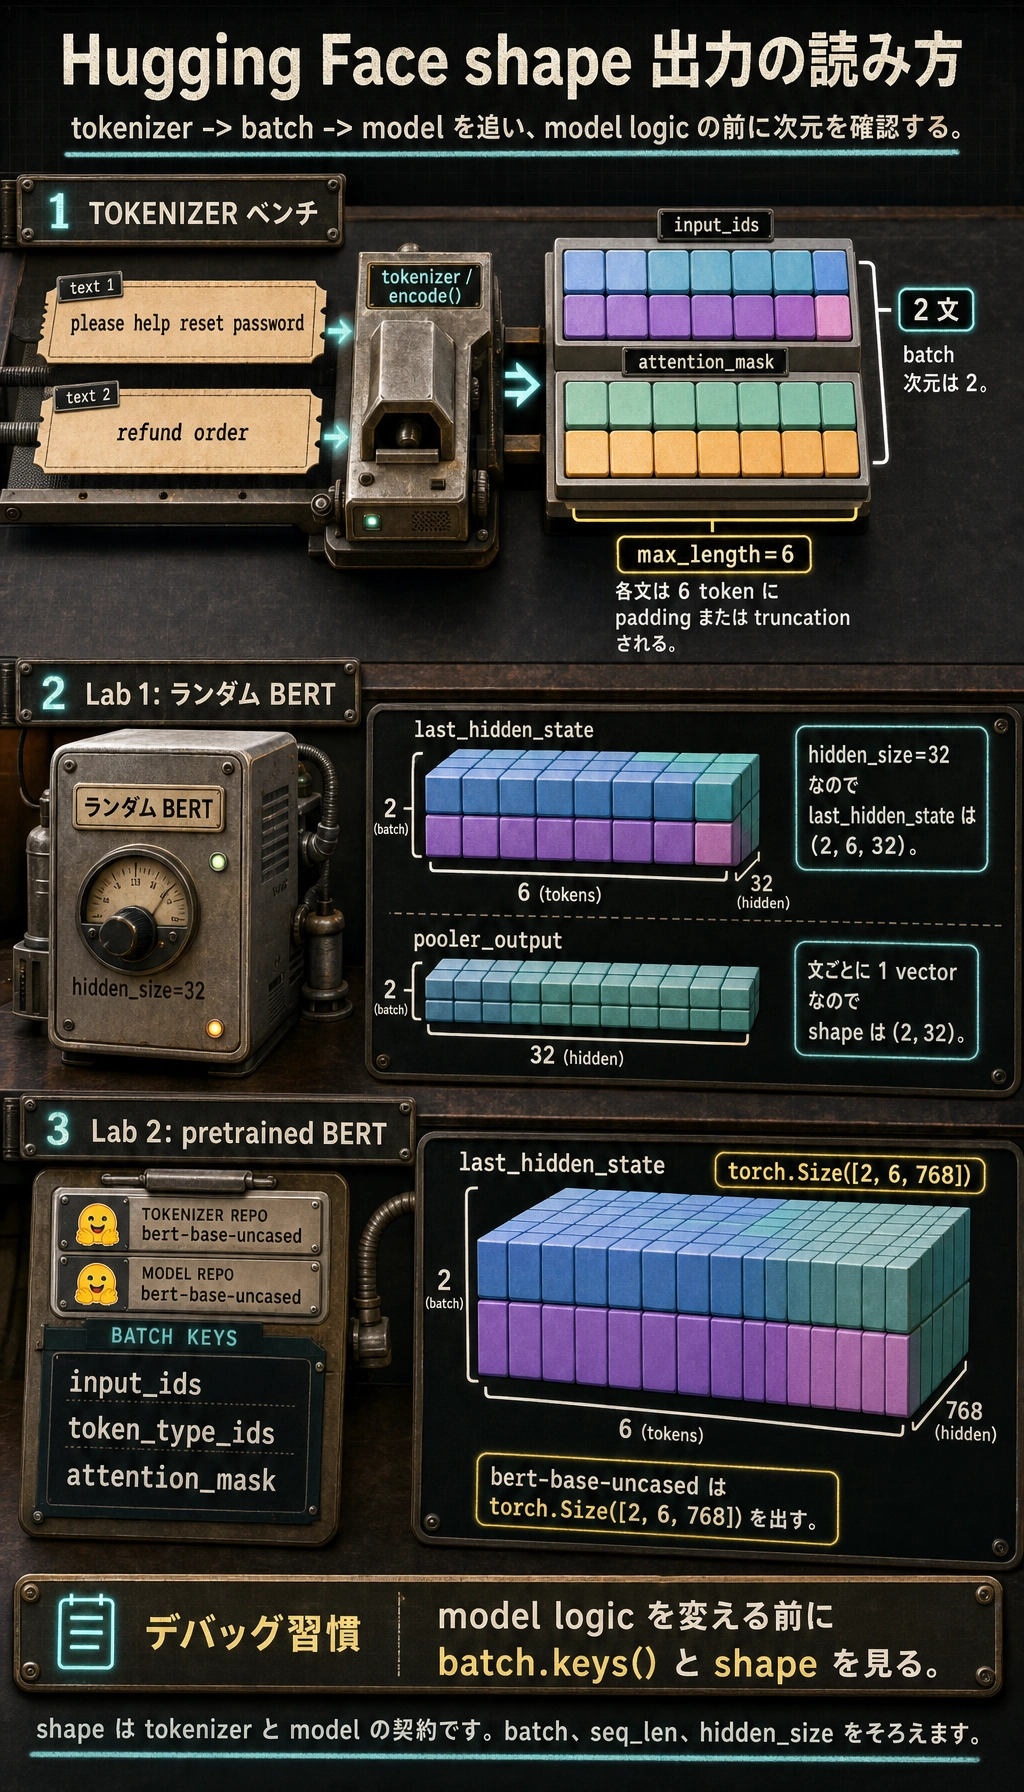
ここでは pretrained weights を持つモデルを使います。流れは同じですが、tokenizer、config、weights は Hub から来ており、互いに一致している必要があります。
実コードを読むためのオブジェクト地図
Section titled “実コードを読むためのオブジェクト地図”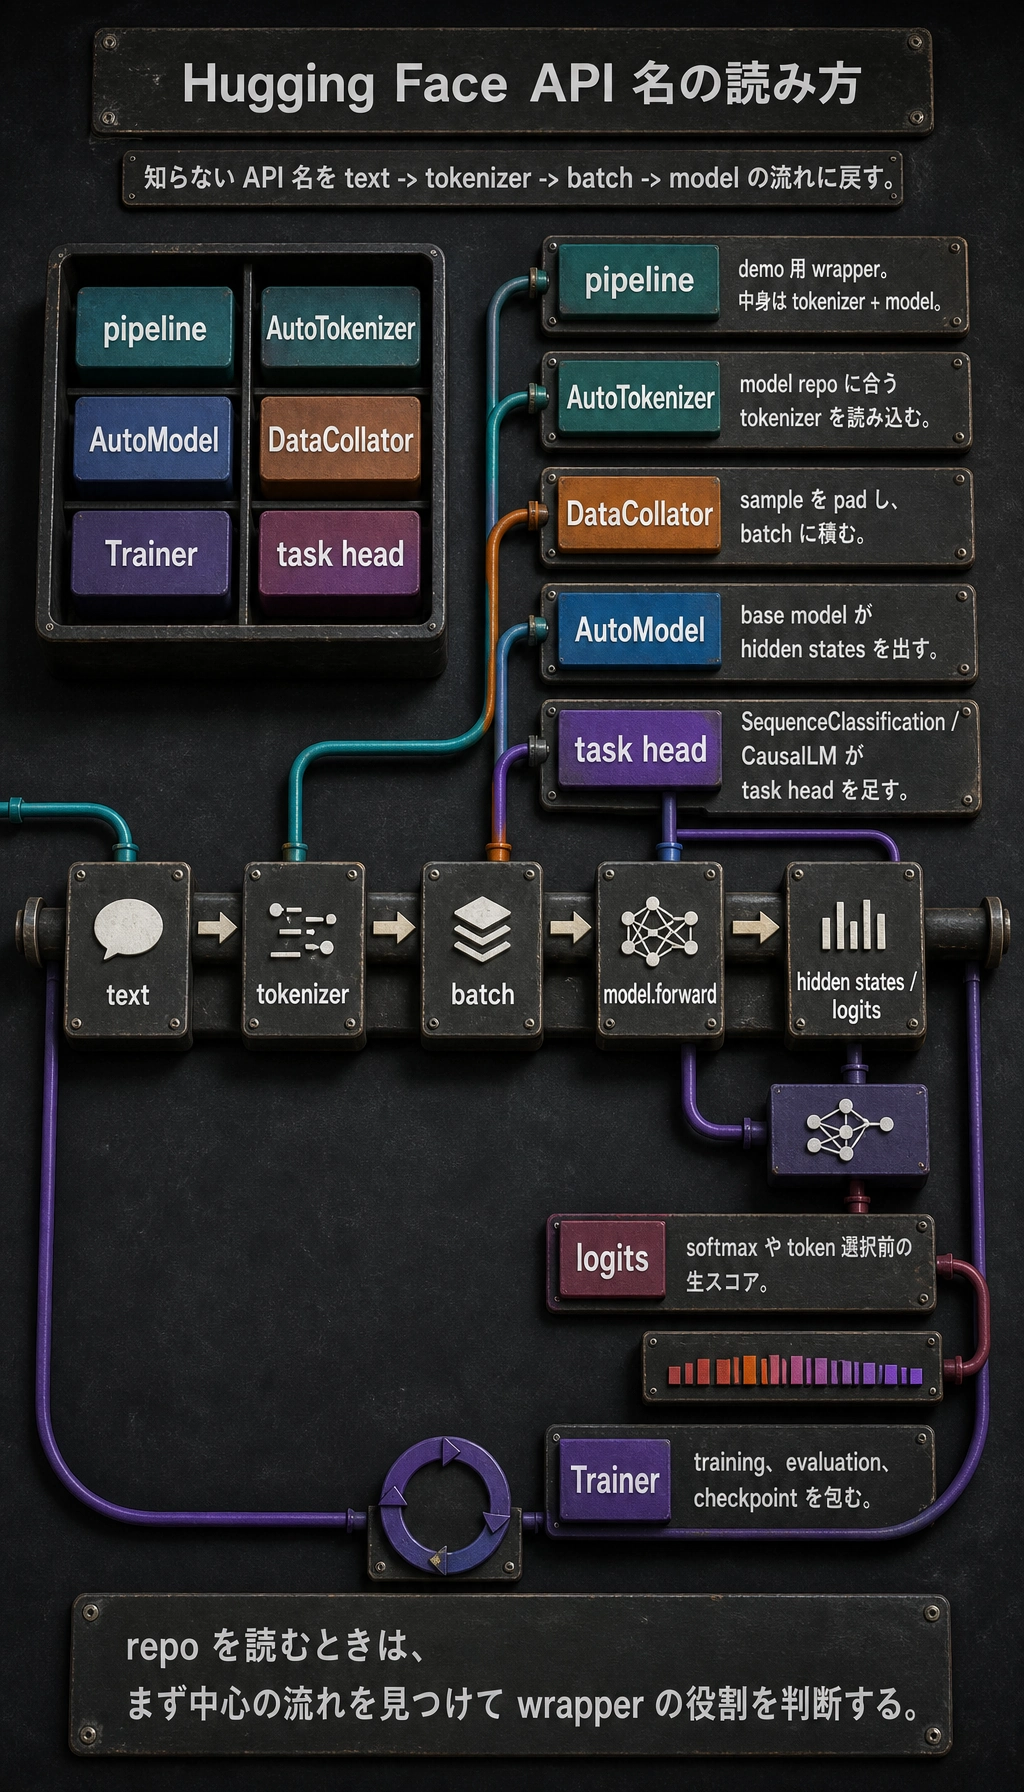
リポジトリを読むときは、知らない名前を中心の流れに戻します。
| 名前 | どう考えるか |
|---|---|
pipeline | tokenizer + model の高レベルなデモ用ラッパー |
AutoTokenizer | model repo に合う tokenizer class を読み込む |
AutoModel | task head なしの base model を読み込む |
AutoModelForSequenceClassification | base model + classification head |
AutoModelForCausalLM | 次の token 生成用のデコーダー系モデル |
DataCollator | sample を padding し、batch に積む |
Trainer | training loop、evaluation、checkpoint、logging を包む |
logits | softmax や token 選択前の生スコア |
デバッグチェックリスト
Section titled “デバッグチェックリスト”- Tokenizer と model は同じ model repo から読み込む。
- model を呼ぶ前に
batch.keys()と tensor shapes を出す。 - padding を使うなら、通常は
attention_maskが必要。 - ランダムな
BertModel(config)は interface 学習用で、pretrained model ではない。 AutoModelは表現を返す。task-specific class は task logits を返す。- CUDA memory error では、まず batch size、sequence length、model size を下げる。
このページを終えたら、この証拠カードを残します。
- 対象
- tokenizer、model、config、pipeline、または手動の forward pass
- オフライン実行
- toy ワークフローの出力は保存される
- 実モデル任意
- ダウンロード済みならモデルIDとタスクを記録する
- 形状またはスコア
- 1つの出力テンソル形状または予測スコア
- デバッグメモ
- モデルのパス、デバイス、トークナイザ/モデル不一致を確認した
- 実験 1 の
max_lengthを6から4に変える。どの token が切られるか。 hidden_size=64に変える。どの output shape が変わるか。- 3 つ目の文を追加し、batch 次元が
2から3になることを確認する。 - 実験 2 で
AutoModelをAutoModelForSequenceClassificationに替える。どの新しい field が出るか。 pipeline()がデモに便利でも、バッチ形状のデバッグに不十分な理由を説明する。
参考実装と解説
- 多くの場合、末尾 token が先に切られます。どの token が消えるかは tokenizer output 次第なので、元テキストから推測せず token を print します。
hidden_size=64は hidden-state tensor の最後の次元を変えます。その config で model を作れば、parameter shape も変わります。- 3 文目を追加すると、batch tensor の先頭次元が
2から3になります。sequence length と hidden size は tokenization と config によって決まります。 AutoModelForSequenceClassificationは task-specific output、特にlogitsを返します。base model の上に classification head が追加されるからです。pipeline()は demo には便利ですが、tokenization、tensor shape、padding、device、model output を隠します。debug にはそれらの詳細が必要です。
Hugging Face は tensor を追うと学びやすいです。
tokenizer creates tensorsmodel consumes tensorsoutputs expose states or logits
この経路を確認できれば、公式サンプルはかなり読みやすくなります。