
10.6.4 実践:再現可能なビジョン・ミニパイプラインを作る
このセクションでは、第 10 章を手を動かして進めるプロジェクトにします。データセットをダウンロードする必要も、クラウドモデルを呼び出す必要もありません。1 本の Python スクリプトが小さな画像データセットを生成し、そのまま一連の視覚処理を実行します。
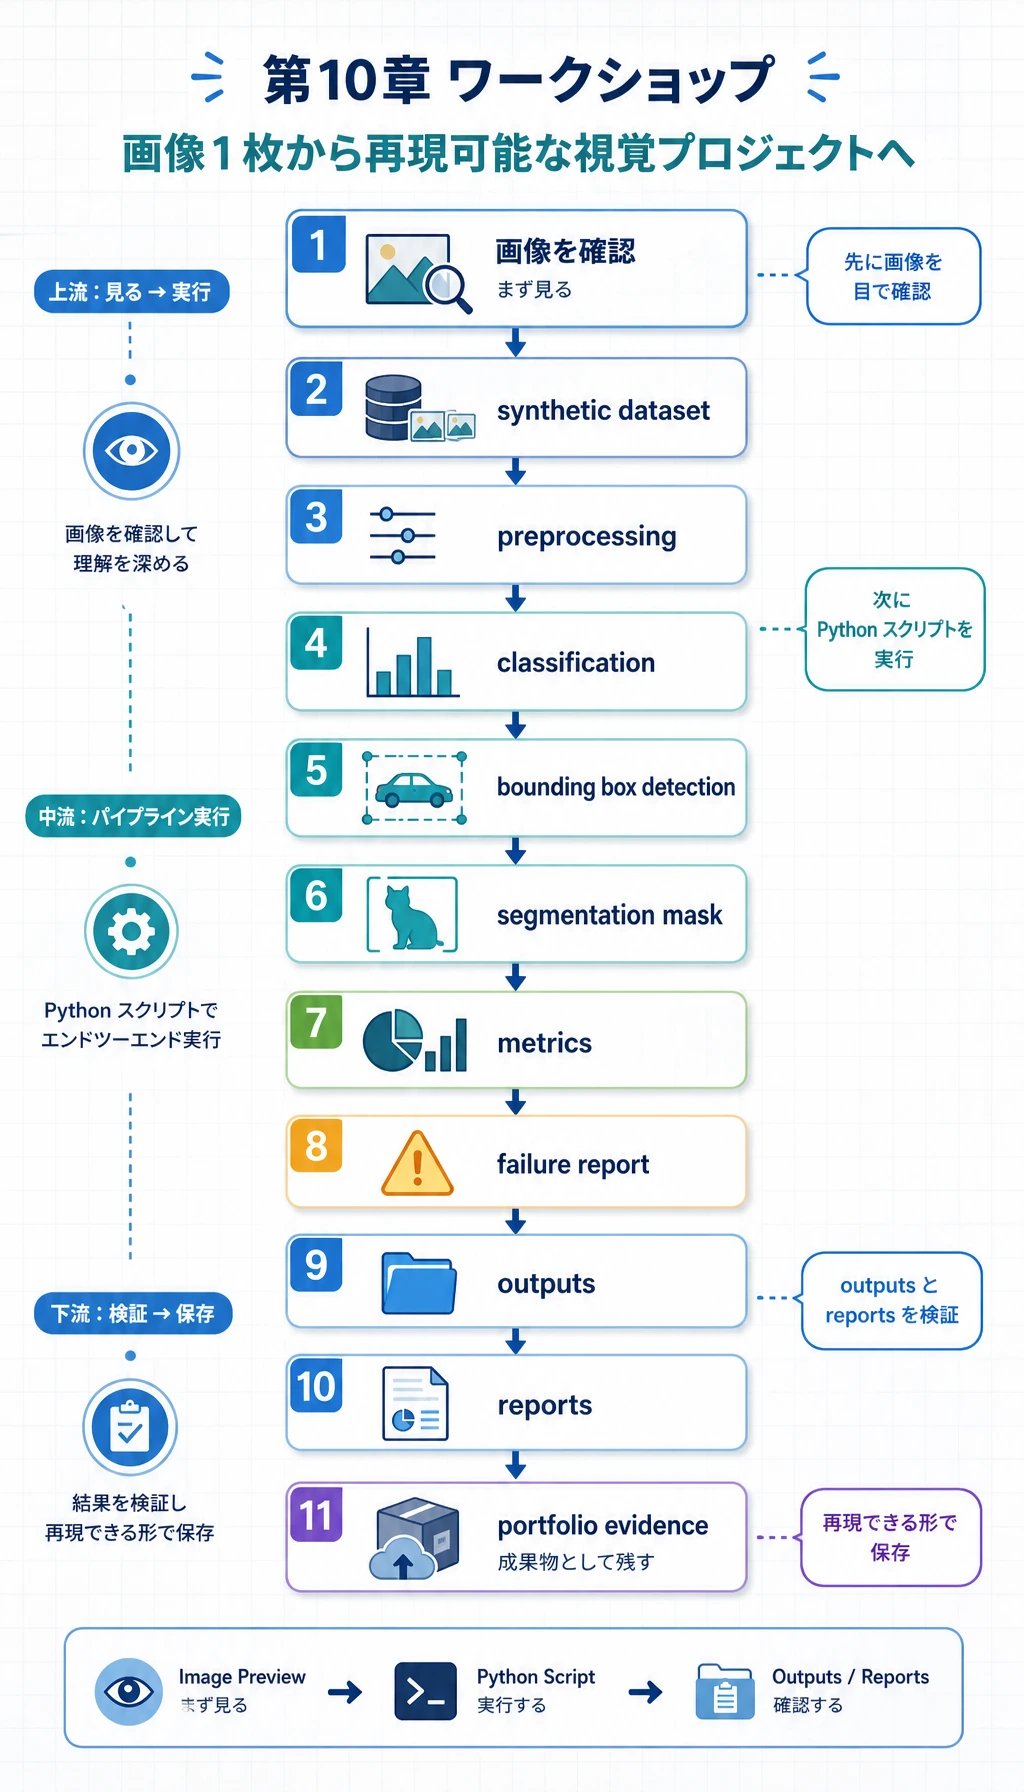
作るものは、実際のビジョンプロジェクトにもよく出てくる 4 つの部品です。
- 分類:画像が circle、square、triangle のどれかを判定する。
- 検出:前景物体の bounding box を描く。
- 分割:前景領域の mask を作る。
- 評価:指標、予測画像、失敗例を保存する。
この例では、あえて深層学習モデルではなく opencv-python と numpy を使います。理由は実用的です。初心者でもオフラインで実行でき、すべての中間ファイルを確認でき、モデルを置き換える前にプロジェクト構造を理解できます。この流れが見えたあとで、単純な分類器を CNN、YOLO 検出器、分割モデルに差し替えると、学習がかなり安定します。
実行後、フォルダは次のようになります。
cv_workshop_run/ data/ labels.csv train_circle_00.png train_circle_00_mask.png ... outputs/ test_circle_00_prediction.png ... reports/ metrics.json predictions.csv failure_cases.mdこれはポートフォリオ作成の基本形として読んでください。
data/は、モデルが何を見たかを示します。outputs/は、モデルが何を予測したかを示します。reports/は、どのように評価し、どこを調べたかを示します。
ステップ 0:生成するデータを理解する
Section titled “ステップ 0:生成するデータを理解する”まずデータの流れを見ます。ビジョンプロジェクトは学習から始まるのではなく、画像、ラベル、mask、box、split、難しいサンプルが見える状態から始まります。
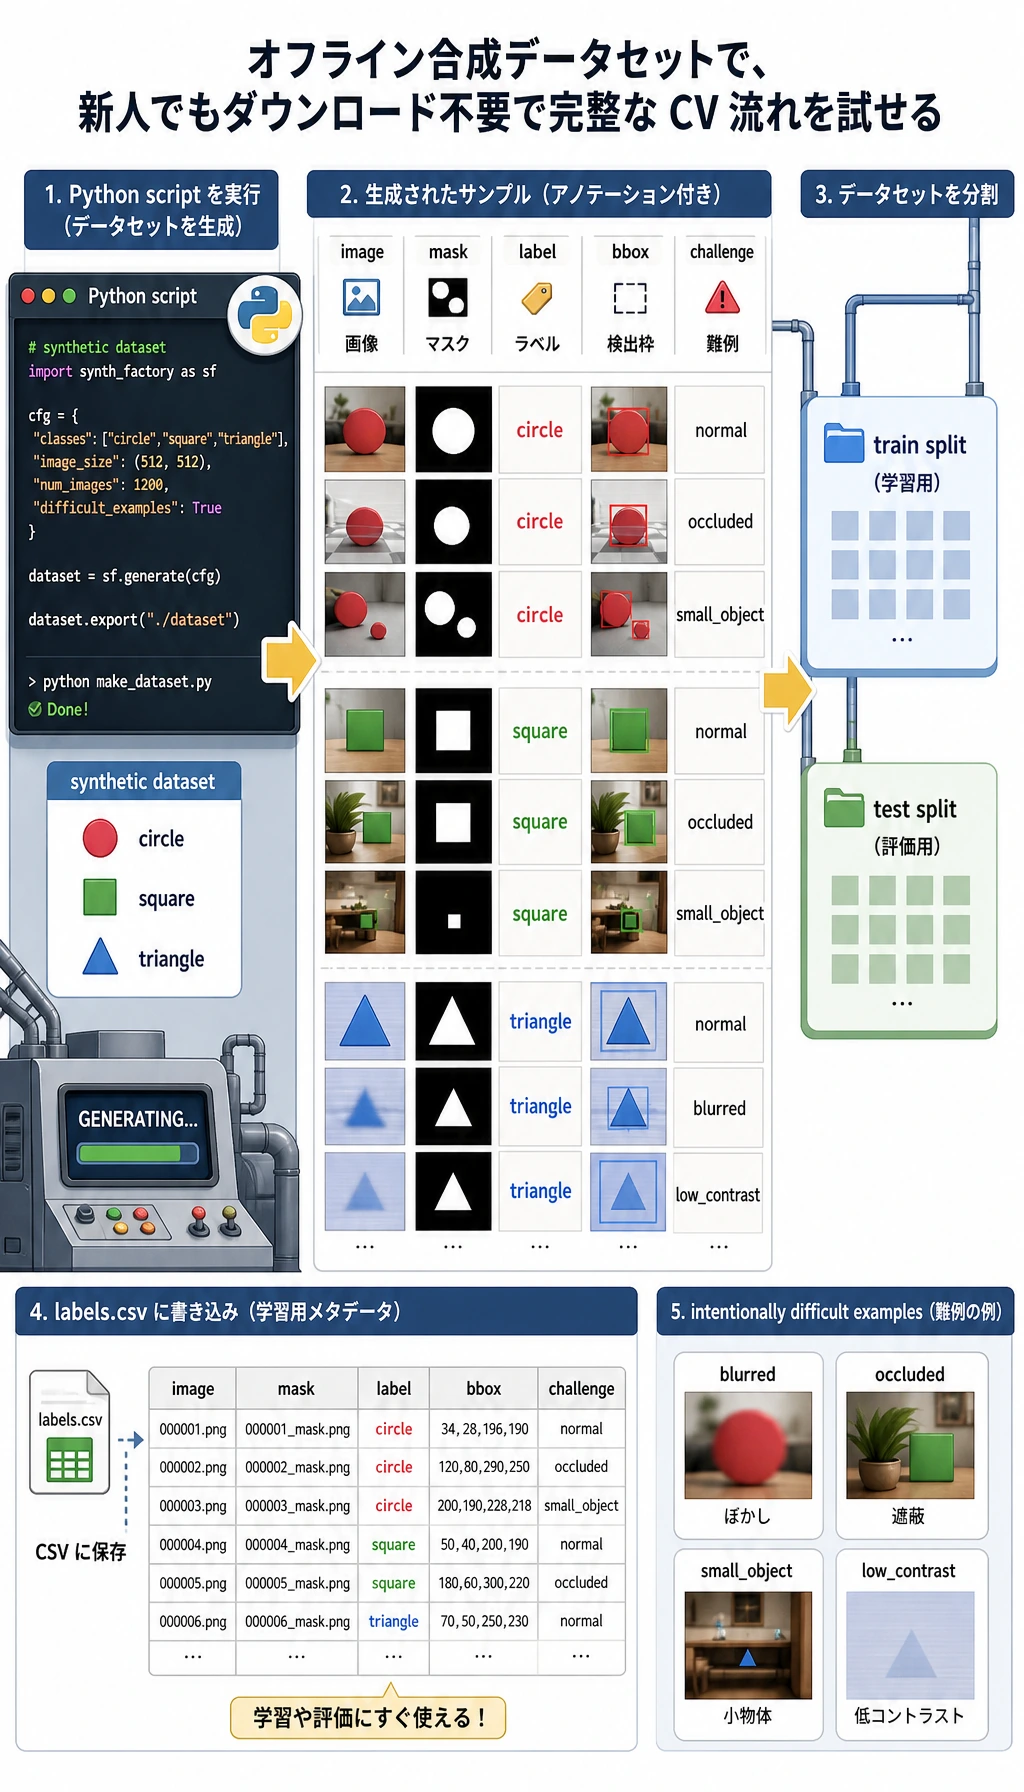
このワークショップでは次のように扱います。
imageは入力 PNG 画像。labelはcircle、square、triangleのクラス。maskはピクセル単位の前景の正解。bboxは bounding box、つまりx1, y1, x2, y2。challengeはoccluded、small_object、low_contrastなどの難しい条件。
大事なのは、合成データであること自体ではありません。大事なのは、プロジェクト全体が再現可能であることです。もう一度実行しても、同じ構造、指標、失敗例レポートを確認できます。
ステップ 1:きれいな作業フォルダを作る
Section titled “ステップ 1:きれいな作業フォルダを作る”mkdir cv-workshopcd cv-workshoppython -m venv .venvsource .venv/bin/activatepip install opencv-python numpyWindows PowerShell では、次のように有効化します。
.\.venv\Scripts\Activate.ps1すでにグローバル環境に依存パッケージが入っている場合は、仮想環境を省略しても構いません。ただし、ポートフォリオとして残すなら、仮想環境を使ったほうが再現しやすくなります。
ステップ 2:完全なスクリプトを保存する
Section titled “ステップ 2:完全なスクリプトを保存する”vision_workshop.py を作り、次のコードを貼り付けてください。
from __future__ import annotations
import csvimport jsonimport mathimport shutilfrom dataclasses import dataclassfrom pathlib import Path
import cv2import numpy as np
ROOT = Path("cv_workshop_run")DATA_DIR = ROOT / "data"OUTPUT_DIR = ROOT / "outputs"REPORT_DIR = ROOT / "reports"IMAGE_SIZE = 128LABELS = ["circle", "square", "triangle"]RNG = np.random.default_rng(42)

@dataclassclass Sample:    image_path: Path    mask_path: Path    label: str    split: str    box: tuple[int, int, int, int]    challenge: str

def reset_workspace() -> None:    if ROOT.exists():        shutil.rmtree(ROOT)    DATA_DIR.mkdir(parents=True)    OUTPUT_DIR.mkdir(parents=True)    REPORT_DIR.mkdir(parents=True)

def add_background_noise(img: np.ndarray, amount: int = 18) -> np.ndarray:    noise = RNG.integers(0, amount, img.shape, dtype=np.uint8)    return cv2.add(img, noise)

def draw_shape(label: str, index: int, split: str, challenge: str = "normal") -> tuple[np.ndarray, np.ndarray, tuple[int, int, int, int]]:    img = np.zeros((IMAGE_SIZE, IMAGE_SIZE, 3), dtype=np.uint8)    img[:] = (18, 24, 32)    img = add_background_noise(img)    mask = np.zeros((IMAGE_SIZE, IMAGE_SIZE), dtype=np.uint8)
    margin = 24    cx = int(RNG.integers(margin + 8, IMAGE_SIZE - margin - 8))    cy = int(RNG.integers(margin + 8, IMAGE_SIZE - margin - 8))    size = int(RNG.integers(24, 39))    color = (        int(RNG.integers(80, 240)),        int(RNG.integers(80, 240)),        int(RNG.integers(80, 240)),    )
    if challenge == "low_contrast":        color = (55, 65, 75)    if challenge == "small_object":        size = 17    if challenge == "edge_touching":        cx, cy = 25, 25
    if label == "circle":        cv2.circle(img, (cx, cy), size, color, -1)        cv2.circle(mask, (cx, cy), size, 255, -1)    elif label == "square":        x1, y1, x2, y2 = cx - size, cy - size, cx + size, cy + size        cv2.rectangle(img, (x1, y1), (x2, y2), color, -1)        cv2.rectangle(mask, (x1, y1), (x2, y2), 255, -1)    elif label == "triangle":        pts = np.array(            [[cx, cy - size], [cx - size, cy + size], [cx + size, cy + size]],            dtype=np.int32,        )        cv2.fillPoly(img, [pts], color)        cv2.fillPoly(mask, [pts], 255)    else:        raise ValueError(label)
    if challenge == "occluded":        cv2.rectangle(img, (cx - size, cy - 8), (cx + size, cy + 8), (18, 24, 32), -1)        cv2.rectangle(mask, (cx - size, cy - 8), (cx + size, cy + 8), 0, -1)    if challenge == "blurred":        img = cv2.GaussianBlur(img, (7, 7), 0)
    ys, xs = np.where(mask > 0)    box = (int(xs.min()), int(ys.min()), int(xs.max()), int(ys.max()))    return img, mask, box

def create_dataset() -> list[Sample]:    samples: list[Sample] = []    challenge_plan = {        ("test", "circle", 0): "low_contrast",        ("test", "square", 1): "occluded",        ("test", "triangle", 2): "small_object",    }
    for split, count in [("train", 12), ("test", 5)]:        for label in LABELS:            for i in range(count):                challenge = challenge_plan.get((split, label, i), "normal")                img, mask, box = draw_shape(label, i, split, challenge)                image_path = DATA_DIR / f"{split}_{label}_{i:02d}.png"                mask_path = DATA_DIR / f"{split}_{label}_{i:02d}_mask.png"                cv2.imwrite(str(image_path), img)                cv2.imwrite(str(mask_path), mask)                samples.append(Sample(image_path, mask_path, label, split, box, challenge))
    with (DATA_DIR / "labels.csv").open("w", newline="", encoding="utf-8") as handle:        writer = csv.writer(handle)        writer.writerow(["image_path", "mask_path", "label", "split", "x1", "y1", "x2", "y2", "challenge"])        for s in samples:            writer.writerow([s.image_path.name, s.mask_path.name, s.label, s.split, *s.box, s.challenge])
    return samples

def segment_foreground(img: np.ndarray) -> np.ndarray:    gray = cv2.cvtColor(img, cv2.COLOR_BGR2GRAY)    blurred = cv2.GaussianBlur(gray, (5, 5), 0)    _, mask = cv2.threshold(blurred, 0, 255, cv2.THRESH_BINARY + cv2.THRESH_OTSU)    if np.mean(mask == 255) > 0.55:        mask = cv2.bitwise_not(mask)    kernel = np.ones((3, 3), dtype=np.uint8)    return cv2.morphologyEx(mask, cv2.MORPH_OPEN, kernel)

def largest_box(mask: np.ndarray) -> tuple[int, int, int, int] | None:    contours, _ = cv2.findContours(mask, cv2.RETR_EXTERNAL, cv2.CHAIN_APPROX_SIMPLE)    if not contours:        return None    c = max(contours, key=cv2.contourArea)    x, y, w, h = cv2.boundingRect(c)    return (x, y, x + w - 1, y + h - 1)

def box_iou(a: tuple[int, int, int, int], b: tuple[int, int, int, int]) -> float:    ax1, ay1, ax2, ay2 = a    bx1, by1, bx2, by2 = b    ix1, iy1 = max(ax1, bx1), max(ay1, by1)    ix2, iy2 = min(ax2, bx2), min(ay2, by2)    iw, ih = max(0, ix2 - ix1 + 1), max(0, iy2 - iy1 + 1)    inter = iw * ih    area_a = (ax2 - ax1 + 1) * (ay2 - ay1 + 1)    area_b = (bx2 - bx1 + 1) * (by2 - by1 + 1)    union = area_a + area_b - inter    return inter / union if union else 0.0

def mask_iou(pred: np.ndarray, truth: np.ndarray) -> float:    p = pred > 0    t = truth > 0    inter = np.logical_and(p, t).sum()    union = np.logical_or(p, t).sum()    return float(inter / union) if union else 0.0

def extract_features(img: np.ndarray) -> np.ndarray:    mask = segment_foreground(img)    contours, _ = cv2.findContours(mask, cv2.RETR_EXTERNAL, cv2.CHAIN_APPROX_SIMPLE)    if not contours:        return np.zeros(7, dtype=np.float32)
    c = max(contours, key=cv2.contourArea)    area = cv2.contourArea(c)    perimeter = cv2.arcLength(c, True)    x, y, w, h = cv2.boundingRect(c)    extent = area / max(1, w * h)    aspect = w / max(1, h)    circularity = 4 * math.pi * area / max(1.0, perimeter * perimeter)    edges = cv2.Canny(cv2.cvtColor(img, cv2.COLOR_BGR2GRAY), 60, 160)    edge_density = float((edges > 0).mean())    hsv = cv2.cvtColor(img, cv2.COLOR_BGR2HSV)    foreground = mask > 0    mean_sat = float(hsv[:, :, 1][foreground].mean()) if foreground.any() else 0.0    mean_val = float(hsv[:, :, 2][foreground].mean()) if foreground.any() else 0.0    area_ratio = area / (IMAGE_SIZE * IMAGE_SIZE)    return np.array(        [area_ratio, extent, aspect, circularity, edge_density, mean_sat / 255, mean_val / 255],        dtype=np.float32,    )

def train_centroid_classifier(samples: list[Sample]) -> dict[str, np.ndarray]:    grouped_features: dict[str, list[np.ndarray]] = {label: [] for label in LABELS}    for s in samples:        if s.split != "train":            continue        img = cv2.imread(str(s.image_path))        grouped_features[s.label].append(extract_features(img))    return {label: np.mean(rows, axis=0) for label, rows in grouped_features.items()}

def predict_label(feature: np.ndarray, centroids: dict[str, np.ndarray]) -> tuple[str, float]:    distances = {label: float(np.linalg.norm(feature - center)) for label, center in centroids.items()}    label = min(distances, key=distances.get)    sorted_distances = sorted(distances.values())    margin = sorted_distances[1] - sorted_distances[0] if len(sorted_distances) > 1 else 0.0    confidence = float(1 / (1 + sorted_distances[0]) * min(1.0, 0.55 + margin * 3))    return label, confidence

def draw_prediction(    img: np.ndarray,    truth_box: tuple[int, int, int, int],    pred_box: tuple[int, int, int, int] | None,    label: str,    pred: str,) -> np.ndarray:    canvas = img.copy()    x1, y1, x2, y2 = truth_box    cv2.rectangle(canvas, (x1, y1), (x2, y2), (0, 190, 0), 2)    if pred_box:        px1, py1, px2, py2 = pred_box        cv2.rectangle(canvas, (px1, py1), (px2, py2), (0, 0, 255), 2)    cv2.putText(canvas, f"true={label} pred={pred}", (8, 18), cv2.FONT_HERSHEY_SIMPLEX, 0.45, (255, 255, 255), 1)    return canvas

def evaluate(samples: list[Sample], centroids: dict[str, np.ndarray]) -> dict[str, object]:    rows: list[dict[str, object]] = []    confusion = {label: {pred: 0 for pred in LABELS} for label in LABELS}
    for s in samples:        if s.split != "test":            continue
        img = cv2.imread(str(s.image_path))        truth_mask = cv2.imread(str(s.mask_path), cv2.IMREAD_GRAYSCALE)        pred_mask = segment_foreground(img)        pred_box = largest_box(pred_mask)        feature = extract_features(img)        pred, confidence = predict_label(feature, centroids)        confusion[s.label][pred] += 1
        box_score = box_iou(s.box, pred_box) if pred_box else 0.0        mask_score = mask_iou(pred_mask, truth_mask)        annotated = draw_prediction(img, s.box, pred_box, s.label, pred)        out_name = s.image_path.stem + "_prediction.png"        cv2.imwrite(str(OUTPUT_DIR / out_name), annotated)
        rows.append(            {                "image": s.image_path.name,                "label": s.label,                "prediction": pred,                "confidence": round(confidence, 3),                "box_iou": round(box_score, 3),                "mask_iou": round(mask_score, 3),                "challenge": s.challenge,                "output": out_name,            }        )
    correct = sum(row["label"] == row["prediction"] for row in rows)    failures = [        row        for row in rows        if row["label"] != row["prediction"]        or row["confidence"] < 0.78        or row["box_iou"] < 0.75        or row["mask_iou"] < 0.82    ]    metrics = {        "classification_accuracy": round(correct / len(rows), 3),        "correct": correct,        "total": len(rows),        "mean_box_iou": round(float(np.mean([r["box_iou"] for r in rows])), 3),        "mean_mask_iou": round(float(np.mean([r["mask_iou"] for r in rows])), 3),        "failure_cases": len(failures),        "confusion": confusion,    }
    with (REPORT_DIR / "metrics.json").open("w", encoding="utf-8") as handle:        json.dump(metrics, handle, indent=2)    with (REPORT_DIR / "predictions.csv").open("w", newline="", encoding="utf-8") as handle:        writer = csv.DictWriter(handle, fieldnames=list(rows[0].keys()))        writer.writeheader()        writer.writerows(rows)    with (REPORT_DIR / "failure_cases.md").open("w", encoding="utf-8") as handle:        handle.write("# 失敗ケース\n\n")        if not failures:            handle.write("失敗ケースは発生しませんでした。プロジェクトを信頼できるものとして扱う前に、より難しい実画像を追加してください。\n")        for row in failures:            handle.write(                f"- `{row['image']}`: true={row['label']}, pred={row['prediction']}, "                f"confidence={row['confidence']}, box_iou={row['box_iou']}, "                f"mask_iou={row['mask_iou']}, challenge={row['challenge']}\n"            )
    return metrics

def main() -> None:    reset_workspace()    samples = create_dataset()    centroids = train_centroid_classifier(samples)    metrics = evaluate(samples, centroids)
    print("STEP 1: dataset")    print(f"images: {len(samples)}")    print(f"labels_csv: {DATA_DIR / 'labels.csv'}")    print()    print("STEP 2: evaluation")    print(f"classification_accuracy: {metrics['classification_accuracy']:.3f} ({metrics['correct']}/{metrics['total']})")    print(f"mean_box_iou: {metrics['mean_box_iou']:.3f}")    print(f"mean_mask_iou: {metrics['mean_mask_iou']:.3f}")    print(f"failure_cases: {metrics['failure_cases']}")    print()    print("STEP 3: files to inspect")    print(f"predictions_csv: {REPORT_DIR / 'predictions.csv'}")    print(f"failure_report: {REPORT_DIR / 'failure_cases.md'}")    print(f"prediction_images: {OUTPUT_DIR}")

if __name__ == "__main__":    main()
ステップ 3:実行する
Section titled “ステップ 3:実行する”python vision_workshop.py次のような出力になれば成功です。
STEP 1: datasetimages: 51labels_csv: cv_workshop_run/data/labels.csv
STEP 2: evaluationclassification_accuracy: 1.000 (15/15)mean_box_iou: 0.909mean_mask_iou: 0.997failure_cases: 7
STEP 3: files to inspectpredictions_csv: cv_workshop_run/reports/predictions.csvfailure_report: cv_workshop_run/reports/failure_cases.mdprediction_images: cv_workshop_run/outputs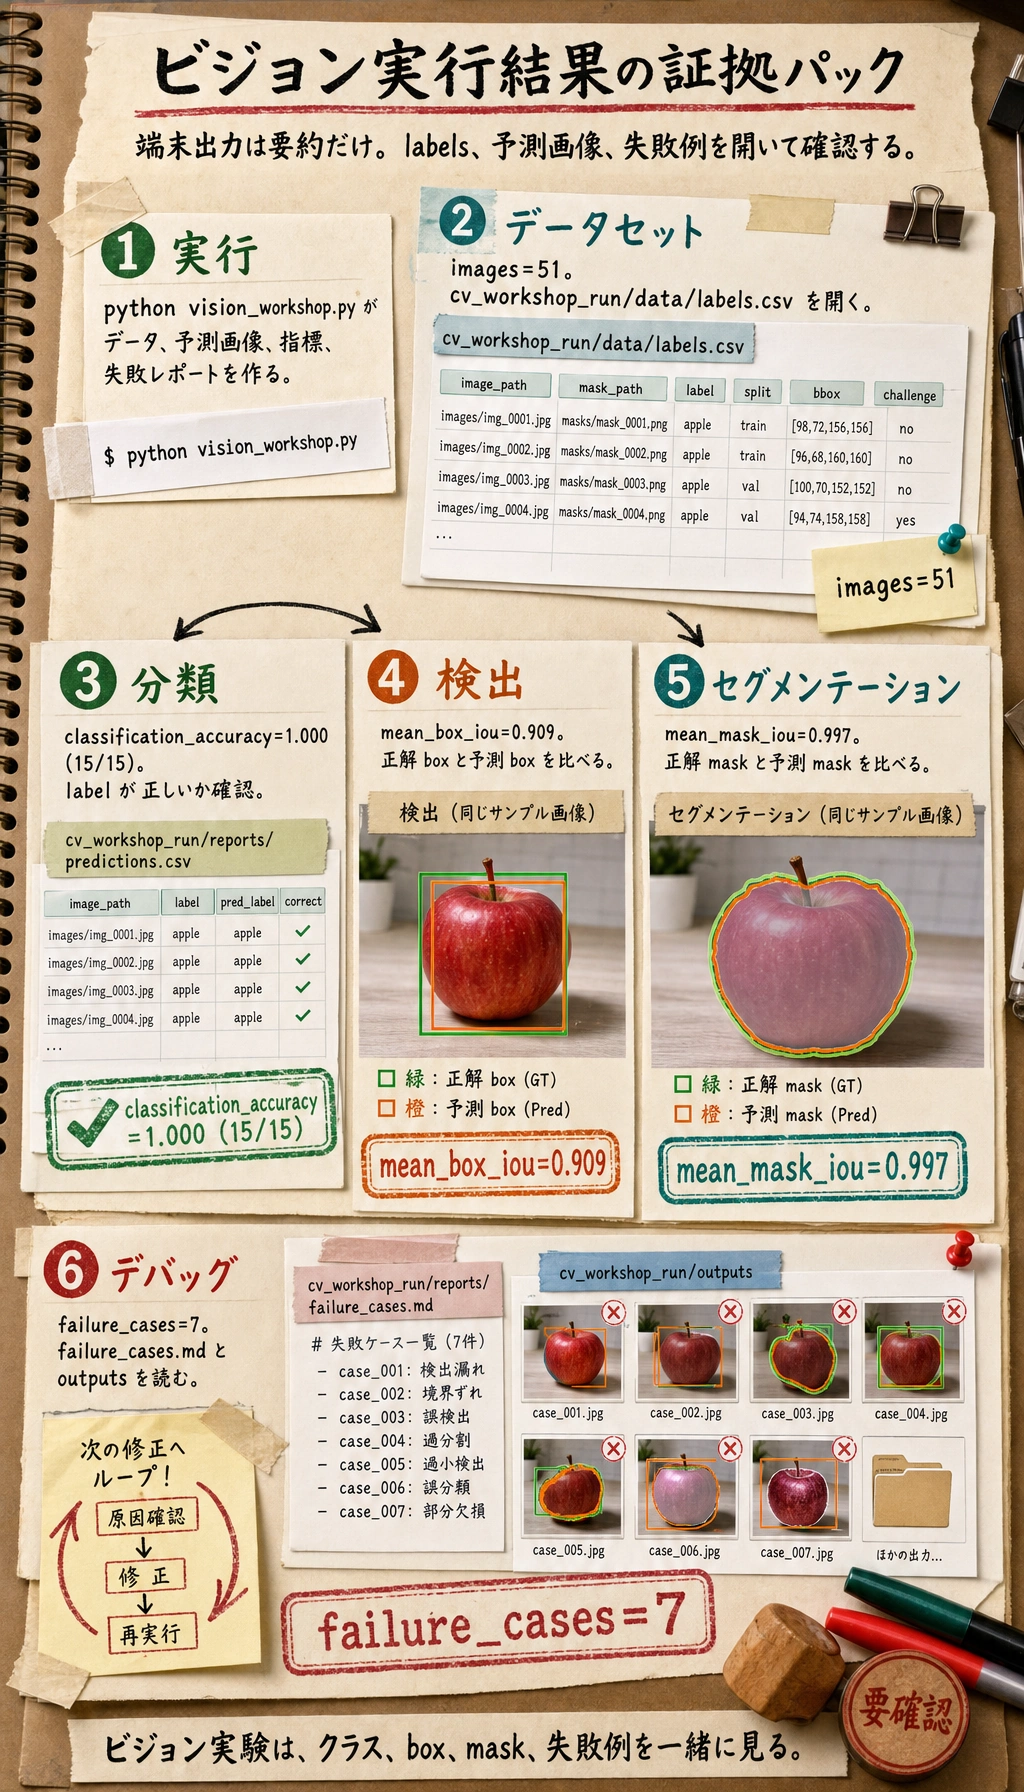
OpenCV のビルドによって小数は少し変わることがありますが、フォルダ構造とレポートファイルは同じになります。
ステップ 4:データセットを確認する
Section titled “ステップ 4:データセットを確認する”cv_workshop_run/data/labels.csv を開きます。1 行が 1 サンプルです。重要な列は次の通りです。
| 列 | 意味 |
|---|---|
image_path | 入力画像ファイル名 |
mask_path | 正解 mask ファイル名 |
label | クラスラベル |
split | train または test |
x1, y1, x2, y2 | 正解 bounding box |
challenge | 通常サンプルか難しいサンプルか |
この CSV は 3 種類のタスクを同時につないでいます。
- 分類は
labelを使う。 - 検出は
x1, y1, x2, y2を使う。 - 分割は
mask_pathを使う。
ステップ 5:パイプラインを普通の言葉で読む
Section titled “ステップ 5:パイプラインを普通の言葉で読む”スクリプトは小さいですが、実際のプロジェクトと同じ骨格を持っています。
create_dataset()が画像、mask、ラベル、box を生成する。segment_foreground()が grayscale、blur、Otsu threshold、morphology で前景領域を探す。largest_box()が segmentation mask から bounding box を作る。extract_features()が物体を数値特徴量に変換する。train_centroid_classifier()がクラスごとの代表特徴量を作る。predict_label()が最も近いクラスを選ぶ。evaluate()が指標、予測画像、失敗例を保存する。
これは深層学習モデルに勝つための例ではありません。プロジェクトの骨組みを理解するための例です。あとから次のように差し替えられます。
- centroid classifier を CNN や事前学習済み分類器にする。
largest_box()を YOLO 系の検出器にする。segment_foreground()を分割モデルにする。
ステップ 6:指標を理解する
Section titled “ステップ 6:指標を理解する”ビジョンプロジェクトを信頼する前に、1 つの指標だけを見ないようにします。
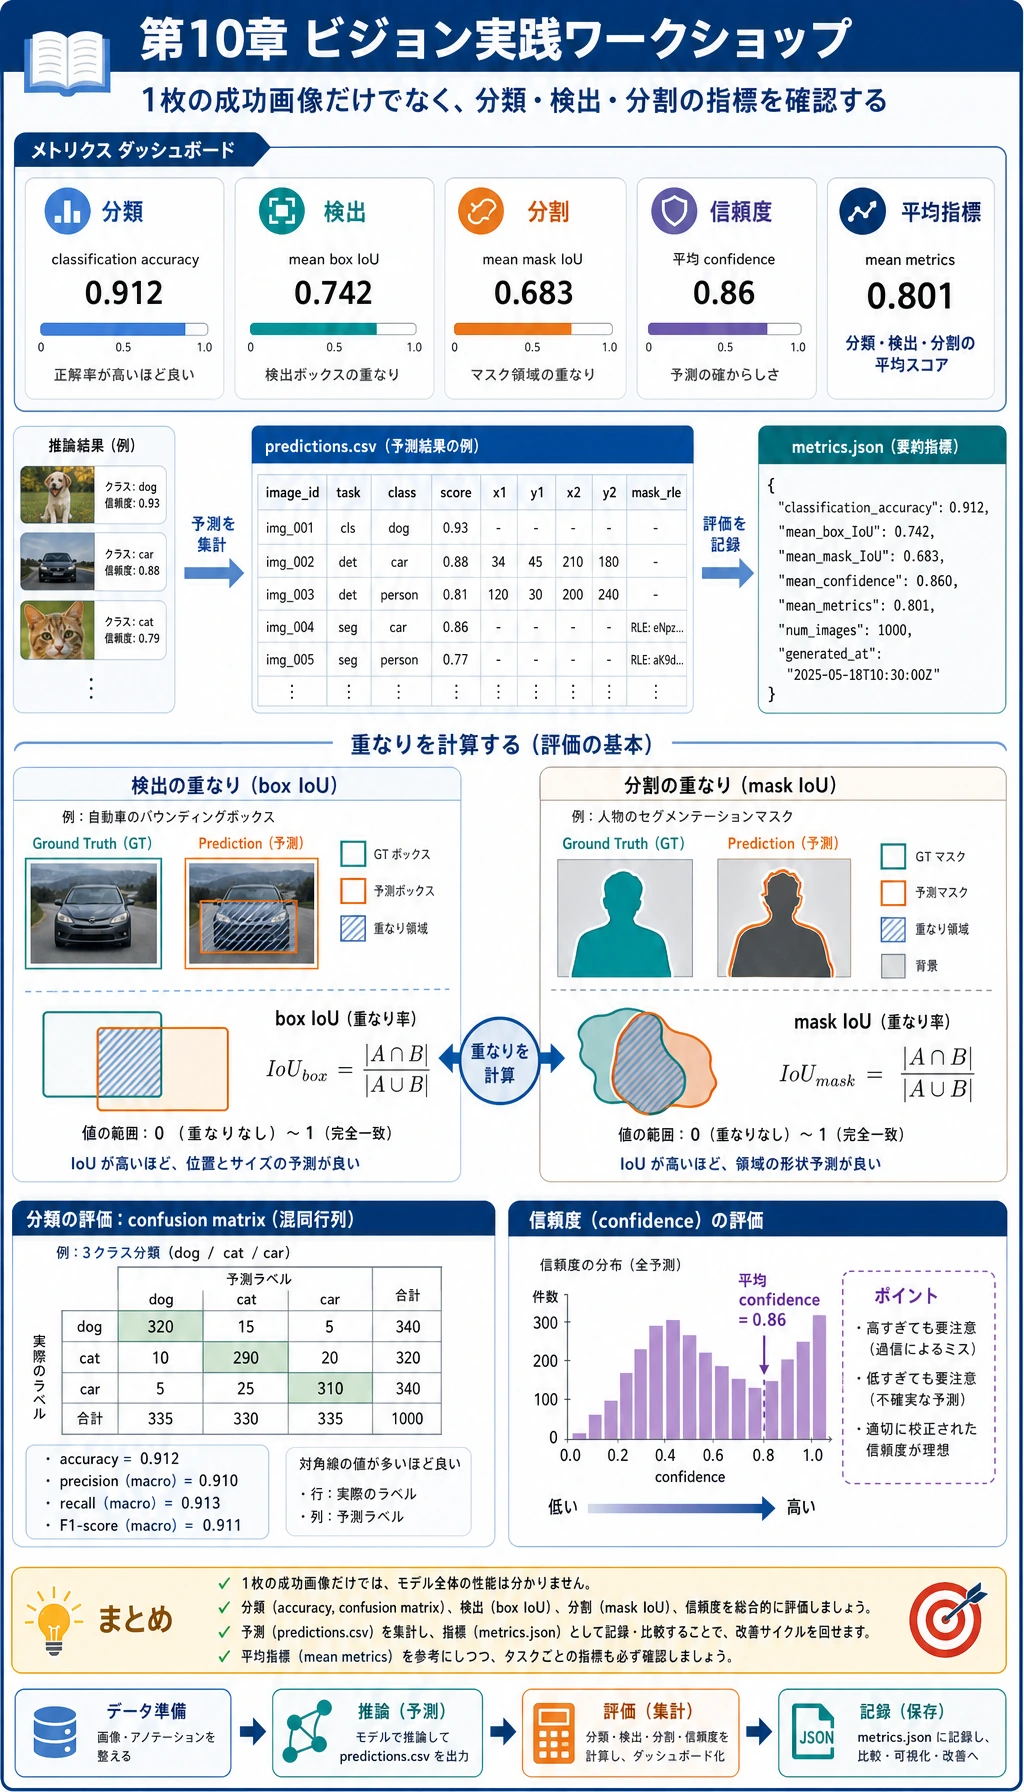
| 指標 | 何を見るか | なぜ重要か |
|---|---|---|
classification_accuracy | クラスラベルが正しいか | 分類には有用だが、検出や分割には不十分 |
confusion | どのクラスが混同されるか | クラス単位のミスを見つける |
box_iou | 予測 box と正解 box の重なり | 検出評価の基本的な考え方 |
mask_iou | 予測 mask と正解 mask の重なり | 分割評価の基本的な考え方 |
confidence | 単純分類器がどれだけ確信しているか | ラベルが合っていても怪しいサンプルを見つけられる |
なぜ classification_accuracy が 1.000 でも failure_cases が 0 ではないのでしょうか。ビジョンプロジェクトでは、クラスは当たっていても、box が弱い、mask が弱い、confidence が低い、ということがあるからです。実プロジェクトではこの違いがとても重要です。
ステップ 7:予測画像を確認する
Section titled “ステップ 7:予測画像を確認する”cv_workshop_run/outputs/ の画像を開きます。
各出力画像には次のものがあります。
- 緑の box:正解 box。
- 赤の box:予測 box。
- テキストラベル:
true=... pred=...。
赤い box と緑の box がうまく重ならない場合、分類が正しくても検出品質はまだ十分ではありません。
ステップ 8:失敗レポートを読む
Section titled “ステップ 8:失敗レポートを読む”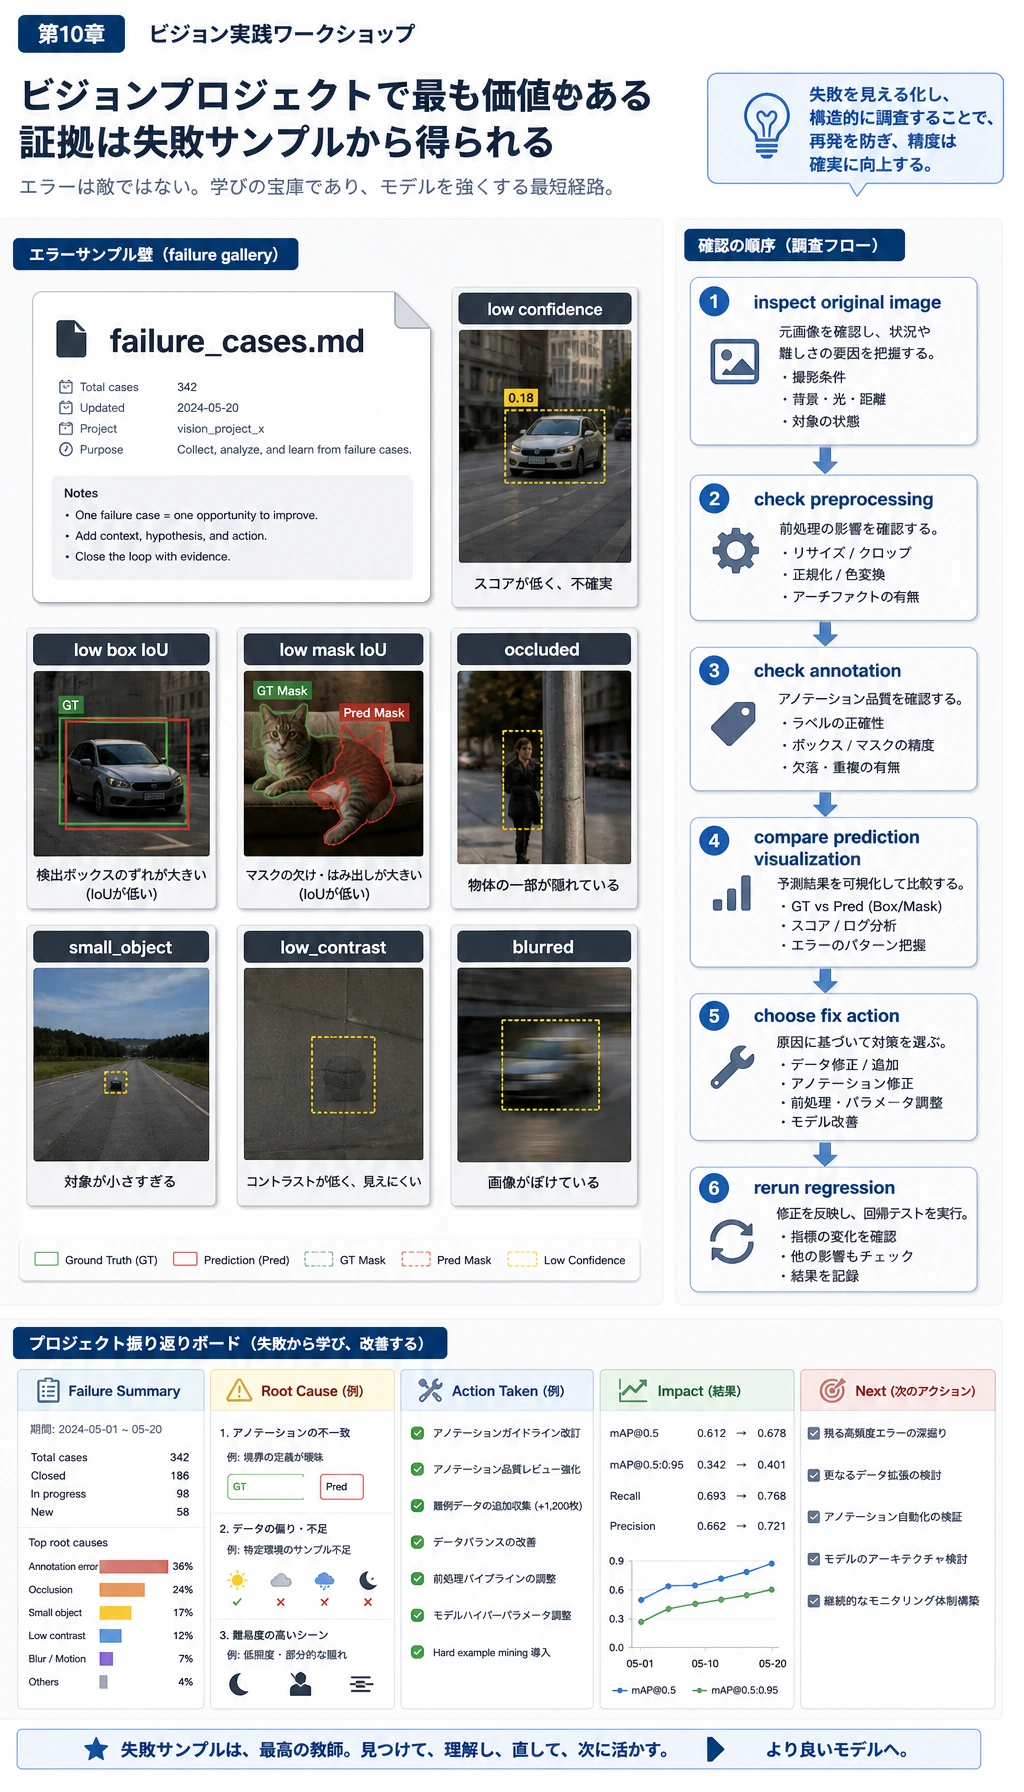
次を開きます。
cv_workshop_run/reports/failure_cases.md有用な失敗レポートは、単に「間違い」と書くだけではありません。どの証拠によって怪しいと判断したかを書きます。
- confidence が低い。
- box IoU が低い。
- mask IoU が低い。
- occlusion がある。
- small object である。
- low contrast である。
- blur や edge-touching object がある。
初心者が「モデルが悪い」と言ったときは、もう少し具体的に問い直します。
- 画像は不鮮明か。
- アノテーションは正しいか。
- 物体が小さすぎないか。
- 前処理が信号を壊していないか。
- 指標のしきい値が厳しすぎないか。
ステップ 9:よくあるエラーと直し方
Section titled “ステップ 9:よくあるエラーと直し方”-
ModuleNotFoundError: No module named 'cv2'現在の Python 環境に OpenCV が入っていません。環境を有効化してpip install opencv-python numpyを実行します。 -
出力フォルダが空 想定と違うフォルダで実行している可能性があります。
pwdを確認し、プロジェクトフォルダで再実行します。 -
すべての mask が空に見える コントラストが低く、threshold が失敗している可能性があります。元画像を確認し、コントラスト調整や別の分割方法を試します。
-
accuracy は高いが failure report が空ではない ラベルは正しくても、box、mask、confidence に問題が残ることがあります。正常な状況として、失敗例を確認します。
-
スクリプト編集後に指標が変わった 乱数、しきい値、画像操作が変わった可能性があります。seed を残し、README に変更内容を書きます。
ステップ 10:練習タスク
Section titled “ステップ 10:練習タスク”順番に試してみてください。
starという 4 つ目のクラスを追加する。challenge_planを変更し、より多くの test サンプルをblurredやoccludedにする。box_iouの失敗しきい値を0.75から0.60に下げ、failure_cases.mdを比較する。- original、mask、prediction を横に並べた画像を保存する。
- baseline が動いたあと、centroid classifier を小さな CNN や事前学習済み分類器に置き換える。
操作例と確認ポイント
starを追加するときは、ラベル一覧、サンプル生成、そして 3 クラス前提の説明や指標をそろえて更新します。再実行したあと、最終 accuracy だけでなく失敗例の変化も確認します。challenge_planはモデルと分割を変えず、ぼかしと遮蔽を少しずつ増やします。どの失敗モードが最初に増えるかを見るのが目的です。box_iouのしきい値を下げたら、failure_cases.mdはスコア表ではなくデバッグ材料として読みます。偽陽性と偽陰性の動きを一緒に見ます。- 横並びの画像は、毎回同じ尺度と順番にそろえると見やすくなります。original、mask、prediction の 3 枚が最小の実用セットです。
- centroid classifier の置き換えは、まず baseline の弱点を説明できるようになってから行います。小さな CNN や事前学習済み分類器は次の一手です。
期待される成果: 1 つの変更、1 つの指標変化、1 つの失敗例を含む短い比較メモ。
このワークショップは、次ができたら完了です。
python vision_workshop.pyを実行できた。labels.csvを開いて意味を説明できた。- 予測画像を少なくとも 3 枚確認した。
metrics.jsonとpredictions.csvを読んだ。- 失敗例を 1 つ選び、短く原因を説明した。
画像ファイル、アノテーション、予測可視化、指標、失敗分析をなぜ一緒に残す必要があるのか説明できれば、第 10 章でいちばん大事な一線を越えています。単に「モデルを動かす」のではなく、再現可能なビジョンプロジェクトを作れる状態になっています。
このページを終えたら、この evidence card を残します。
- タスク出力
- 分類ラベル、検出ボックス、セグメンテーションマスク、OCR テキスト、または動画イベント
- 成果物
- 元画像、処理後画像、予測オーバーレイ、metrics ファイル、失敗サンプル
- 指標
- accuracy/F1、mAP、IoU、Dice、レイテンシ、またはシナリオ別レビュー評価
- 失敗確認
- データ品質、ラベル誤り、前処理不一致、閾値、または本番制約
- 期待される成果
- ビジュアル出力と短い失敗レポートを含む再現可能な実行フォルダ