
6.3.2 卷积基础
- 解释为什么太早 flatten 图像很浪费。
- 手算一个卷积输出值。
- 理解 kernel、stride、padding、channel 和 feature map。
- 用 PyTorch 验证输出 shape。
- 解释为什么堆叠卷积会扩大感受野。
先看滑动窗口
Section titled “先看滑动窗口”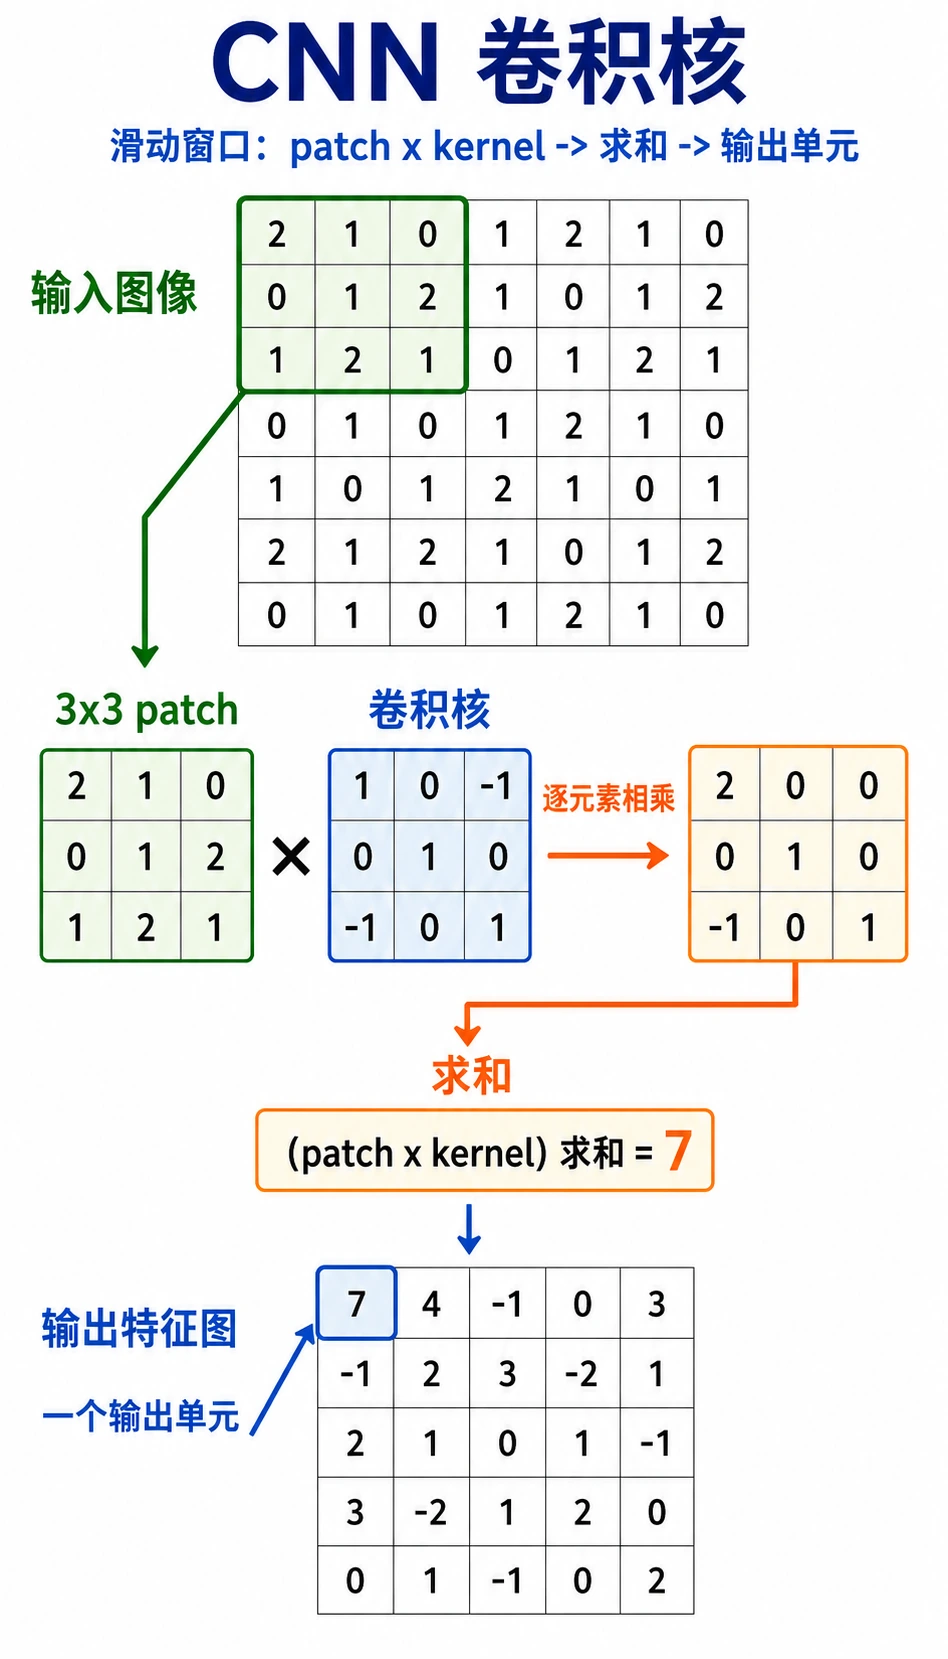
按这个顺序读图:
小窗口和 kernel 逐元素相乘求和一个输出值滑动并重复
卷积核就是一个小型模式检测器。它不是一次看完整张图,而是扫描局部区域,并把得分写进 feature map。
为什么不先把图像 flatten?
Section titled “为什么不先把图像 flatten?”一张 32 x 32 灰度图有 1024 个像素。如果接一个输出为 512 的全连接层,需要:
1024 * 512 = 524288 个权重一张 224 x 224 x 3 彩色图有 150528 个输入值。朴素全连接层参数会爆炸,而且会忽略像素的位置关系。
卷积解决两个问题:
| 过早 flatten 的问题 | 卷积的做法 |
|---|---|
| 附近像素的空间关系丢失 | 看局部窗口 |
| 每个位置都需要单独权重 | 同一个 kernel 到处复用 |
| 参数数量增长很快 | 在整张图上共享参数 |
两个核心术语:
- 局部连接:每个输出只看一小块区域;
- 参数共享:同一个 kernel 扫描多个位置。
实验 1:手算卷积
Section titled “实验 1:手算卷积”import numpy as np
image = np.array( [ [1, 2, 0, 0], [5, 3, 0, 4], [2, 1, 3, 1], [0, 2, 1, 2], ], dtype=np.float32,)
kernel = np.array( [ [1, 0], [0, -1], ], dtype=np.float32,)
out = np.zeros((3, 3), dtype=np.float32)for i in range(3): for j in range(3): patch = image[i : i + 2, j : j + 2] out[i, j] = np.sum(patch * kernel)
print("manual_conv_lab")print(out)预期输出:
manual_conv_lab[[-2. 2. -4.] [ 4. 0. -1.] [ 0. 0. 1.]]左上角输出值:
patch = [[1, 2],         [5, 3]]
kernel = [[ 1,  0],          [ 0, -1]]
score = 1*1 + 2*0 + 5*0 + 3*(-1) = -2
这就是卷积的核心计算。
实验 2:把 kernel 当边缘检测器
Section titled “实验 2:把 kernel 当边缘检测器”这个横向 kernel 会比较相邻像素从左到右的变化。
import numpy as np
image = np.array(    [        [0, 0, 0, 0, 0],        [0, 0, 1, 1, 1],        [0, 0, 1, 1, 1],        [0, 0, 1, 1, 1],        [0, 0, 0, 0, 0],    ],    dtype=np.float32,)
kernel = np.array([[-1, 1]], dtype=np.float32)
out = np.zeros((5, 4), dtype=np.float32)for i in range(5):    for j in range(4):        patch = image[i : i + 1, j : j + 2]        out[i, j] = np.sum(patch * kernel)
print("edge_lab")print(out)
预期输出:
edge_lab[[0. 0. 0. 0.] [0. 1. 0. 0.] [0. 1. 0. 0.] [0. 1. 0. 0.] [0. 0. 0. 0.]]1 出现在图像从 0 变成 1 的边界位置。这也是为什么早期 CNN 层经常学到类似边缘的滤波器。
Stride、Padding 和输出尺寸
Section titled “Stride、Padding 和输出尺寸”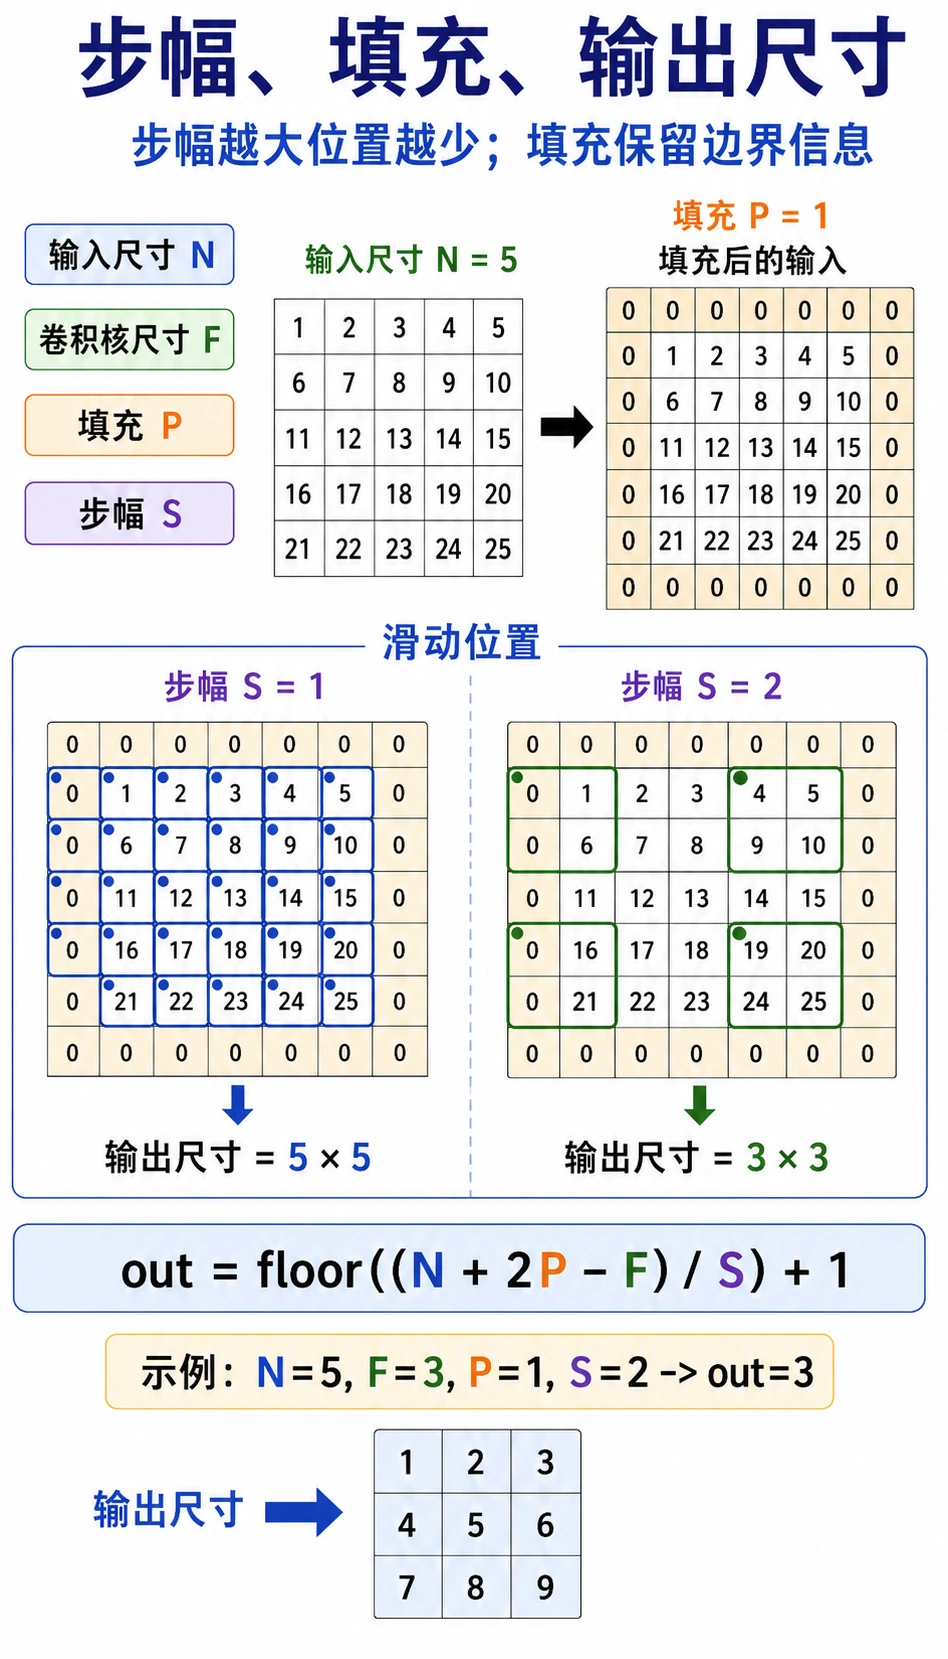
| 术语 | 含义 | 影响 |
|---|---|---|
kernel_size | 窗口大小 | kernel 越大,看见的局部区域越大 |
stride | 每次移动多远 | stride 越大,输出越小 |
padding | 给输入周围加边框 | 保留边缘信息并控制尺寸 |
单个空间维度的输出尺寸:
output = floor((input + 2*padding - kernel_size) / stride) + 1例子:
input=6, kernel_size=3, padding=1, stride=2output = floor((6 + 2*1 - 3) / 2) + 1 = 3用 PyTorch 验证:
import torchfrom torch import nn
x = torch.randn(1, 1, 6, 6)conv = nn.Conv2d(    in_channels=1,    out_channels=2,    kernel_size=3,    stride=2,    padding=1,)y = conv(x)
print("size_lab")print("input:", tuple(x.shape))print("output:", tuple(y.shape))
预期输出:
size_labinput: (1, 1, 6, 6)output: (1, 2, 3, 3)shape 按 [batch, channels, height, width] 读。
彩色图像有三个输入通道:红、绿、蓝。PyTorch 中一批 RGB 图像通常是:
[batch, 3, height, width]RGB 图像上的 3 x 3 卷积核实际 shape 是:
[out_channels, in_channels, kernel_height, kernel_width]运行:
import torchfrom torch import nn
x = torch.randn(2, 3, 32, 32)conv = nn.Conv2d(in_channels=3, out_channels=8, kernel_size=3, padding=1)y = conv(x)
print("channel_lab")print("input:", tuple(x.shape))print("output:", tuple(y.shape))print("weight:", tuple(conv.weight.shape))print("bias:", tuple(conv.bias.shape))
预期输出:
channel_labinput: (2, 3, 32, 32)output: (2, 8, 32, 32)weight: (8, 3, 3, 3)bias: (8,)解释:
2:batch 里有两张图;3:RGB 输入通道;8:八个学到的输出 feature map;(8, 3, 3, 3):八个 kernel,每个都看三个输入通道。
感受野:CNN 如何随深度看得更大
Section titled “感受野:CNN 如何随深度看得更大”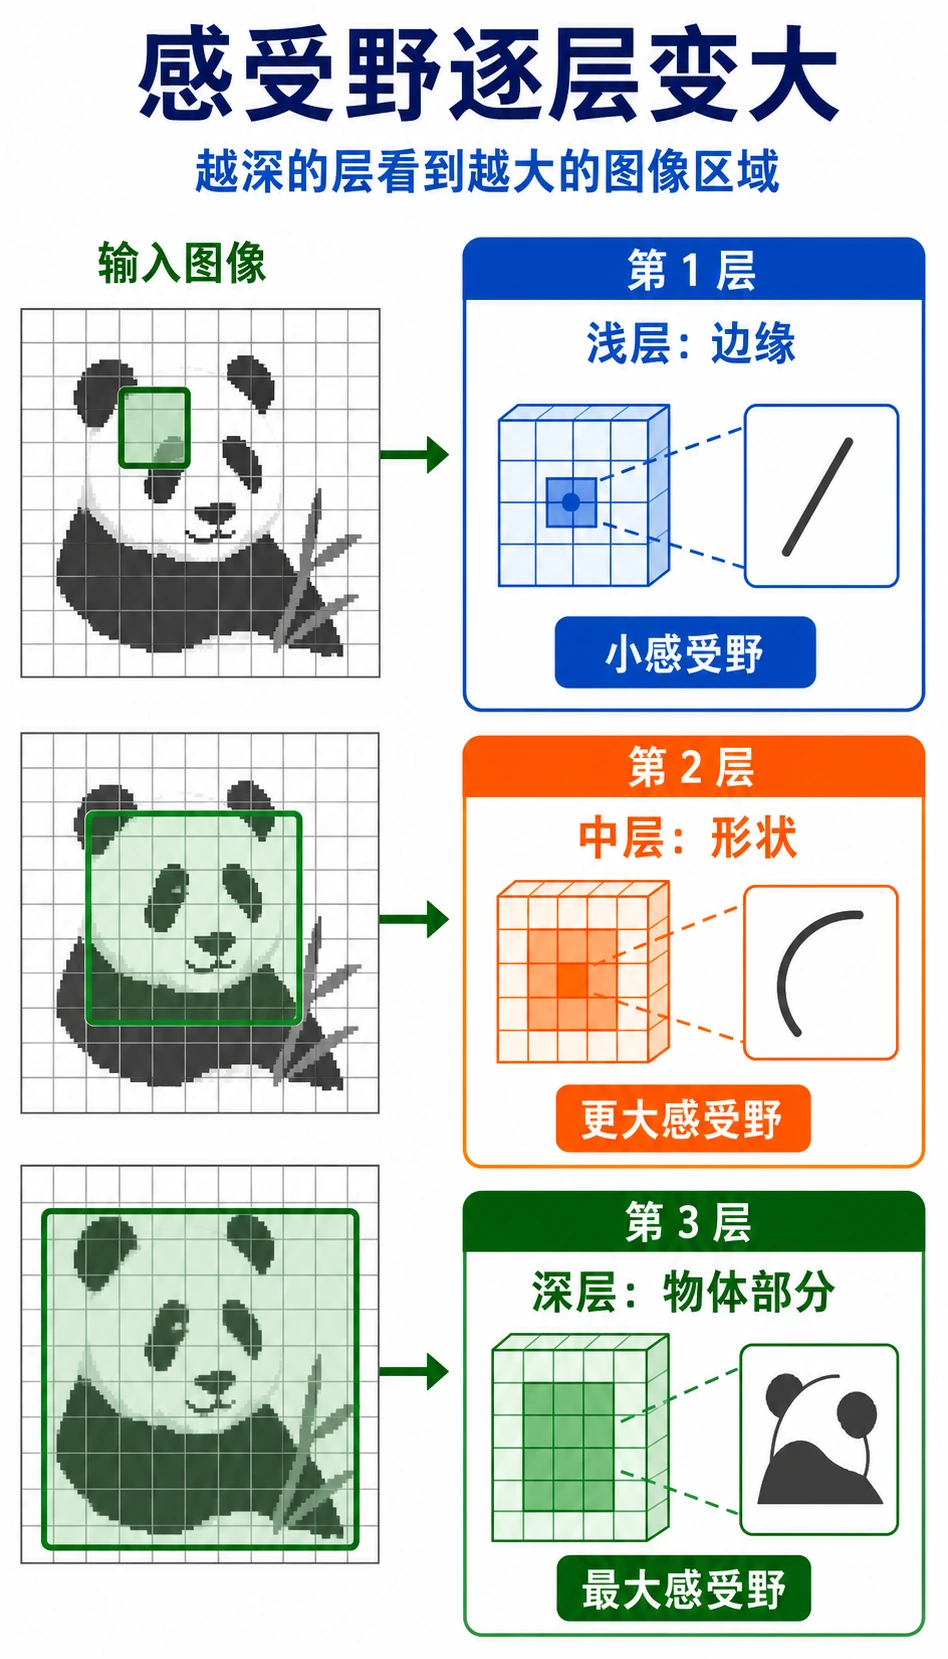
一层 3 x 3 卷积只能看很小的局部区域。如果堆叠多层,后面的特征会间接依赖原图中更大的区域。
直觉:
| 层深度 | 常学到什么 |
|---|---|
| 浅层 | 边缘、颜色变化、纹理 |
| 中层 | 角点、简单形状、部件 |
| 深层 | 更大的物体部件和语义模式 |
这就是 CNN 适合图像的原因:小局部线索可以逐层组合成更大的视觉概念。
基础 Conv2d 检查清单
Section titled “基础 Conv2d 检查清单”import torchfrom torch import nn
x = torch.randn(1, 1, 8, 8)conv = nn.Conv2d( in_channels=1, out_channels=4, kernel_size=3, stride=1, padding=1,)y = conv(x)
print("conv2d_lab")print("input:", tuple(x.shape))print("output:", tuple(y.shape))print("weight:", tuple(conv.weight.shape))print("bias:", tuple(conv.bias.shape))预期输出:
conv2d_labinput: (1, 1, 8, 8)output: (1, 4, 8, 8)weight: (4, 1, 3, 3)bias: (4,)读任何 Conv2d 时,先问:
- 输入 shape
[N, C, H, W]是什么? in_channels是否等于输入的C?out_channels会创建多少个 feature map?kernel_size、stride、padding会怎样改变H和W?
每个卷积实验都保存一条 shape 方程:
- 输入形状
- [N, C_in, H, W]
- 卷积核
- [C_out, C_in, kH, kW]
- 输出形状
- [N, C_out, H_out, W_out]
- 含义
- C_out 特征图扫描局部区域
如果这条记录清楚,卷积就会变成 shape 和局部模式操作,而不是神秘图像层。
| 错误 | 为什么有问题 | 修复 |
|---|---|---|
在 PyTorch 里用 [H, W, C] | PyTorch 期待 [N, C, H, W] | 从图像库转换时用 permute |
in_channels 写错 | Conv2d 接不上输入 | 层前打印 x.shape |
| 忘记 padding | feature map 意外变小 | 计算输出尺寸或打印 shape |
| 把卷积当魔法 | 很难调试 feature | 记住 patch * kernel -> sum |
| 太早 flatten | 空间结构丢失 | 先用 conv block,再接 classifier head |
- 改变手写
2 x 2kernel,观察输出如何变化。 - 手算实验 1 的
out[1, 0],和输出对照。 - 把 size lab 里的
stride改成1,输出 shape 变成什么? - 把 channel lab 里的
out_channels改成16,哪些 shape 会变? - 用
permute把图像样式张量从[N, H, W, C]转成[N, C, H, W]。
参考实现与讲解
- 改 kernel 就是在改变模型关注的局部模式。边缘、平滑、锐化等 kernel 会让输出图呈现完全不同的响应。
out[1, 0]来自输入窗口[1, 2; 4, 5]与 kernel 逐元素相乘再求和;手算结果应该和程序打印值一致。stride=1会让窗口移动更密,输出空间尺寸通常变大。用公式floor((W - K + 2P) / S) + 1验证。out_channels=16会改变卷积输出的 channel 维度,也会影响下一层接收的in_channels。- PyTorch 卷积默认使用
[N, C, H, W]。从图像库常见格式转换时使用x.permute(0, 3, 1, 2)。
- 卷积比过早 flatten 更能保留局部空间结构。
- kernel 是在不同位置共享的小型模式检测器。
stride和padding控制 kernel 如何移动,以及输出尺寸如何变化。- 多通道卷积会综合多个输入通道的信息。
- 堆叠卷积层会扩大感受野,并建立视觉层级。