
1.2.3 Remote Repositories
Where this lesson fits
Section titled “Where this lesson fits”In this lesson, you will connect your local Git repository to GitHub. You will understand why remote repositories serve three purposes at the same time—backup, collaboration, and portfolio display—and learn how to sync code to the cloud with push, pull, and clone.
Learning objectives
Section titled “Learning objectives”- Create a repository on GitHub
- Configure SSH connections (no more password prompts)
- Master
git push,git pull, andgit clone - Write a good README.md
Why do we need a remote repository?
Section titled “Why do we need a remote repository?”So far, your Git history has only existed on your own computer. If the hard drive fails, all your code and history will be gone.
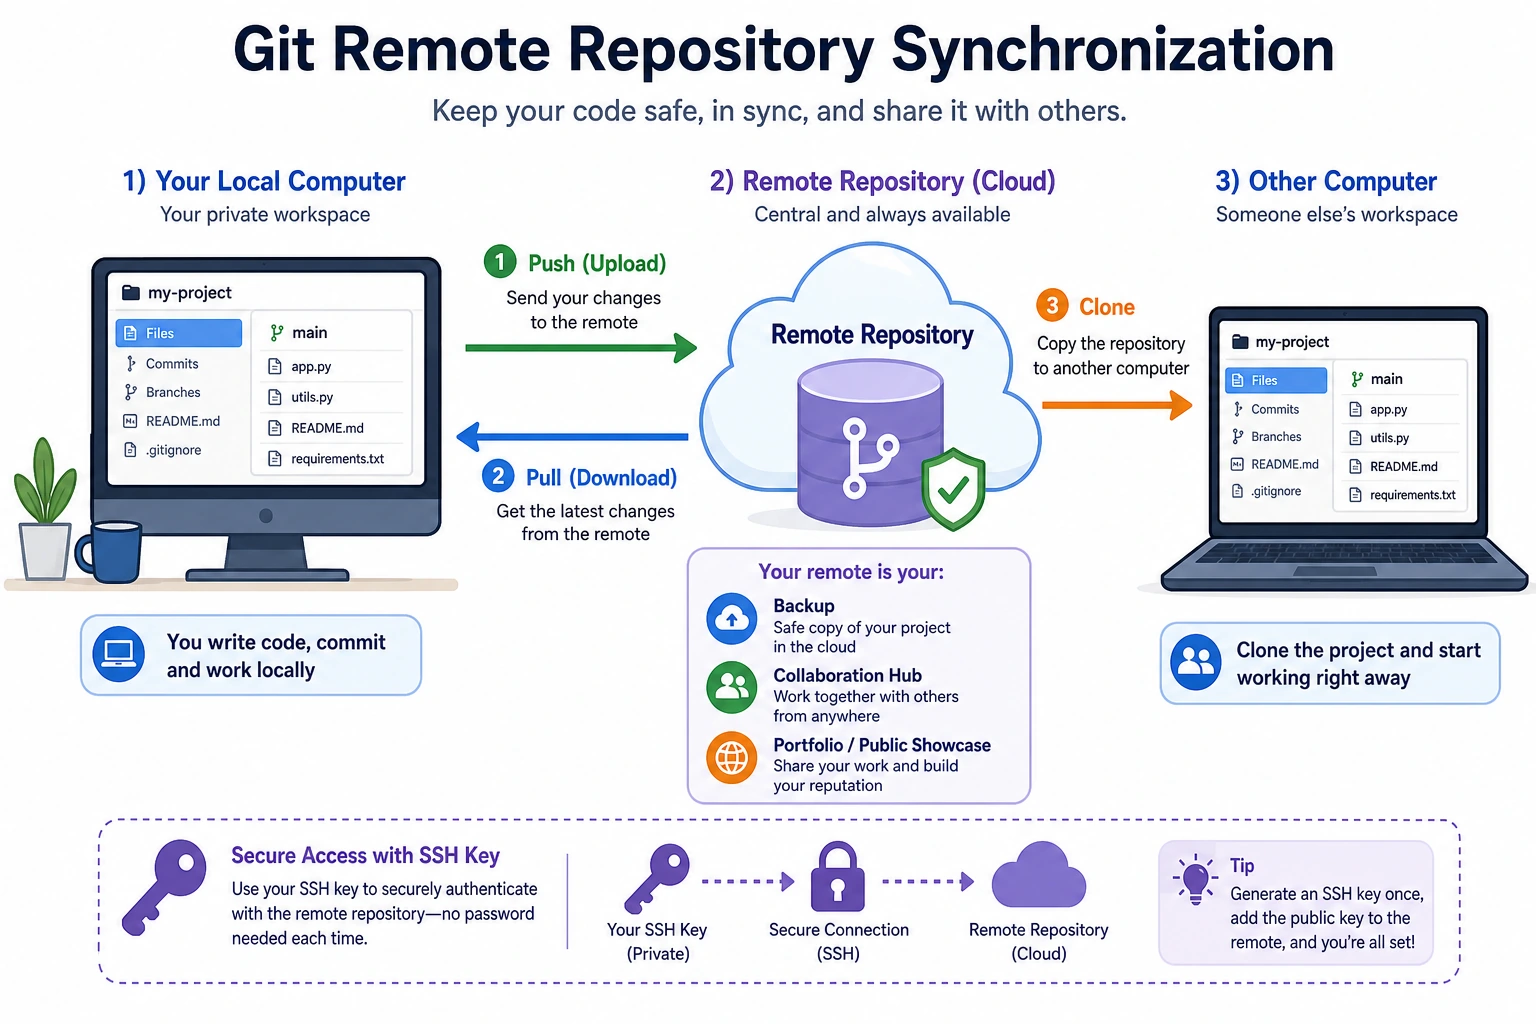
A remote repository is a copy of your code stored in the cloud, usually on GitHub. It has three core benefits:
- Backup — if your computer breaks, your code is still in the cloud
- Collaboration — multiple people can push code to the same repository
- Showcase — your GitHub profile is your code portfolio, and employers will look at it during interviews
Sign up for GitHub
Section titled “Sign up for GitHub”- Open github.com
- Click Sign up and register with your email
- It is recommended to use an English username that is short and easy to remember (for example,
zhangsan-dev), because it will appear in your project links
Configure SSH connections
Section titled “Configure SSH connections”Every time you push code to GitHub, you need to verify your identity. SSH is the most convenient method—configure it once, and you will no longer need to enter a password.
Step 1: Generate an SSH key
Section titled “Step 1: Generate an SSH key”You will be asked a few questions. Just press Enter for all of them (use the default values):
Enter file in which to save the key (/Users/your-username/.ssh/id_ed25519): [Enter]Enter passphrase (empty for no passphrase): [Enter]Enter same passphrase again: [Enter]Step 2: Copy the public key
Section titled “Step 2: Copy the public key”# macOScat ~/.ssh/id_ed25519.pub | pbcopy
# Linuxcat ~/.ssh/id_ed25519.pub# Then manually copy the output
# Windows PowerShellGet-Content ~/.ssh/id_ed25519.pub | Set-ClipboardThe output will look like this (this is the public key and can be safely shared):
ssh-ed25519 AAAAC3NzaC1lZDI1NTE5AAAAI... [email protected]Step 3: Add it to GitHub
Section titled “Step 3: Add it to GitHub”- Open github.com/settings/keys
- Click New SSH key
- Fill in
My Laptopin the Title field (or any name that helps you recognize which computer it is) - Paste the public key you just copied into the Key field
- Click Add SSH key
Step 4: Verify the connection
Section titled “Step 4: Verify the connection”If you see:
Hi zhangsan! You've successfully authenticated, but GitHub does not provide shell access.then the setup was successful!
Create a remote repository and push code
Section titled “Create a remote repository and push code”Example: Push our earlier AI project to GitHub
Section titled “Example: Push our earlier AI project to GitHub”Method 1: Create the repository on GitHub first, then connect your local project
Section titled “Method 1: Create the repository on GitHub first, then connect your local project”Step 1: Create a repository on GitHub
- Open github.com/new
- Set the Repository name to
ai-image-classifier - Set the Description to “A simple image classification project using CNN”
- Choose Public (so others can see your work)
- Do not check “Add a README file” (we already have one locally)
- Click Create repository
Step 2: Connect the local repository to GitHub
GitHub will show you a set of commands. We need the section for “push an existing repository”:
cd ai-image-classifier
# Connect the remote repository (replace zhangsan with your GitHub username)
# Push the local code to GitHubgit push -u origin maingit remote add origin means: give the remote repository the name origin (this is the conventional name), and use the URL that comes after it.
-u origin main means: associate the local main branch with the remote main branch. After that, you only need to run git push; you no longer need to type the full command.
Step 3: Verify
Refresh the GitHub page, and you should see your code, commit history, and README there.
Method 2: Clone an empty repository first, then add files to it
Section titled “Method 2: Clone an empty repository first, then add files to it”If you do not have local code yet, you can do the reverse:
# Clone an empty repository from GitHub (or someone else's project)cd my-new-project
# Write code inside it...echo "print('hello')" > main.py
# Commit and pushgit add .git commit -m "Add main program"git pushDaily push and pull workflow
Section titled “Daily push and pull workflow”After you connect the remote repository, daily work becomes very simple:
git push: push new local commits to the remote
Section titled “git push: push new local commits to the remote”# Write some new codeecho "new feature" >> src/utils.pygit add .git commit -m "Add data preprocessing function"
# Push to GitHubgit pushgit pull: pull remote updates to your local machine
Section titled “git pull: pull remote updates to your local machine”# Suppose you made changes on another computer (or a teammate did) and pushed them to GitHub# You need to pull the latest code downgit pullThe rhythm in real work
Section titled “The rhythm in real work”# Before starting work each day: pull the latest codegit pull
# Write code and make changes...
# After finishing a feature: commit and pushgit add .git commit -m "Complete the data augmentation module"git push
# Keep writing code...
# Finish another featuregit add .git commit -m "Add training log recording"git pushgit clone: download someone else’s project
Section titled “git clone: download someone else’s project”This may be the first Git operation you use: downloading an open-source project from GitHub:
# Clone an AI-related open-source projectcd yolov5lsgit clone does three things:
- Creates a folder with the same name as the project
- Downloads all the code and the full commit history
- Automatically configures the remote repository connection
Common actions after cloning
Section titled “Common actions after cloning”# View the commit history of this projectgit log --oneline -10 # View the latest 10 entries
# See which branches existgit branch -a
# View the remote repository URLgit remote -vWrite a good README.md
Section titled “Write a good README.md”The homepage of every GitHub project automatically displays the contents of README.md. A good README is the front door of your portfolio.
README template for AI projects
Section titled “README template for AI projects”# Project Name
A one-sentence introduction to what this project does.
## 📋 Project Overview
Use 2–3 sentences to describe the project background, the problem it solves, and the method it uses.
## ✨ Key Features
- Feature 1: trains a baseline image classifier- Feature 2: saves metrics and example predictions- Feature 3: documents how to rerun the experiment
## 🛠️ Tech Stack
- Python 3.11- PyTorch 2.0- Other libraries used
## 🚀 Quick Start
### Environment setup
```bashgit clone [email protected]:yourname/project.gitcd projectpip install -r requirements.txt```
### Run
```bashpython src/train.py```
## 📊 Experimental results
| Model | Accuracy | Training time ||------|:-----:|:------:|| SimpleCNN | 85.2% | 10 min || ResNet18 | 92.7% | 30 min |
## 📁 Project structure
```project/├── data/ # Data files├── models/ # Trained models├── src/│ ├── model.py # Model definition│ ├── train.py # Training script│ └── utils.py # Utility functions├── requirements.txt└── README.md```
## 📄 License
MITExample: Update the README for our project
Section titled “Example: Update the README for our project”# Write a README using the template above (simplified version)cat > README.md << 'READMEEOF'# AI Image Classifier
An introductory project that uses CNN to classify images on the CIFAR-10 dataset.
## Tech Stack
- Python 3.11- PyTorch 2.0
## Quick Start
```bashgit clone [email protected]:zhangsan/ai-image-classifier.gitcd ai-image-classifierpip install -r requirements.txtpython src/train.pyProject Structure
Section titled “Project Structure”ai-image-classifier/├── data/ # Data files (ignored by git)├── models/ # Model weights (ignored by git)├── src/│ ├── model.py # CNN model definition│ ├── train.py # Training script│ └── utils.py # Utility functions├── .gitignore├── requirements.txt└── README.mdREADMEEOF
git add README.md git commit -m “Improve README: add project description and usage” git push
---
## Evidence to Keep
Keep this page's proof of learning as a small evidence card:
```textrepo_state: git status before and after the operationoperation: init, add, commit, branch, merge, remote, pull, or push command usedhistory: git log or branch graph showing what changedfailure_check: untracked files, wrong branch, merge conflict, or remote/auth issueExpected_output: a clean Git trace that another learner can replay safely
Review notes and pass criteria
This page passes when the relationship between local and remote repositories can be checked by another person, not just when the commands have been typed.
Minimum evidence:
git remote -vshowsoriginpointing to the intended repository.git statusis clean after the push.git log --oneline -3shows the latest README or code commit.- The GitHub page shows the same commit and README.
- If push is rejected, you can explain the remote difference before running
git pulland resolving it.
Use git push -u origin main only for the first upstream link. After that, the daily rhythm is pull -> edit -> add -> commit -> push.
Common issues
Section titled “Common issues”Push rejected
Section titled “Push rejected”! [rejected] main -> main (fetch first)This means the remote repository has commits that you do not have locally (maybe you changed them on another computer, or a teammate pushed new code). The solution is:
git pull # First pull the remote updatesgit push # Then push againClone is very slow
Section titled “Clone is very slow”Cloning GitHub projects can be slow in some regions. Here are a few solutions:
# Option 1: Clone only the latest version (do not download full history), which is much faster
# Option 2: Use a mirror for acceleration# Replace github.com with a mirror site (please search for the latest available mirror URL)Pushed to the wrong repository
Section titled “Pushed to the wrong repository”# Check the currently connected remote repositorygit remote -v
# Change the remote repository URLSummary
Section titled “Summary”| Command | Purpose | When to use |
|---|---|---|
git remote add origin URL | Connect a remote repository | Before the first push for a new project |
git push | Push local commits to the remote | After finishing a feature |
git pull | Pull remote updates to local | Before starting work |
git clone URL | Download a remote repository to local | When you get a project for the first time |
Daily workflow: pull → write code → add → commit → push. It’s that simple.