
10.1.3 OpenCV Basics
Learning Objectives
Section titled “Learning Objectives”After completing this section, you will be able to:
- Use OpenCV to create, read, and save images
- Perform basic transformations such as resizing, cropping, and flipping
- Understand common color order issues in OpenCV
- Draw rectangles, circles, and text on images with OpenCV
Why do almost every CV beginner course start with OpenCV?
Section titled “Why do almost every CV beginner course start with OpenCV?”Because OpenCV is like the “Swiss Army knife” of computer vision:
- It can read and write images
- It can resize, rotate, and crop
- It can do filtering and edge detection
- It can do face detection and video processing
And it is very suitable for beginners to build an engineering mindset.
First create an image instead of relying on an external file
Section titled “First create an image instead of relying on an external file”To make the code run directly, let’s generate a blank image ourselves first.
import cv2import numpy as np
# Create a black canvas: height 240, width 320, 3 color channelsimg = np.zeros((240, 320, 3), dtype=np.uint8)
print("shape:", img.shape)print("dtype:", img.dtype)
cv2.imwrite("opencv_blank.png", img)print("Saved opencv_blank.png")
Expected output:
shape: (240, 320, 3)dtype: uint8Saved opencv_blank.pngHere, shape = (240, 320, 3) means:
- Height: 240
- Width: 320
- 3 color channels
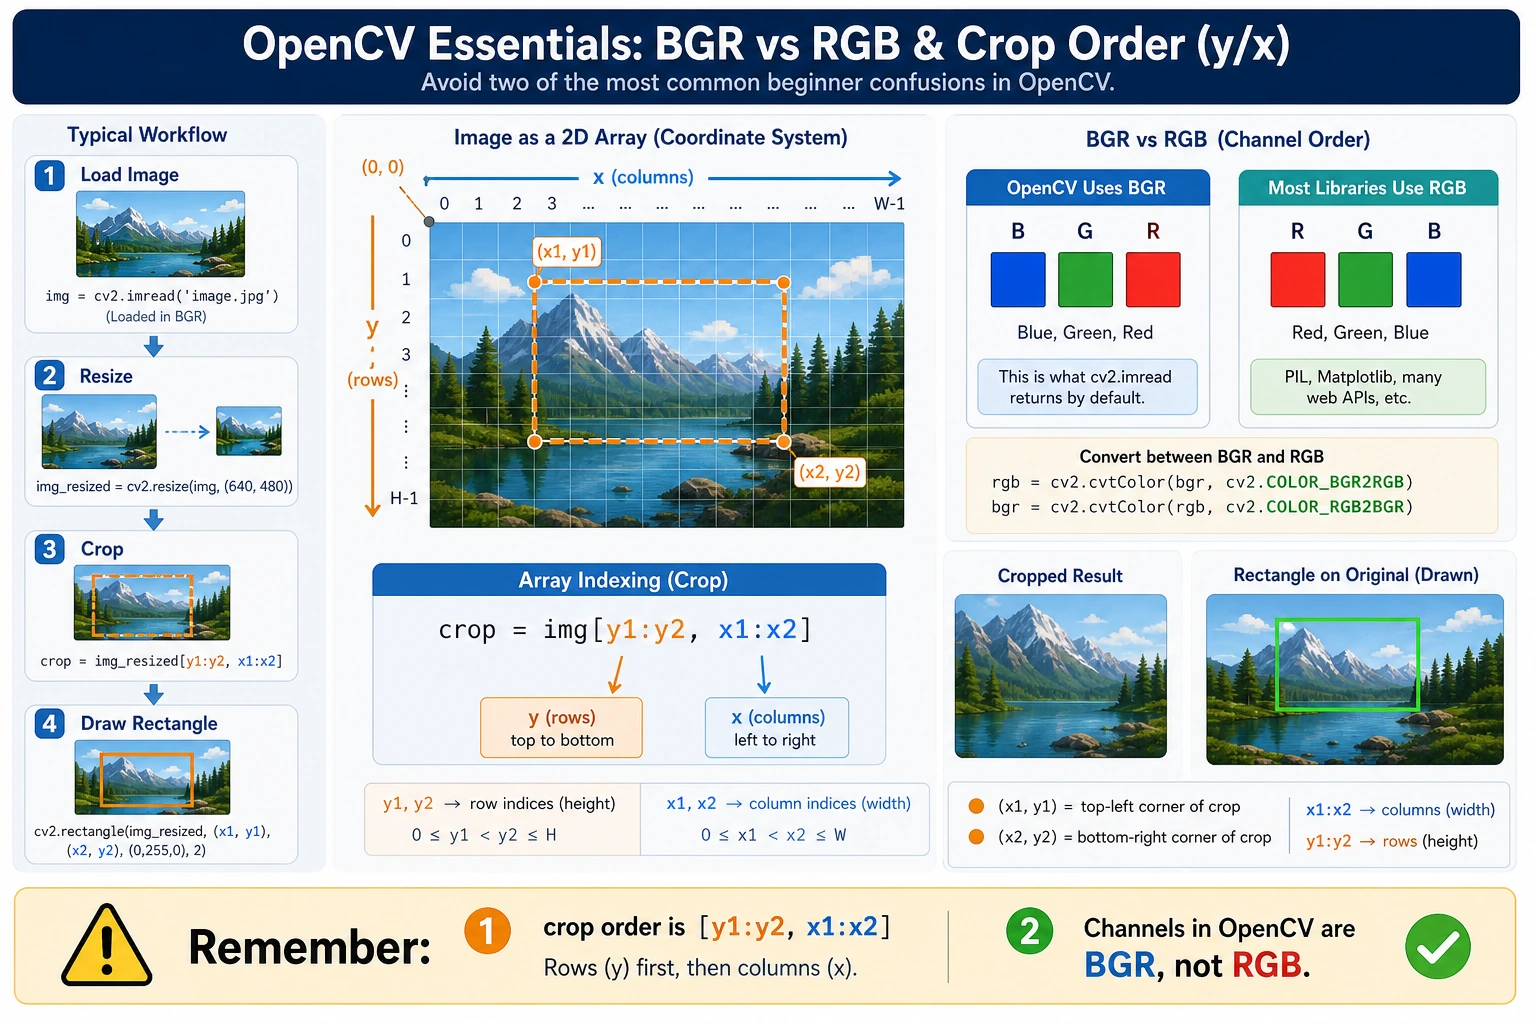
The color order in OpenCV is BGR, not RGB
Section titled “The color order in OpenCV is BGR, not RGB”This is a very classic pitfall.
OpenCV uses:
BGR
by default, not the RGB we are more familiar with.
import cv2import numpy as np
img = np.zeros((100, 100, 3), dtype=np.uint8)
# This color is BGR, not RGBimg[:, :] = (255, 0, 0)
cv2.imwrite("opencv_blue.png", img)print("Saved a blue image opencv_blue.png")
Expected output:
Saved a blue image opencv_blue.pngIf you think (255, 0, 0) is red, you will end up with a “wrong color” image.
Convert to RGB
Section titled “Convert to RGB”import cv2import numpy as np
img_bgr = np.zeros((2, 2, 3), dtype=np.uint8)img_bgr[:, :] = (255, 0, 0)
img_rgb = cv2.cvtColor(img_bgr, cv2.COLOR_BGR2RGB)
print("BGR pixel:", img_bgr[0, 0].tolist())print("RGB pixel:", img_rgb[0, 0].tolist())Expected output:
BGR pixel: [255, 0, 0]RGB pixel: [0, 0, 255]Evidence to Keep
Section titled “Evidence to Keep”Keep this page’s proof of learning as a small evidence card:
- Input Image
- source image or synthetic image used in the run
- Array Shape
- width, height, channels, dtype, and coordinate convention
- Processed Output
- grayscale, crop, edge, threshold, or saved intermediate image
- Failure Check
- channel order, resize distortion, coordinate mistake, or over-processing
- Expected Output
- before/after image plus the printed shape or pixel values
Common basic operations: resizing, cropping, flipping
Section titled “Common basic operations: resizing, cropping, flipping”import cv2import numpy as np
img = np.zeros((200, 300, 3), dtype=np.uint8)img[:, :] = (40, 180, 240)
# Resizesmall = cv2.resize(img, (150, 100))
# Crop: rows first, then columns, i.e. [y1:y2, x1:x2]crop = img[50:150, 80:220]
# Flipflip_horizontal = cv2.flip(img, 1)
print("Original image:", img.shape)print("After resizing:", small.shape)print("After cropping:", crop.shape)print("After horizontal flip:", flip_horizontal.shape)
cv2.imwrite("opencv_small.png", small)cv2.imwrite("opencv_crop.png", crop)cv2.imwrite("opencv_flip.png", flip_horizontal)Expected output:
- Original Image
- (200, 300, 3)
- After Resizing
- (100, 150, 3)
- After Cropping
- (100, 140, 3)
- After Horizontal Flip
- (200, 300, 3)
Why is cropping written as [y1:y2, x1:x2]?
Section titled “Why is cropping written as [y1:y2, x1:x2]?”Because an image is essentially a 2D array, and array indexing follows this order:
- Rows first (height direction,
y) - Then columns (width direction,
x)
Drawing on images
Section titled “Drawing on images”Many computer vision tasks need results marked on the image, such as:
- Drawing bounding boxes
- Labeling class names
- Marking center points
import cv2import numpy as np
canvas = np.ones((300, 400, 3), dtype=np.uint8) * 255
# Draw rectanglecv2.rectangle(canvas, (50, 50), (180, 180), (0, 255, 0), 2)
# Draw circlecv2.circle(canvas, (280, 120), 40, (255, 0, 0), -1)
# Draw linecv2.line(canvas, (30, 250), (350, 250), (0, 0, 255), 3)
# Write textcv2.putText(    canvas,    "CV Demo",    (120, 40),    cv2.FONT_HERSHEY_SIMPLEX,    1,    (0, 0, 0),    2)
cv2.imwrite("opencv_draw_demo.png", canvas)print("Saved opencv_draw_demo.png")
Expected output:
Saved opencv_draw_demo.pngConvert to a grayscale image
Section titled “Convert to a grayscale image”Many classic vision operations first convert a color image to grayscale because:
- It is faster to compute
- It removes color distractions
- It keeps only brightness information
import cv2import numpy as np
img = np.zeros((100, 100, 3), dtype=np.uint8)img[:, :50] = (0, 0, 255)      # Redimg[:, 50:] = (0, 255, 0)      # Green
gray = cv2.cvtColor(img, cv2.COLOR_BGR2GRAY)
print("Original image shape:", img.shape)print("Grayscale image shape:", gray.shape)print("First 5 pixels of grayscale image:", gray[0, :5].tolist())
cv2.imwrite("opencv_gray.png", gray)
Expected output:
Original image shape: (100, 100, 3)Grayscale image shape: (100, 100)First 5 pixels of grayscale image: [76, 76, 76, 76, 76]A small project: make an “info card” image
Section titled “A small project: make an “info card” image”This example combines the knowledge from above: creating an image, drawing shapes, writing text, and saving the result.
import cv2import numpy as np
card = np.ones((220, 420, 3), dtype=np.uint8) * 245
cv2.rectangle(card, (20, 20), (400, 200), (60, 120, 200), 2)cv2.circle(card, (80, 85), 35, (60, 120, 200), -1)
cv2.putText(card, "AI Fullstack", (140, 75), cv2.FONT_HERSHEY_SIMPLEX, 0.9, (30, 30, 30), 2)cv2.putText(card, "Chapter 10: CV Basics", (140, 115), cv2.FONT_HERSHEY_SIMPLEX, 0.7, (60, 60, 60), 2)cv2.putText(card, "OpenCV starter demo", (40, 170), cv2.FONT_HERSHEY_SIMPLEX, 0.7, (20, 20, 20), 2)
cv2.imwrite("opencv_info_card.png", card)print("Saved opencv_info_card.png")
Expected output:
Saved opencv_info_card.png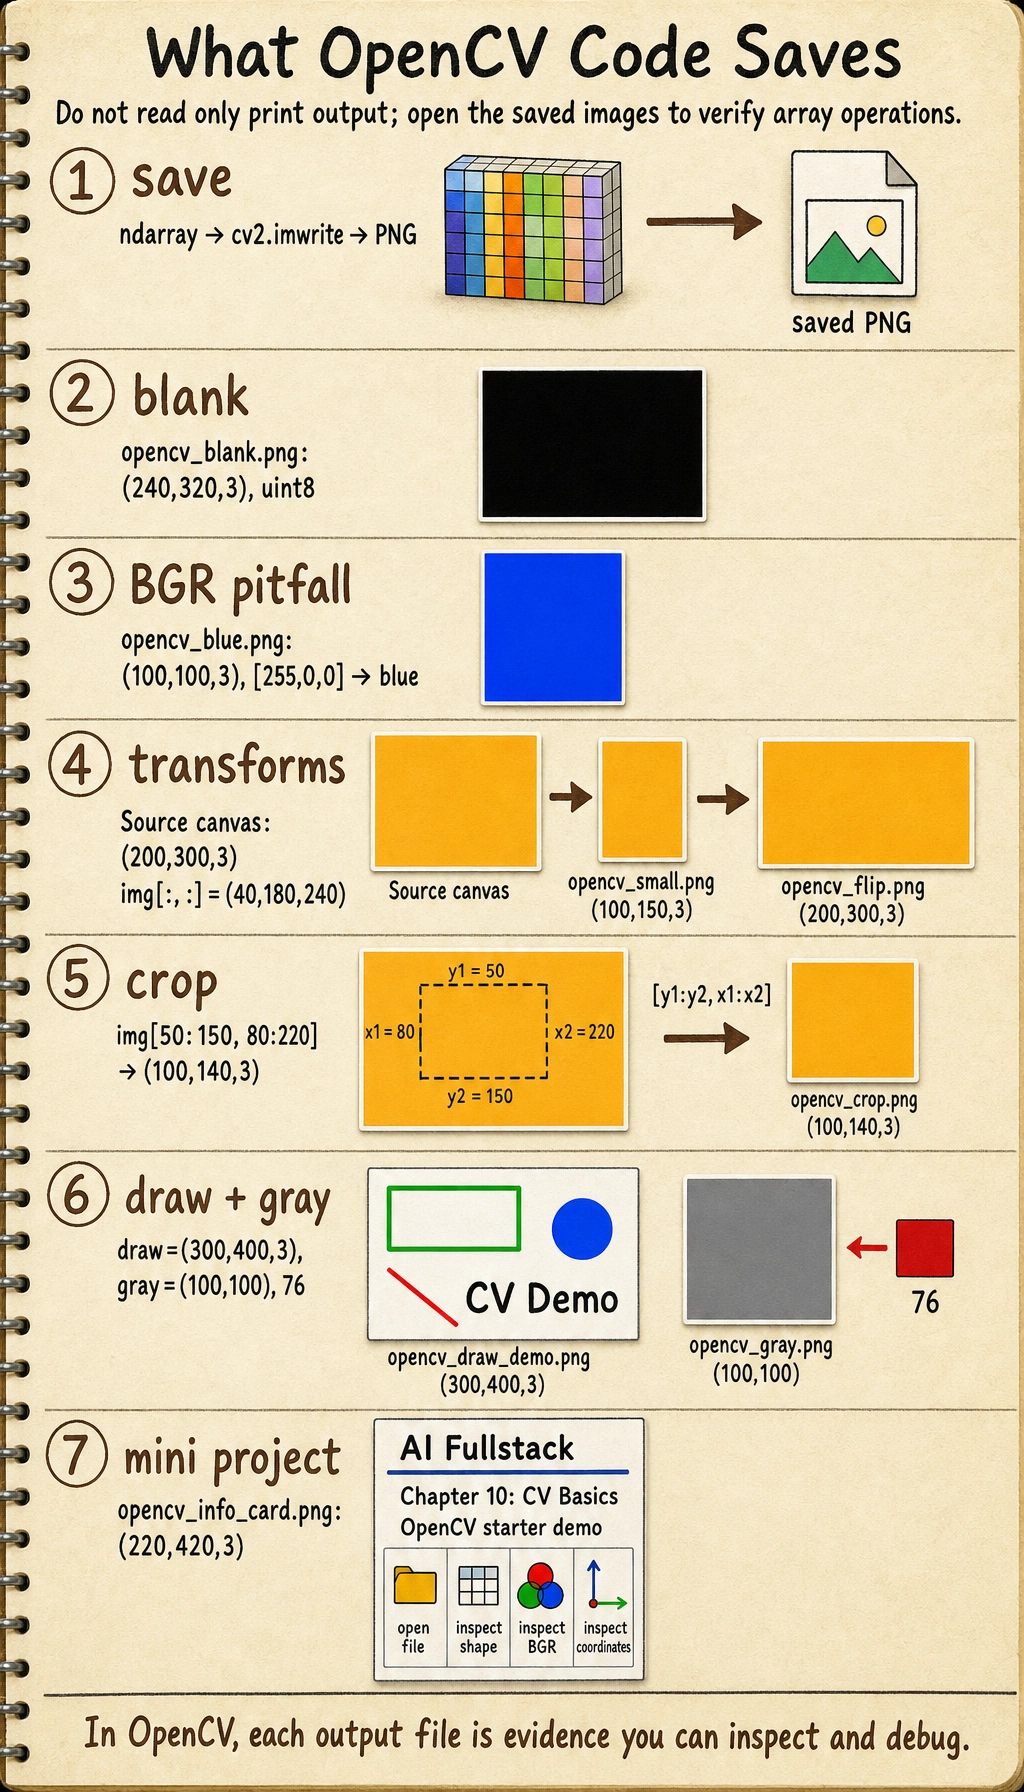
Common beginner mistakes
Section titled “Common beginner mistakes”cv2.imshow() does not open a window
Section titled “cv2.imshow() does not open a window”In many remote environments, notebooks, and server environments, imshow() is not convenient to use.
For teaching and script-based scenarios, it is recommended to use cv2.imwrite() to save the result first.
Treating BGR as RGB
Section titled “Treating BGR as RGB”This is one of the most common bugs for OpenCV beginners.
Reversing the x and y order when cropping
Section titled “Reversing the x and y order when cropping”Image array indexing is [y, x], not [x, y].
Summary
Section titled “Summary”The key point of this lesson is not to memorize every OpenCV API, but to build the feeling that “I can already manipulate images”:
- I can create images
- I can transform images
- I can annotate images
- I can save the results
With these basics, the next lesson on filtering, edge detection, and morphological operations will be much smoother.
Exercises
Section titled “Exercises”- Change the canvas color to another color and generate a new card image.
- Draw multiple rectangles and circles on the same image to practice the coordinate system.
- Try resizing the image to different resolutions and then save the results.
Solution approach and explanation
- If you use OpenCV drawing functions, remember that color tuples are usually BGR, not RGB. A correct new card should save successfully and show the intended color after you open it.
- For rectangles and circles, check that all coordinates stay inside the image. Drawing order matters: later shapes can cover earlier ones.
- Resizing changes the number of pixels. If the width-height ratio changes, the image is distorted, so keep both an intentionally distorted version and an aspect-ratio-preserving version when comparing.