
12.2.4 SD Applications
Learning Objectives
Section titled “Learning Objectives”- Understand the most common application forms of Stable Diffusion
- Distinguish text-to-image, image-to-image, inpainting, and style control
- Understand why real-world applications are usually “model + workflow”
- Build a systematic intuition for SD product forms
First, Build a Map
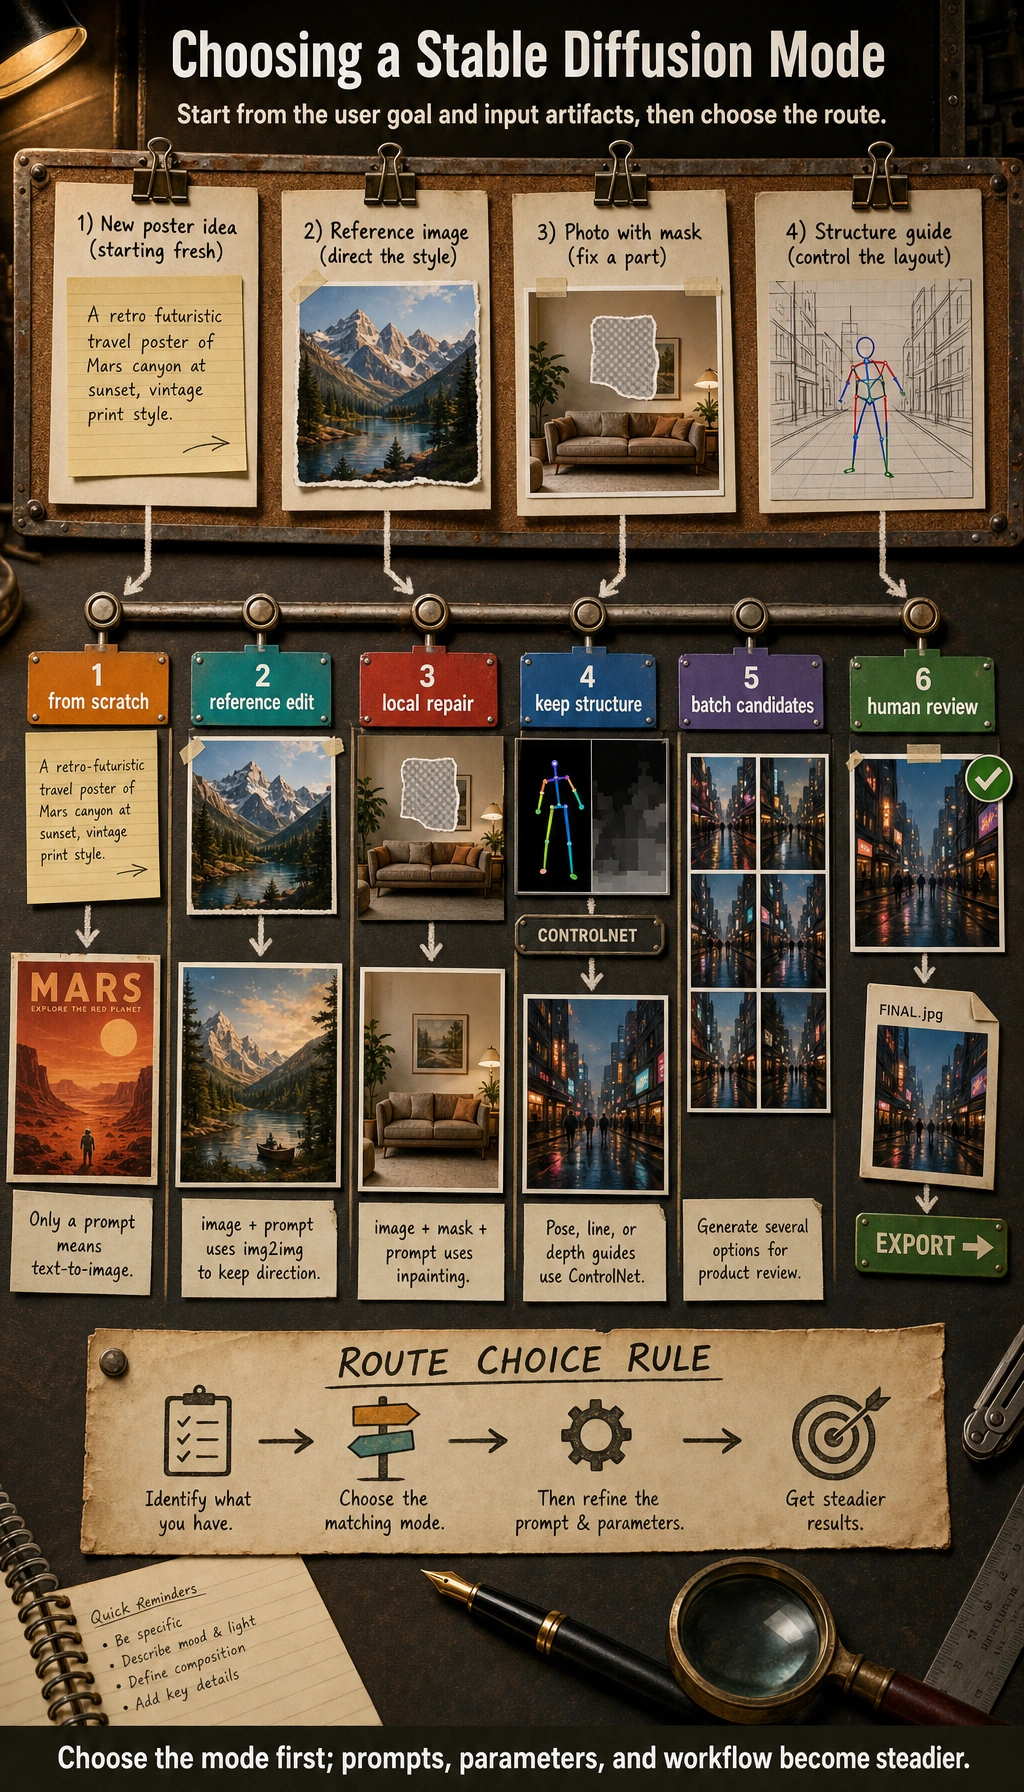
Section titled “First, Build a Map”SD applications are easier to understand as “user goal -> generation form -> workflow”:
flowchart LR A["What does the user want?"] --> B["Text-to-image / Image-to-image / Inpainting / Conditional control"] B --> C["Batch generation and filtering"] C --> D["Editing, post-processing, and export"]So what this section really wants to solve is:
- Why SD in real products is rarely just one button
- Why workflow design is often more important than a single generation
Why Is Stable Diffusion So Easy to Productize?
Section titled “Why Is Stable Diffusion So Easy to Productize?”Because it is very close to user needs. Many user problems can be directly mapped to generation tasks:
- I want a poster
- I want to turn this sketch into a polished image
- I want to modify one part of this picture
- I want to turn this image into another style
In other words, Stable Diffusion can easily move from:
- model capability
to:
- product capability
That is the fundamental reason its application ecosystem exploded.
A Better Analogy for Beginners
Section titled “A Better Analogy for Beginners”You can think of Stable Diffusion applications as:
- a creative workbench
Text-to-image is like:
- starting from a blank canvas
Image-to-image is like:
- refining an existing sketch
Inpainting is like:
- changing only a small part of the image
Once you understand it this way, it becomes much clearer why it naturally grows into products, rather than staying as just a model demo.
First Type: Text-to-Image
Section titled “First Type: Text-to-Image”The Classic Entry Point
Section titled “The Classic Entry Point”The user inputs:
- a prompt
The system outputs:
- an image
For example:
text_to_image_task = {    "prompt": "An orange cat sitting by the window, sunset, cinematic",    "output": "generated_image"}
print(text_to_image_task)
Expected output:
{'prompt': 'An orange cat sitting by the window, sunset, cinematic', 'output': 'generated_image'}This is the blank-canvas mode: the prompt is the main input, and the system creates a new candidate image from scratch.
Why Is This So Intuitive?
Section titled “Why Is This So Intuitive?”Because it makes the idea of “language intent -> image result” very direct for the first time. Users do not need to understand the model; as long as they can describe what they want, they can start creating.
Second Type: Image-to-Image (img2img)
Section titled “Second Type: Image-to-Image (img2img)”The Biggest Difference from Text-to-Image
Section titled “The Biggest Difference from Text-to-Image”Text-to-image is more like:
- starting from scratch
Image-to-image is more like:
- transforming an existing image
For example:
img2img_task = {    "image": "rough_sketch.png",    "prompt": "Turn it into a cyberpunk-style illustration"}
print(img2img_task)
Expected output:
{'image': 'rough_sketch.png', 'prompt': 'Turn it into a cyberpunk-style illustration'}Here the image is no longer optional context. It becomes the starting structure, and the prompt tells the model how to transform it.
Why Is This Mode Valuable?
Section titled “Why Is This Mode Valuable?”Because many creative tasks are not about “generating from zero,” but about:
- starting from a sketch
- starting from a reference image
- starting from an existing composition
Users often care more about “improving along an existing direction” than about gambling on a brand-new image.
Third Type: Inpainting
Section titled “Third Type: Inpainting”Why Does This Feature Feel So Product-Like?
Section titled “Why Does This Feature Feel So Product-Like?”Because real users often do not want to remake the whole image. They only want to change one local area.
For example:
- remove a passerby in the background
- fill in an empty tabletop
- replace a small region with something else
A Task Example
Section titled “A Task Example”inpainting_task = { "image": "scene.png", "mask": "mask.png", "prompt": "Fill the masked area with a wooden table"}
print(inpainting_task)Expected output:
{'image': 'scene.png', 'mask': 'mask.png', 'prompt': 'Fill the masked area with a wooden table'}The mask is the key extra input. Without it, the system may edit the wrong area or regenerate more of the image than the user intended.
The key new element here is:
mask
In other words, the model not only needs to know “what to generate,” but also “where to change it.”
Fourth Type: Style Control and Conditional Control
Section titled “Fourth Type: Style Control and Conditional Control”Often, what users really want to control is not “what to draw,” but:
- what style to draw it in
- what composition to keep
- what line art to follow
- what pose to preserve
This makes many “control-based generation” workflows very important.
For example:
- line art -> finished image
- pose map -> character
- depth map -> scene
So in real applications, the user input is often not just one prompt, but a set of conditions.
A Selection Table That Is Good for Beginners to Remember
Section titled “A Selection Table That Is Good for Beginners to Remember”| User need | More suitable mode |
|---|---|
| Make a poster from scratch | Text-to-image |
| Turn an existing sketch into a polished image | Image-to-image |
| Only change a local element | Inpainting |
| Keep pose, composition, or structure fixed | Conditional control |
This table is especially useful for beginners, because it helps you translate a “feature name” directly into “when should I use it?”
Why Are Real SD Applications Usually Not Just “One Model + One Prompt”?
Section titled “Why Are Real SD Applications Usually Not Just “One Model + One Prompt”?”Because once you productize it, you usually add many more layers:
- prompt templates
- style presets
- negative prompts
- batch generation
- candidate filtering
- post-processing
At that point, the system becomes more like:
model + parameter panel + workflow.
That is why many AI image generation products eventually look like a creative workbench, rather than a single generation button.
An Example of a Workflow Product
Section titled “An Example of a Workflow Product”poster_workflow = { "task": "poster generation", "inputs": { "prompt": "Tech conference poster, blue neon style", "style_preset": "futuristic", "negative_prompt": "blurry, low resolution, distorted text", "num_images": 4 }, "steps": [ "Construct the prompt", "Batch sampling", "Filter candidate images", "Post-process" ]}
print(poster_workflow)Expected output:
{'task': 'poster generation', 'inputs': {'prompt': 'Tech conference poster, blue neon style', 'style_preset': 'futuristic', 'negative_prompt': 'blurry, low resolution, distorted text', 'num_images': 4}, 'steps': ['Construct the prompt', 'Batch sampling', 'Filter candidate images', 'Post-process']}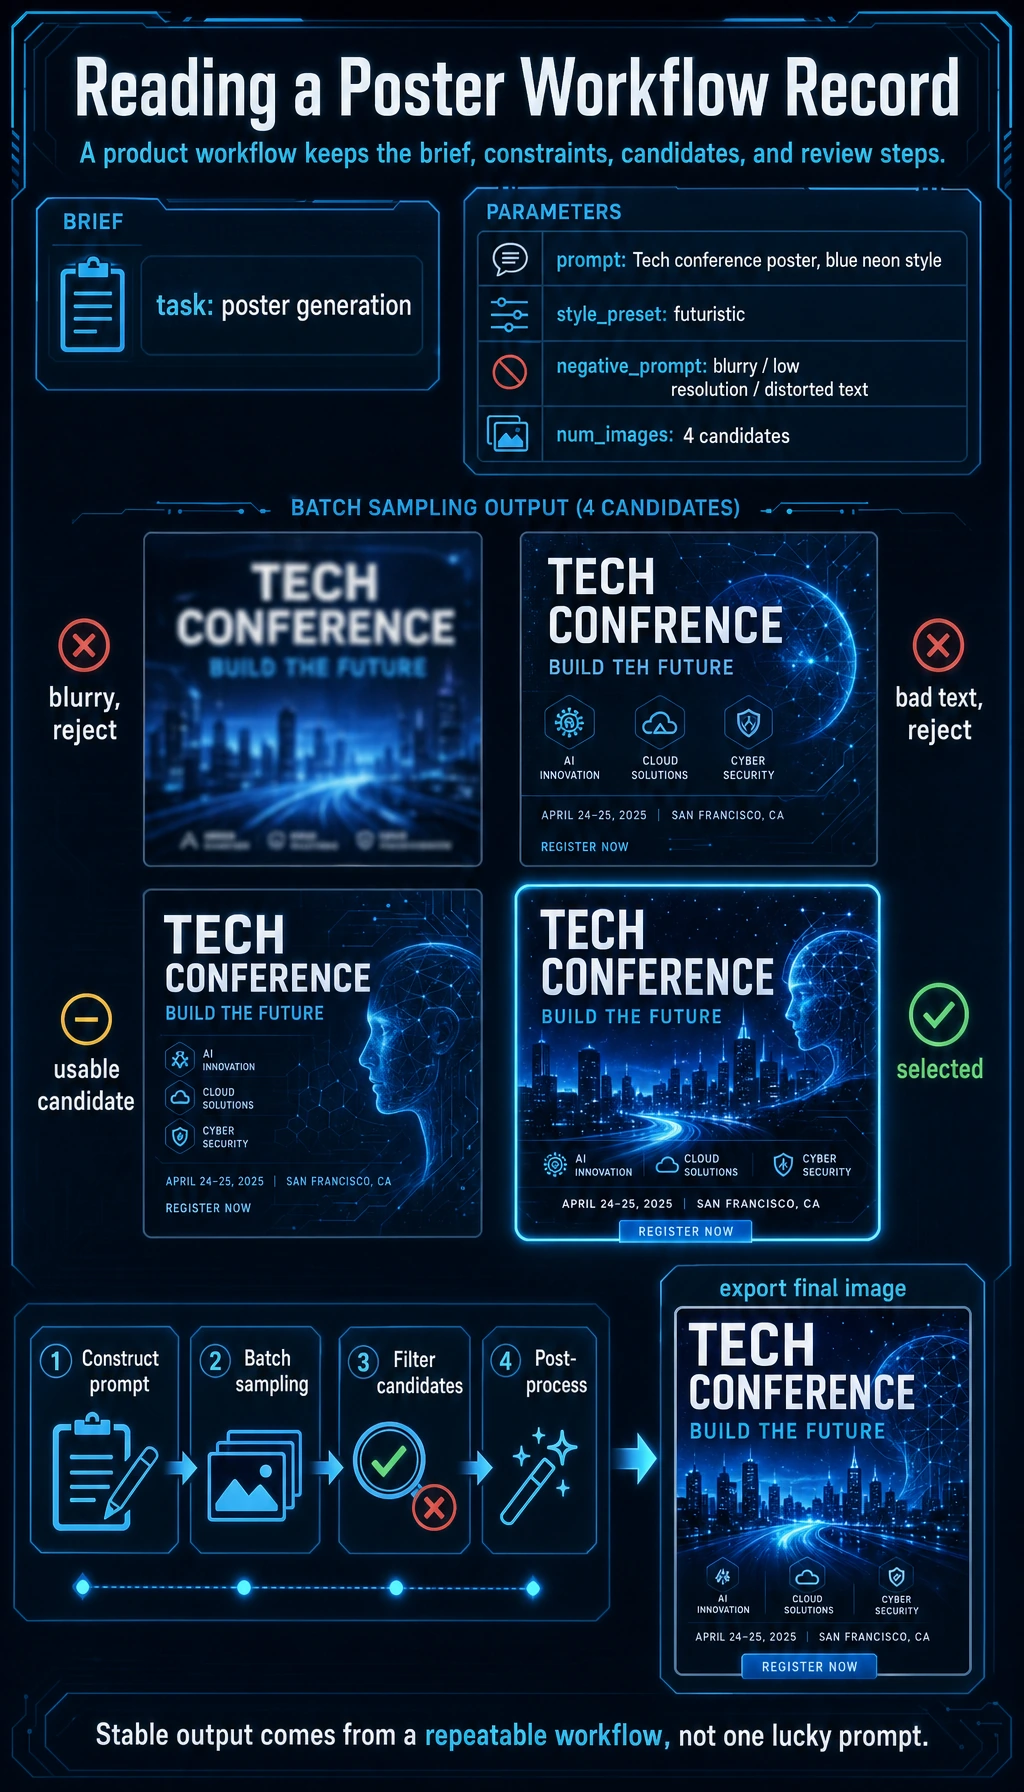
This record is deliberately more product-like than a single prompt. It captures the brief, constraints, number of candidates, and review steps needed to make the result repeatable.
The most important meaning of this example is:
At the application layer, what usually matters is not “generate one image,” but “how do we reliably produce a result the user can accept?”
Another Minimal “Workflow Selector” Example
Section titled “Another Minimal “Workflow Selector” Example”def choose_sd_mode(request): normalized = request.lower() if "edit image" in normalized or "retouch" in normalized: return "inpainting_or_img2img" if "sketch" in normalized: return "img2img" if "pose" in normalized or "line art" in normalized: return "controlled_generation" return "text_to_image"
for request in ["Make a poster", "Turn this sketch into an illustration", "Edit image: remove the person in the upper right corner"]: print(request, "->", choose_sd_mode(request))Expected output:
Make a poster -> text_to_imageTurn this sketch into an illustration -> img2imgEdit image: remove the person in the upper right corner -> inpainting_or_img2imgNotice the first line in the function: product routing should normalize user text before matching rules. Otherwise a capitalized request can silently fall into the wrong mode.
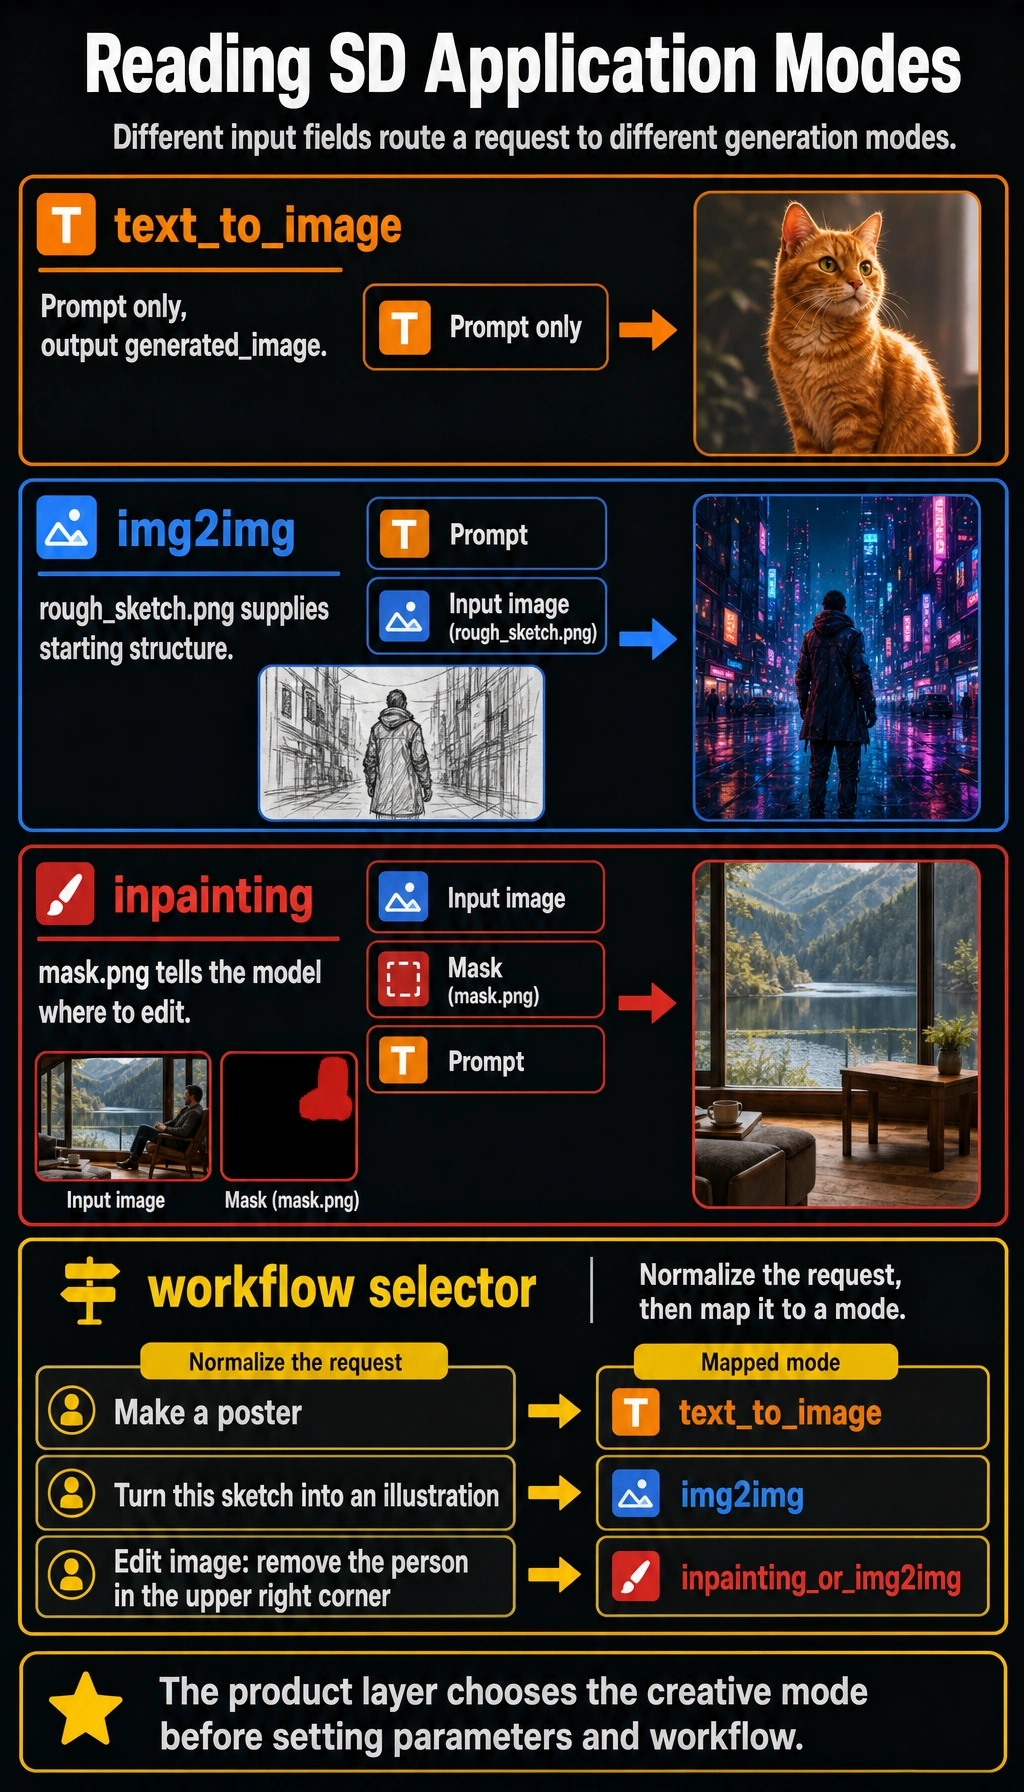
This example is very suitable for beginners, because it reminds you that:
- the product layer first needs to determine which creative mode the user is in
- then it decides the parameters and process that follow
Why Do Applications Often Need Batch Generation?
Section titled “Why Do Applications Often Need Batch Generation?”Because image generation is naturally stochastic. With the same prompt:
- this time may be great
- next time may be average
- the time after that may go off-topic
So many applications do not generate only one image. Instead, they:
- generate multiple images at once
- let the user choose
This is the product-level way of dealing with the randomness of the model.
The Most Common Failure Points in Stable Diffusion Applications
Section titled “The Most Common Failure Points in Stable Diffusion Applications”Text Control Is Not Stable Enough
Section titled “Text Control Is Not Stable Enough”The more complex the user description is, the easier it is for the result to drift.
Local Details Are Hard to Control
Section titled “Local Details Are Hard to Control”Especially:
- text
- hands
- fine structures
The User’s Real Problem Is Often Not “Generation,” but “Editing”
Section titled “The User’s Real Problem Is Often Not “Generation,” but “Editing””This is also why many products increasingly emphasize:
- img2img
- inpainting
- control
rather than only single-shot text-to-image.
If You Turn This into a Project, What Is Most Worth Showing?
Section titled “If You Turn This into a Project, What Is Most Worth Showing?”What is most worth showing is usually not:
- “I can generate images”
but:
- How different creative needs are routed to different workflows
- How candidate images are generated in batches and filtered
- How the editing stage is connected
- How the final result is exported
This makes it easier for others to see that:
- you understand a creative workbench
- not just a single image generation button
Evidence to Keep
Section titled “Evidence to Keep”Keep this page’s proof of learning as a small evidence card:
- Prompt Record
- prompt, negative requirements, reference, seed/model, and version number
- Candidate Outputs
- generated or simulated results with selection reason
- Technical Note
- diffusion step, latent, cross-attention, LoRA, or application mode
- Failure Check
- prompt drift, style mismatch, artifact, copyright, portrait, or review failure
- Expected Output
- selected image/version record plus rejected-candidate notes
Summary
Section titled “Summary”The most important thing in this section is not memorizing a few application names, but understanding:
The value of Stable Diffusion applications lies in how they can be organized into different creative workflows, not just in single-image generation.
Once you look at it from a workflow perspective, it becomes much easier to understand why it can grow into such a rich set of product forms.
Exercises
Section titled “Exercises”- Design one application scenario of your own for text-to-image, image-to-image, and inpainting.
- Think about why real SD products usually support generating multiple candidate images at once.
- Explain in your own words why we say SD products are more like a “workbench” than “one model button.”
- If you were building an e-commerce product image tool, which type of SD application would you need more? Why?
Solution approach and explanation
- Text-to-image: generate campaign concept images from a brief. Image-to-image: turn a rough sketch into a polished visual. Inpainting: replace only a damaged product background while keeping the product unchanged.
- Real products generate multiple candidates because prompts are underspecified and image quality is partly stochastic. Candidate sets give users choice and make review, ranking, and iteration possible.
- It is a workbench because useful output usually involves prompts, seeds, negative prompts, reference images, editing masks, style controls, upscaling, safety checks, and human selection. The model is only one part of that loop.
- For e-commerce, image-to-image and inpainting are often more important than pure text-to-image because the product identity must stay fixed. Text-to-image is useful for ideation, but product pages need controlled edits and consistent assets.