
1.2.4 Branches and Collaboration
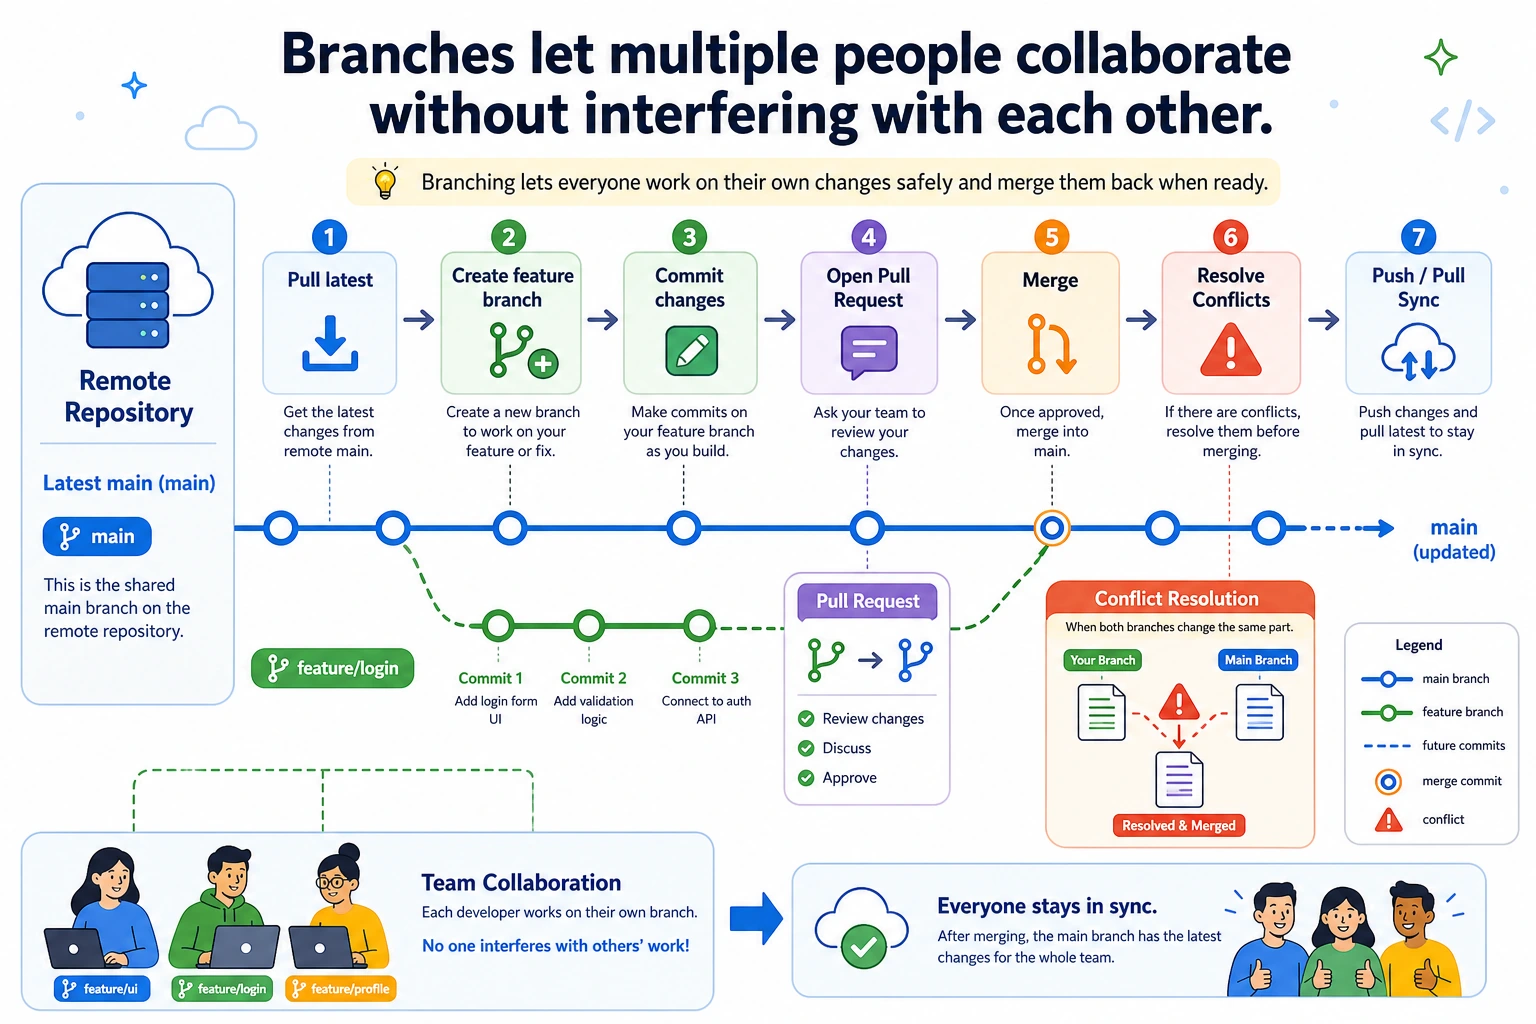
Where This Lesson Fits
Section titled “Where This Lesson Fits”This lesson explains why Git supports safe collaboration. You’ll understand how branches let you try new ideas without breaking the main codebase, and you’ll get a first look at Pull Requests and merge conflicts, preparing you for team projects and open-source contributions later.
Learning Objectives
Section titled “Learning Objectives”- Understand the concept of branches and when to use them
- Master creating, switching, and merging branches
- Learn the collaboration workflow of Pull Requests
- Learn how to resolve simple merge conflicts
What Is a Branch?
Section titled “What Is a Branch?”An Analogy: Renovating an Apartment
Section titled “An Analogy: Renovating an Apartment”Imagine you live in an apartment (main branch = the home you are currently living in). You want to try a new interior design style, but you’re not sure whether it will turn out well.
You have two choices:
- Make changes directly in your home — if you mess it up, you can’t really live there anymore
- Rent an identical apartment first (a new branch) and try things there — if it looks good, move the changes back; if not, just end the lease
A branch is option 2. You can make changes freely on a new branch. If it works, merge it back into main. If it doesn’t, delete the branch, and main stays completely unaffected.
Real-World Scenarios in Code
Section titled “Real-World Scenarios in Code”You are working on an AI image classification project, and the code on the main branch is running normally.
What you want to try:
- Replace the model from CNN to Vision Transformer.
- Check whether the result is actually better.
- Spend several days on changes that may touch many files.
If you change main directly, half-finished code may stop running, an urgent bug fix becomes hard to ship, and reverting a failed ViT attempt may involve dozens of files.
If you use a branch, you can work slowly on feature/vit, switch back to main for urgent fixes, and delete the experiment if it does not work.
Basic Branch Operations
Section titled “Basic Branch Operations”View Branches
Section titled “View Branches”# View local branches (the current branch has a * in front)git branch# Output:# * main
# View all branches (including remote branches)git branch -aCreate and Switch Branches
Section titled “Create and Switch Branches”# Create a new branchgit branch feature/data-augmentation
# Switch to the new branchgit checkout feature/data-augmentation
# Or do it in one step: create and switch (more common)git checkout -b feature/data-augmentationExample: Developing a New Feature on a Branch
Section titled “Example: Developing a New Feature on a Branch”Let’s do a real example. Continue using the previous ai-image-classifier project:
cd ai-image-classifier
# Confirm that we are on the main branchgit branch# * main
# Create and switch to a new branch: add data augmentationgit checkout -b feature/data-augmentation
Now you are on the new branch. Start writing code:
# Create the data augmentation modulecat > src/augmentation.py << 'EOF'import torchvision.transforms as T
def get_train_transforms():    """Augmentation strategy for training data"""    return T.Compose([        T.RandomHorizontalFlip(p=0.5),        # 50% chance of horizontal flip        T.RandomRotation(degrees=15),          # Random rotation of ±15 degrees        T.ColorJitter(                         # Color jitter            brightness=0.2,            contrast=0.2,            saturation=0.2        ),        T.ToTensor(),        T.Normalize(            mean=[0.485, 0.456, 0.406],            std=[0.229, 0.224, 0.225]        ),    ])
def get_test_transforms():    """Test data only gets normalized, no augmentation"""    return T.Compose([        T.ToTensor(),        T.Normalize(            mean=[0.485, 0.456, 0.406],            std=[0.229, 0.224, 0.225]        ),    ])EOF
# Update train.py to use data augmentationcat >> src/train.py << 'EOF'
# Added: use data augmentationfrom augmentation import get_train_transforms, get_test_transformstrain_transform = get_train_transforms()test_transform = get_test_transforms()print("Data augmentation strategy loaded")EOF
# Commit to the current branchgit add .git commit -m "feat: add data augmentation module (random flip, rotation, color jitter)"
Now check the status of the two branches:
# View the history of the current branchgit log --oneline -3# Output:# aaa1111 feat: add data augmentation module (random flip, rotation, color jitter)# bbb2222 Improve README: add project overview and usage# ccc3333 Add .gitignore
# Switch back to main and take a lookgit checkout main
# main does not have augmentation.py!ls src/# model.py  train.py  utils.py  (no augmentation.py)
# Switch back to the feature branchgit checkout feature/data-augmentationls src/# augmentation.py  model.py  train.py  utils.py  (it’s there!)
That’s the power of branches—two timelines that do not affect each other.
Merging Branches
Section titled “Merging Branches”When the feature on your branch is finished and passes tests, you can merge it back into main.
# Step 1: switch back to the main branchgit checkout main
# Step 2: merge the feature branch into maingit merge feature/data-augmentation
Output:
Updating bbb2222..aaa1111Fast-forward src/augmentation.py | 25 +++++++++++++++++++++++++ src/train.py | 5 +++++ 2 files changed, 30 insertions(+) create mode 100644 src/augmentation.pyNow the main branch also has the data augmentation code:
ls src/# augmentation.py model.py train.py utils.py ✅Cleaning Up After the Merge
Section titled “Cleaning Up After the Merge”# The feature branch has been merged, so you can delete it (to keep the repo tidy)git branch -d feature/data-augmentation
# View branches — only main remainsgit branch# * mainMerge Conflicts
Section titled “Merge Conflicts”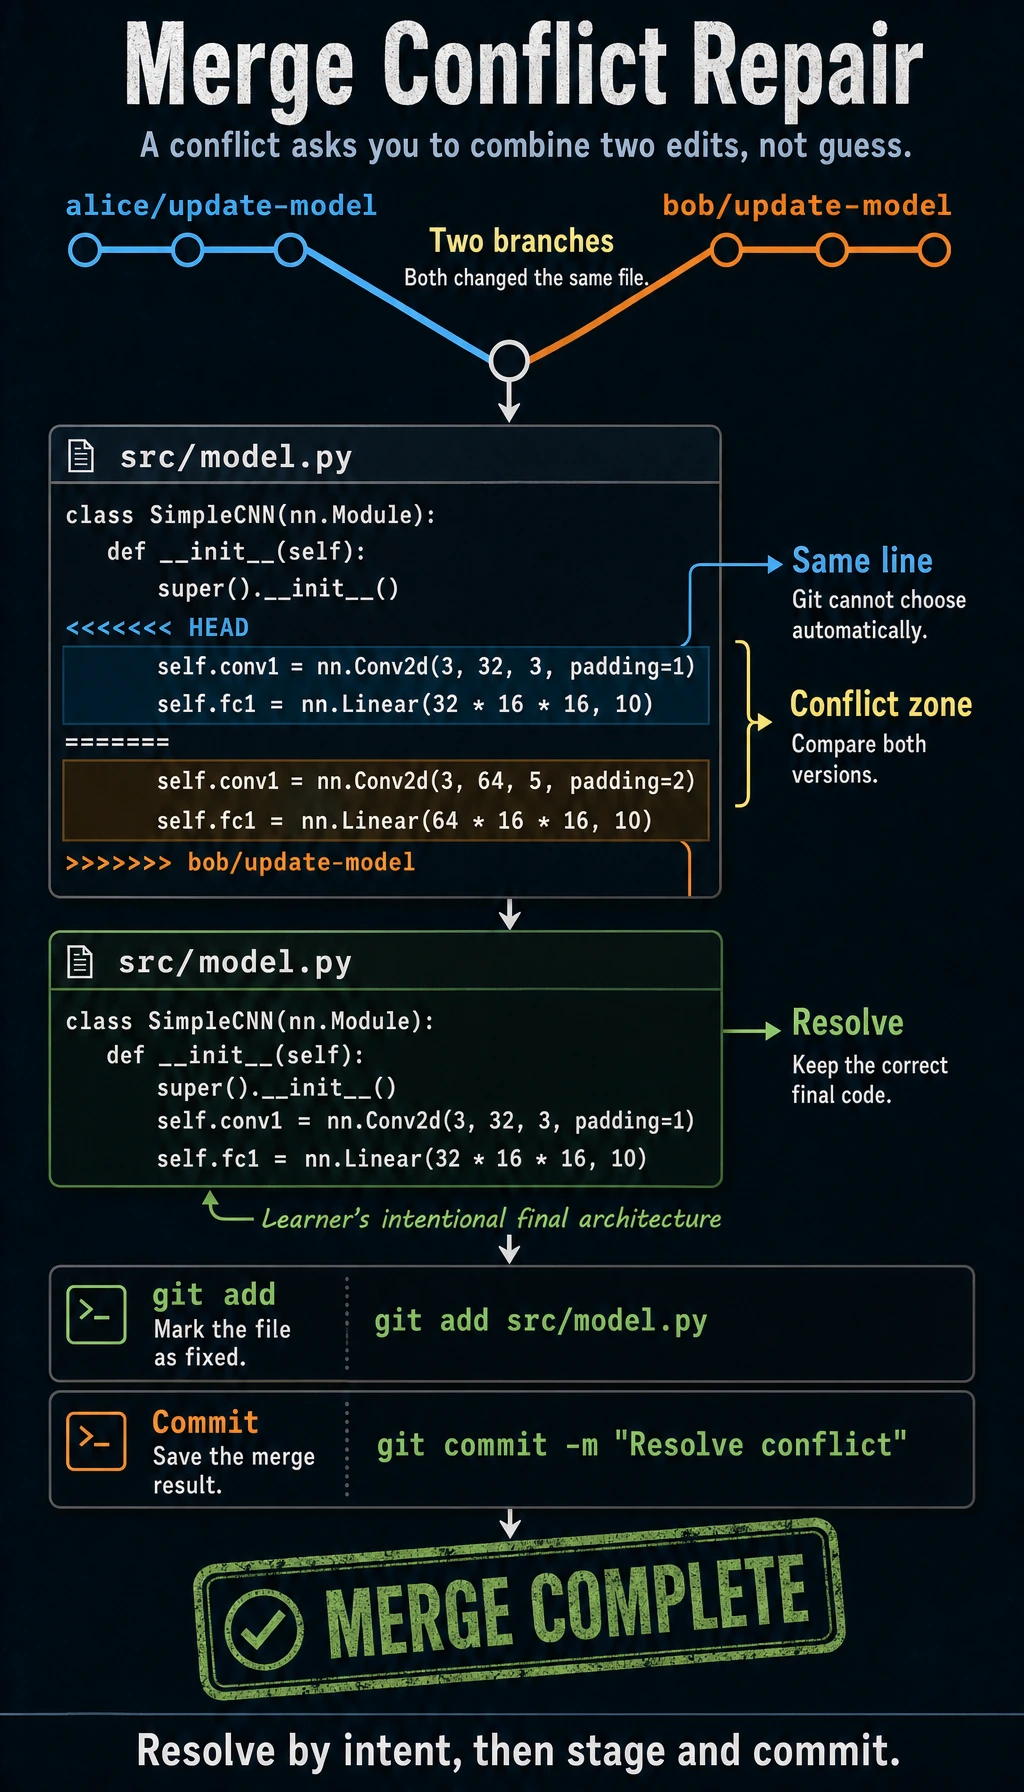
When Do Conflicts Happen?
Section titled “When Do Conflicts Happen?”When two branches modify the same location in the same file, Git does not know which version to keep, so a conflict occurs.
Example: Create a Conflict and Resolve It
Section titled “Example: Create a Conflict and Resolve It”# Create two branches from main to simulate two people working at the same timegit checkout -b alice/update-modelcat > src/model.py << 'EOF'import torchimport torch.nn as nn
class SimpleCNN(nn.Module): def __init__(self): super().__init__() self.conv1 = nn.Conv2d(3, 32, 3, padding=1) # Engineer A: change to 32 filters self.pool = nn.MaxPool2d(2, 2) self.fc1 = nn.Linear(32 * 16 * 16, 10)
def forward(self, x): x = self.pool(torch.relu(self.conv1(x))) x = x.view(-1, 32 * 16 * 16) return self.fc1(x)EOFgit add . && git commit -m "alice: increase filter count to 32"
# Switch back to main and create Engineer B's branchgit checkout maingit checkout -b bob/update-modelcat > src/model.py << 'EOF'import torchimport torch.nn as nn
class SimpleCNN(nn.Module): def __init__(self): super().__init__() self.conv1 = nn.Conv2d(3, 64, 5, padding=2) # Engineer B: change to 64 filters, 5x5 kernel self.pool = nn.MaxPool2d(2, 2) self.fc1 = nn.Linear(64 * 16 * 16, 10)
def forward(self, x): x = self.pool(torch.relu(self.conv1(x))) x = x.view(-1, 64 * 16 * 16) return self.fc1(x)EOFgit add . && git commit -m "bob: switch to 64 filters and a 5x5 kernel"Now merge Engineer A’s changes:
git checkout maingit merge alice/update-model # ✅ Success, no conflictThen merge Engineer B’s changes:
git merge bob/update-model# Output:# CONFLICT (content): Merge conflict in src/model.py# Automatic merge failed; fix conflicts and then commit the result.A conflict occurred! Because Engineer A and Engineer B both modified the same line in model.py.
Resolving the Conflict
Section titled “Resolving the Conflict”Open src/model.py, and you will see Git marking the conflict like this:
class SimpleCNN(nn.Module):    def __init__(self):        super().__init__()        # Engineer A keeps a 3x3 kernel and raises filters to 32.        self.conv1 = nn.Conv2d(3, 32, 3, padding=1)        self.fc1 = nn.Linear(32 * 16 * 16, 10)
# Engineer B changes both filter count and kernel size. self.conv1 = nn.Conv2d(3, 64, 5, padding=2) self.fc1 = nn.Linear(64 * 16 * 16, 10)- In a real conflict, Git shows
<<<<<<< HEAD, then the current branch version, then=======, then the incoming branch version, and finally>>>>>>> branch-name. - The example above uses
CONFLICT_MARKER_*placeholders so repository checks do not mistake this teaching sample for an unresolved merge conflict.
You need to manually decide what to keep. For example, let’s choose Engineer B’s version:
import torchimport torch.nn as nn
class SimpleCNN(nn.Module):    def __init__(self):        super().__init__()        self.conv1 = nn.Conv2d(3, 64, 5, padding=2)  # Use Engineer B's version        self.pool = nn.MaxPool2d(2, 2)        self.fc1 = nn.Linear(64 * 16 * 16, 10)
    def forward(self, x):        x = self.pool(torch.relu(self.conv1(x)))        x = x.view(-1, 64 * 16 * 16)        return self.fc1(x)
Delete all the <<<<<<<, =======, and >>>>>>> markers, and keep only the code you want. Then:
git add src/model.pygit commit -m "merge: merge Engineer A and Engineer B's changes, using Engineer B's 64-filter design"The conflict is resolved.
# Clean up branchesgit branch -d alice/update-modelgit branch -d bob/update-modelPull Request (Good to Know)
Section titled “Pull Request (Good to Know)”In team collaboration, you usually do not merge directly into main. Instead, you use a Pull Request (PR) so someone else can review your code first and merge it only after confirming it looks good.
Pull Request Workflow
Section titled “Pull Request Workflow”1. You create a feature branch and write code2. Push it to GitHub3. Create a Pull Request on GitHub4. A teammate reviews your code and gives feedback5. You make changes based on the feedback and push new commits6. The teammate clicks "Approve"7. The code gets merged into the main branchPractical Steps
Section titled “Practical Steps”# 1. Create a branch and write codegit checkout -b feature/add-evaluationecho "def evaluate(model, dataloader): pass" > src/evaluate.pygit add . && git commit -m "Add model evaluation module"
# 2. Push the branch to GitHubgit push -u origin feature/add-evaluationThen open GitHub, and you’ll see a prompt:
feature/add-evaluation had recent pushes — Compare & pull request
Click that button, fill in the PR title and description, and click Create pull request to finish.
For a personal project, you can review it yourself and then click Merge pull request on the GitHub page to merge it directly.
Chapter Self-Check
Section titled “Chapter Self-Check”Complete the following checks to confirm you understand Git basics:
- Can create a Git repository from scratch
- Can use
add→committo save code changes - Can use
git diffto see what changed - Know how to write a
.gitignorefile - Can push code to GitHub
- Can use
git cloneto download someone else’s project - Understand branches, and can create and merge them
- Stay calm when merge conflicts happen, and know how to solve them
Check reasoning and explanation
- You pass this check when you can create a repo, make a commit, inspect a diff, write
.gitignore, push or clone, and create/merge a branch. - A clean Git trace includes
git status --shortbefore and after risky operations. - When a conflict happens, keep both versions only if both are needed, then remove all conflict markers before committing.
- Use
git restorefor uncommitted mistakes and new commits for shared history. Use hard reset only in disposable practice repos. - Good evidence can be a branch graph, a short PR, or a terminal transcript showing branch creation, merge, and clean status.
Evidence to Keep
Section titled “Evidence to Keep”Keep this page’s proof of learning as a small evidence card:
- Repo State
- git status before and after the operation
- Operation
- init, add, commit, branch, merge, remote, pull, or push command used
- History
- git log or branch graph showing what changed
- Failure Check
- untracked files, wrong branch, merge conflict, or remote/auth issue
- Expected Output
- a clean Git trace that another learner can replay safely