
3.2.5 Array Reshaping and Operations
Learning Objectives
Section titled “Learning Objectives”- Master reshaping operations such as reshape, flatten, and ravel
- Learn array concatenation (concatenate, stack, hstack, vstack)
- Learn array splitting (split, hsplit, vsplit)
- Understand transpose and axis swapping
reshape: Changing Shape
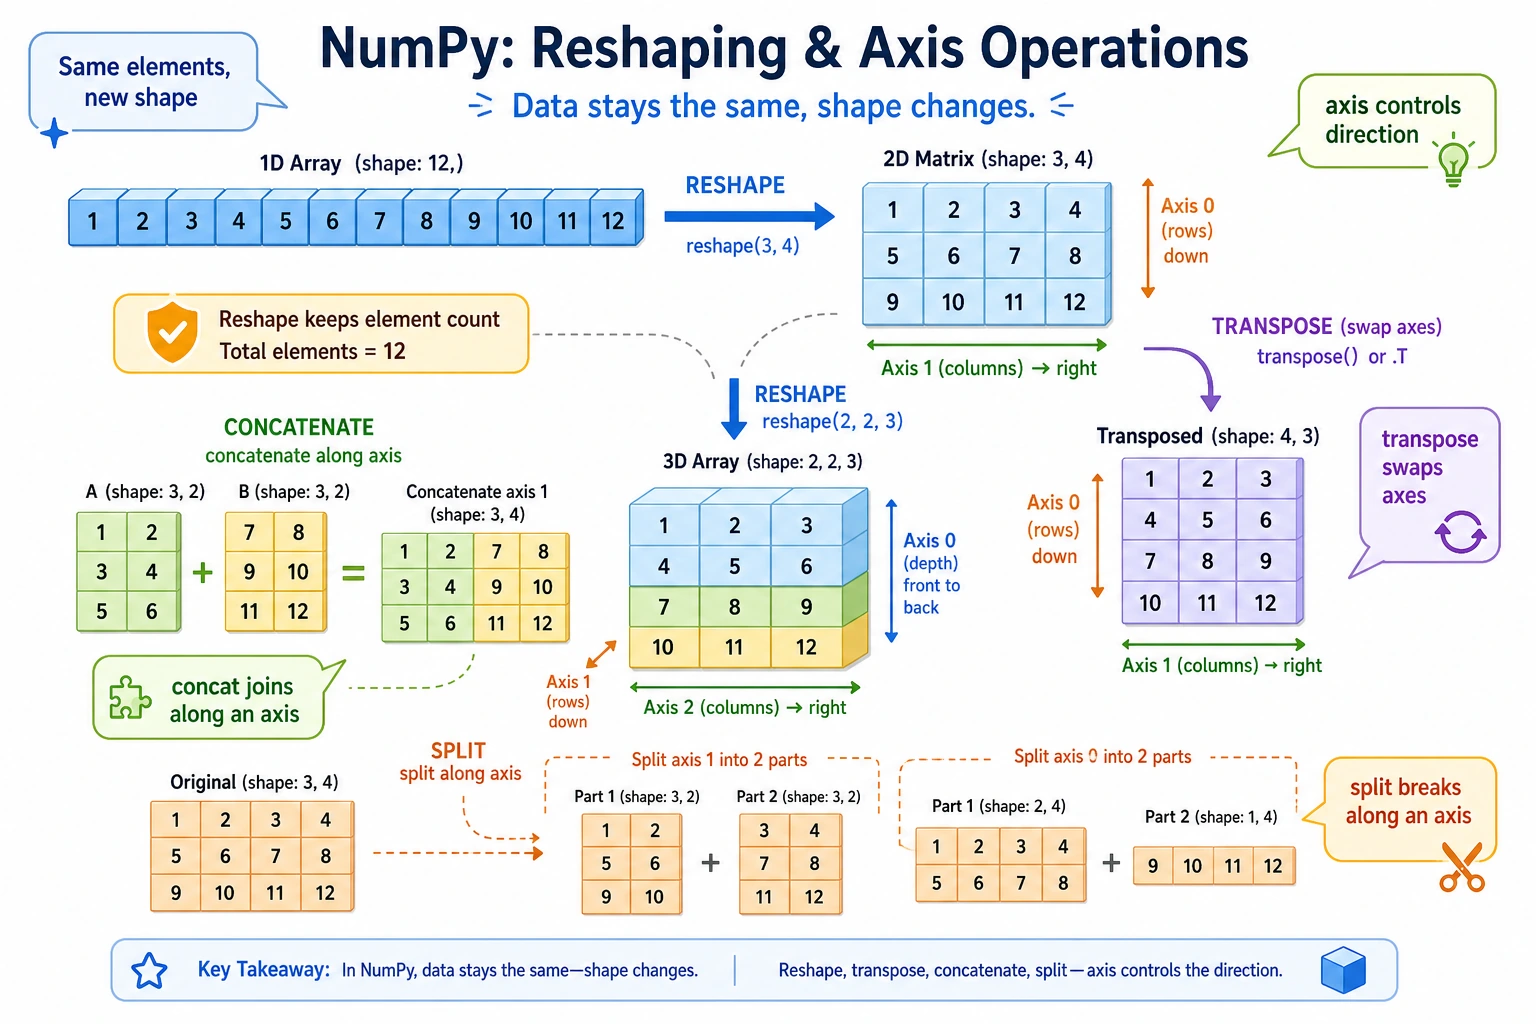
Section titled “reshape: Changing Shape”reshape is one of the most commonly used reshaping operations—it changes the shape of an array without changing the data.
Basic Usage
Section titled “Basic Usage”import numpy as np
arr = np.arange(12) # [ 0 1 2 3 4 5 6 7 8 9 10 11]print(arr.shape) # (12,)
# Change to 3 rows and 4 columnsm1 = arr.reshape(3, 4)print(m1)# [[ 0 1 2 3]# [ 4 5 6 7]# [ 8 9 10 11]]
# Change to 4 rows and 3 columnsm2 = arr.reshape(4, 3)print(m2)# [[ 0 1 2]# [ 3 4 5]# [ 6 7 8]# [ 9 10 11]]
# Change to a 2×2×3 3D arraym3 = arr.reshape(2, 2, 3)print(m3)# [[[ 0 1 2]# [ 3 4 5]]# [[ 6 7 8]# [ 9 10 11]]]Use -1 for Automatic Calculation
Section titled “Use -1 for Automatic Calculation”-1 means “let NumPy automatically calculate this dimension”:
arr = np.arange(12)
# I want 3 rows, please calculate the number of columnsm1 = arr.reshape(3, -1)    # Automatically calculates 4 columnsprint(m1.shape)             # (3, 4)
# I want 4 columns, please calculate the number of rowsm2 = arr.reshape(-1, 4)    # Automatically calculates 3 rowsprint(m2.shape)             # (3, 4)
# Convert to a single column (column vector)col = arr.reshape(-1, 1)print(col.shape) # (12, 1)flatten and ravel: Flattening Arrays
Section titled “flatten and ravel: Flattening Arrays”Convert a multi-dimensional array back to one dimension:
matrix = np.array([    [1, 2, 3],    [4, 5, 6]])
# flatten: returns a copy (changes do not affect the original array)flat = matrix.flatten()print(flat)          # [1 2 3 4 5 6]flat[0] = 99print(matrix[0, 0])  # 1  ← original array does not change
# ravel: returns a view (changes affect the original array)rav = matrix.ravel()print(rav) # [1 2 3 4 5 6]rav[0] = 99print(matrix[0, 0]) # 99 ← original array also changes!| Method | Return type | Affects original? | Speed |
|---|---|---|---|
flatten() | Copy | No | Slower (data must be copied) |
ravel() | View | Yes | Faster (no copy) |
reshape(-1) | View | Yes | Faster |
Array Concatenation
Section titled “Array Concatenation”concatenate: General-Purpose Concatenation
Section titled “concatenate: General-Purpose Concatenation”a = np.array([1, 2, 3])b = np.array([4, 5, 6])
# 1D concatenationc = np.concatenate([a, b])print(c) # [1 2 3 4 5 6]For 2D concatenation, you need to specify the direction (axis):
m1 = np.array([[1, 2], [3, 4]])m2 = np.array([[5, 6], [7, 8]])
# axis=0: stack vertically (increase rows)v = np.concatenate([m1, m2], axis=0)print(v)# [[1 2]#  [3 4]#  [5 6]#  [7 8]]
# axis=1: stack horizontally (increase columns)h = np.concatenate([m1, m2], axis=1)print(h)# [[1 2 5 6]#  [3 4 7 8]]
vstack and hstack: Shortcut Concatenation
Section titled “vstack and hstack: Shortcut Concatenation”m1 = np.array([[1, 2], [3, 4]])m2 = np.array([[5, 6], [7, 8]])
# vstack = vertical stack = stack vertically = concatenate(axis=0)print(np.vstack([m1, m2]))# [[1 2]# [3 4]# [5 6]# [7 8]]
# hstack = horizontal stack = stack horizontally = concatenate(axis=1)print(np.hstack([m1, m2]))# [[1 2 5 6]# [3 4 7 8]]stack: Create a New Dimension
Section titled “stack: Create a New Dimension”The difference between stack and concatenate is that stack adds a new dimension:
a = np.array([1, 2, 3])   # shape: (3,)b = np.array([4, 5, 6])   # shape: (3,)
# Stack along a new dimensions0 = np.stack([a, b], axis=0)   # similar to placing them "side by side"print(s0)# [[1 2 3]#  [4 5 6]]print(s0.shape)  # (2, 3)
s1 = np.stack([a, b], axis=1)   # similar to placing them "top to bottom"print(s1)# [[1 4]#  [2 5]#  [3 6]]print(s1.shape)  # (3, 2)
Concatenation Summary
Section titled “Concatenation Summary”| Function | Purpose | Dimension Change |
|---|---|---|
np.concatenate() | Concatenate along an existing axis | Number of dimensions stays the same, one axis becomes longer |
np.vstack() | Stack vertically | Number of rows increases |
np.hstack() | Stack horizontally | Number of columns increases |
np.stack() | Stack along a new axis | Adds one dimension |
Array Splitting
Section titled “Array Splitting”split: Even Splitting
Section titled “split: Even Splitting”arr = np.arange(12) # [ 0 1 2 3 4 5 6 7 8 9 10 11]
# Split evenly into 3 partsparts = np.split(arr, 3)print(parts[0]) # [0 1 2 3]print(parts[1]) # [4 5 6 7]print(parts[2]) # [8 9 10 11]
# Split at specified positionsparts2 = np.split(arr, [3, 7]) # split at indices 3 and 7print(parts2[0]) # [0 1 2]print(parts2[1]) # [3 4 5 6]print(parts2[2]) # [7 8 9 10 11]2D Splitting
Section titled “2D Splitting”matrix = np.arange(16).reshape(4, 4)print(matrix)# [[ 0 1 2 3]# [ 4 5 6 7]# [ 8 9 10 11]# [12 13 14 15]]
# vsplit: split verticallytop, bottom = np.vsplit(matrix, 2)print(top)# [[0 1 2 3]# [4 5 6 7]]
# hsplit: split horizontallyleft, right = np.hsplit(matrix, 2)print(left)# [[ 0 1]# [ 4 5]# [ 8 9]# [12 13]]Transpose and Axis Swapping
Section titled “Transpose and Axis Swapping”2D Transpose
Section titled “2D Transpose”Transpose means rows become columns, and columns become rows:
matrix = np.array([    [1, 2, 3],    [4, 5, 6]])print(matrix.shape)  # (2, 3)
# Transposet = matrix.Tprint(t)# [[1 4]#  [2 5]#  [3 6]]print(t.shape)  # (3, 2)
# You can also use transposet2 = matrix.transpose()print(np.array_equal(t, t2))  # True
Add Dimensions: np.newaxis and expand_dims
Section titled “Add Dimensions: np.newaxis and expand_dims”Sometimes we need to add a dimension to an array (for example, turning a row vector into a column vector):
arr = np.array([1, 2, 3])      # shape: (3,)
row = arr[np.newaxis, :]        # shape: (1, 3) row vectorcol = arr[:, np.newaxis]        # shape: (3, 1) column vectorprint(row)  # [[1 2 3]]print(col)# [[1]#  [2]#  [3]]
# Method 2: np.expand_dimsrow2 = np.expand_dims(arr, axis=0)   # add a dimension at axis=0 → (1, 3)col2 = np.expand_dims(arr, axis=1)    # add a dimension at axis=1 → (3, 1)
# Method 3: reshaperow3 = arr.reshape(1, -1)   # (1, 3)col3 = arr.reshape(-1, 1)   # (3, 1)
Remove Dimensions: squeeze
Section titled “Remove Dimensions: squeeze”Remove dimensions whose size is 1:
arr = np.array([[[1, 2, 3]]])print(arr.shape)          # (1, 1, 3)
squeezed = arr.squeeze()print(squeezed.shape)     # (3,)print(squeezed)           # [1 2 3]
Practice: Data Reorganization
Section titled “Practice: Data Reorganization”import numpy as np
# Scenario: you have 12 months of sales data (1D)monthly_sales = np.array([ 120, 135, 150, 180, 200, 210, 195, 188, 220, 250, 280, 310])
# Reorganize into 4 quarters × 3 monthsquarterly = monthly_sales.reshape(4, 3)print("Quarterly data:")print(quarterly)# [[120 135 150] Q1# [180 200 210] Q2# [195 188 220] Q3# [250 280 310]] Q4
# Total sales for each quarterq_totals = quarterly.sum(axis=1)quarters = ["Q1", "Q2", "Q3", "Q4"]for q, total in zip(quarters, q_totals): print(f" {q}: {total}")
# First half vs second halffirst_half, second_half = np.vsplit(quarterly, 2)print(f"\nFirst-half total: {first_half.sum()}")print(f"Second-half total: {second_half.sum()}")Evidence to Keep
Section titled “Evidence to Keep”Keep this page’s proof of learning as a small evidence card:
- Array State
- shape, dtype, axis, and sample values before the operation
- Operation
- indexing, slicing, broadcasting, reshape, linear algebra, or random/stat function
- Output
- resulting array shape, values, or statistic
- Failure Check
- axis confusion, view/copy trap, broadcast mismatch, or wrong shape
- Expected Output
- printed shapes and values that make the array operation inspectable
Summary
Section titled “Summary”| Operation | Function | Description |
|---|---|---|
| Change shape | reshape() | Keep the total number of elements the same, change the arrangement of dimensions |
| Flatten | flatten() / ravel() | Convert multi-dimensional arrays to 1D |
| Concatenate | concatenate() / vstack() / hstack() | Merge multiple arrays |
| Stack | stack() | Merge arrays and add a new dimension |
| Split | split() / vsplit() / hsplit() | Split one array into multiple parts |
| Transpose | .T / transpose() | Swap rows and columns |
| Add dimensions | np.newaxis / expand_dims() | Add a dimension with size 1 |
| Remove dimensions | squeeze() | Remove dimensions with size 1 |
Hands-on Exercises
Section titled “Hands-on Exercises”Exercise 1: reshape Practice
Section titled “Exercise 1: reshape Practice”arr = np.arange(24)
# 1. Change it into a 4×6 matrix# 2. Change it into a 2×3×4 3D array# 3. Change it into 6 rows (let the number of columns be calculated automatically)# 4. Flatten a (2,3,4) array back into 1DExercise 2: Concatenation and Splitting
Section titled “Exercise 2: Concatenation and Splitting”# Grade data from 3 classesclass_a = np.array([[85, 90], [78, 82], [92, 88]]) # 3 students × 2 subjectsclass_b = np.array([[76, 80], [95, 91], [83, 87]]) # 3 students × 2 subjectsclass_c = np.array([[88, 92], [71, 75], [90, 85]]) # 3 students × 2 subjects
# 1. Merge the grades from the 3 classes into one 9×2 matrix# 2. If scores for a 3rd subject need to be added, how should you concatenate them?extra_scores = np.array([[70], [65], [80], [75], [90], [85], [78], [72], [88]])# 3. Split the merged 9×3 matrix back into 3 groups, 3 students eachExercise 3: Data Reorganization
Section titled “Exercise 3: Data Reorganization”# Temperature data for 365 days in a year (dummy data)rng = np.random.default_rng(seed=42)daily_temps = rng.uniform(low=-5, high=38, size=360) # Use 360 days for easier splitting
# 1. Reorganize into 12 months × 30 days# 2. Calculate the average temperature for each month# 3. Find the hottest and coldest months# 4. Calculate the average temperature difference between the first half and second half of the yearReference implementation and walkthrough
- The same 24 values can become
(4, 6),(2, 3, 4), or(6, -1)as long as the total element count stays 24. Use-1only for one dimension so NumPy can infer it. - For class score data,
np.vstackstacks classes vertically,np.hstackadds columns horizontally, andnp.splitcan recover equal-sized blocks when the row counts line up. - For daily temperature data, reshape to
(12, 30)if every month has 30 readings, then useaxis=1for monthly means andargmaxorargminto find the warmest or coldest month.