
1.3.1 Python Environment Management
What this section covers
Section titled “What this section covers”This section solves the most common problems in AI learning: “environment mess” and “dependency conflicts.” You will understand why every project should have its own isolated environment, and learn how to create, switch, export, and restore Python environments with Miniconda.
Learning objectives
Section titled “Learning objectives”- Understand why virtual environments are needed (through a real-world failure case)
- Install and configure Miniconda
- Learn how to create, activate, switch, and delete virtual environments
- Understand the difference between conda and pip, and know when to use each
- Learn how to export and import environment configurations
- Be able to troubleshoot common environment issues on your own
Why do we need virtual environments?
Section titled “Why do we need virtual environments?”A real-world failure scenario
Section titled “A real-world failure scenario”Xiaoming is working on two AI projects:
- Project A (image classification): needs
torch==1.13because it uses an old library that only works with 1.13 - Project B (LLM application): needs
torch==2.1because it uses the latest Flash Attention
If he installs both projects’ dependencies into the same Python environment:
pip install torch==1.13 # Project A workspip install torch==2.1 # Project B works, but torch is upgraded to 2.1# Then when going back to Project A — it fails! Because torch is now 2.1This is called a package version conflict — one Python environment can only hold one version of a package with the same name.
How do virtual environments solve this problem?
Section titled “How do virtual environments solve this problem?”A virtual environment is an independent, isolated Python installation. Each project gets its own environment, and they do not interfere with each other:
Project A environment: Python 3.10 + torch 1.13 + ...Project B environment: Python 3.11 + torch 2.1 + ...When you switch projects, just switch environments. The two sides won’t affect each other.
Analogy
Section titled “Analogy”Think of a virtual environment like multiple users/workspaces on a phone. Each user has their own independently installed apps, and they don’t interfere with each other. You can install DingTalk in your “work” user and games in your “personal” user, and they remain completely isolated.
The mental model you should keep
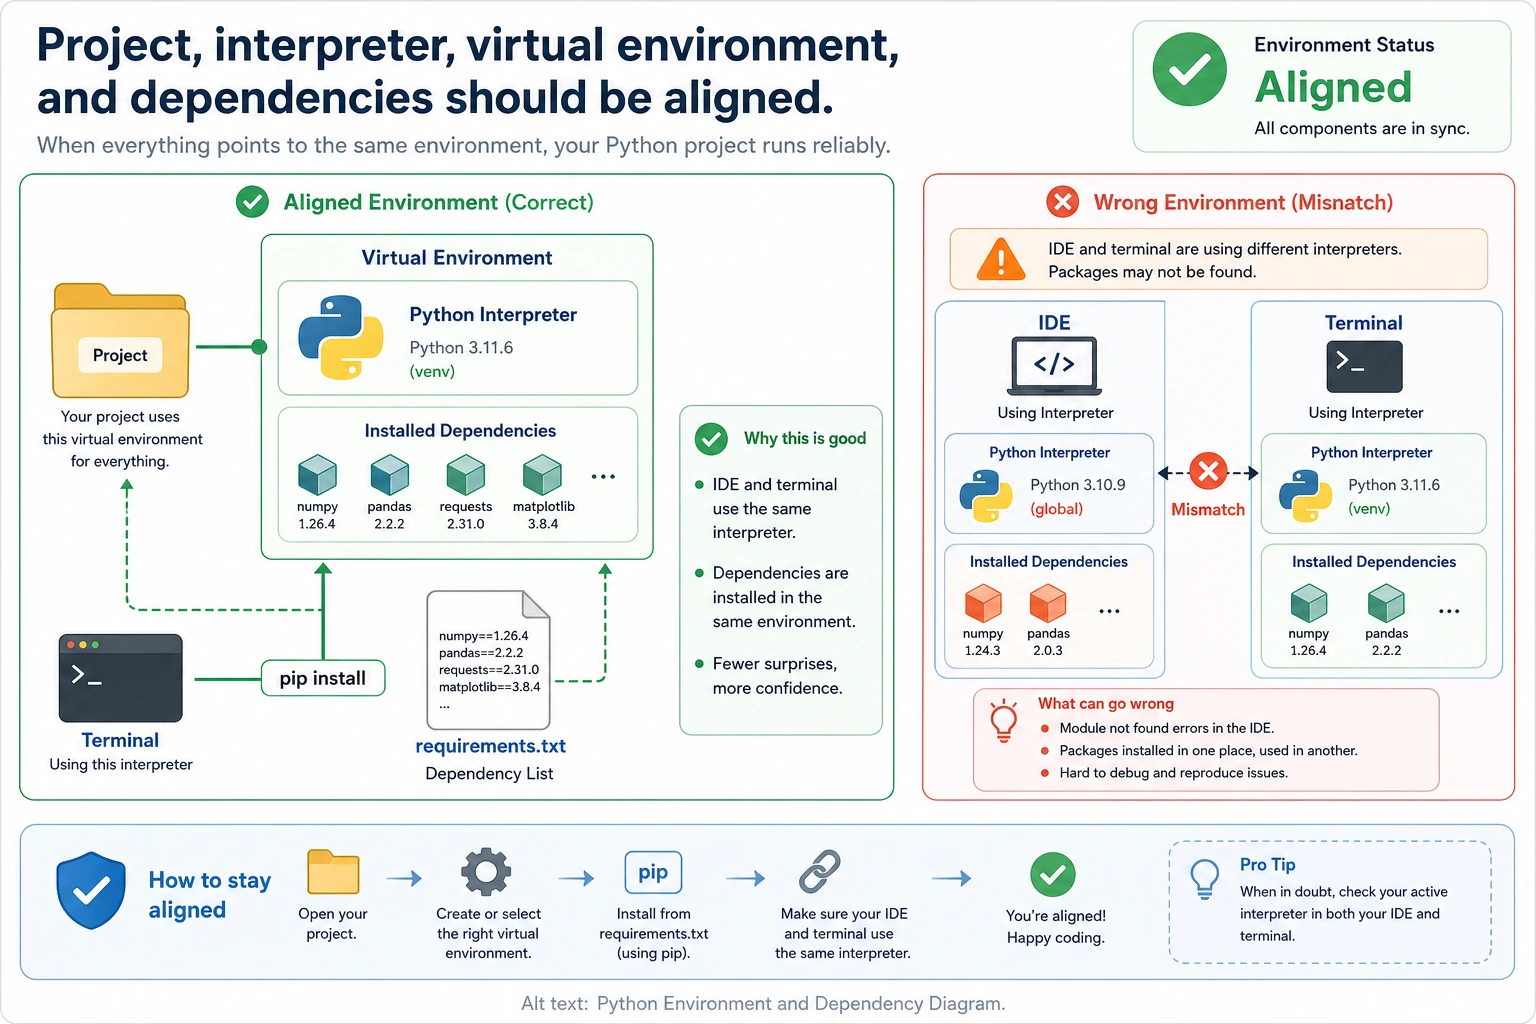
Section titled “The mental model you should keep”When a Python project fails, do not immediately reinstall everything. First check whether these four things point to the same project:
flowchart LR A["Project folder"] --> B["Selected Python interpreter"] B --> C["pip installs packages into this environment"] C --> D["VS Code / Jupyter uses the same interpreter"] D --> E["Your code imports packages successfully"]| What to check | Command or place to look | What you want to see |
|---|---|---|
| Current folder | pwd | You are inside the project folder |
| Current Python | which python | The path points to the intended environment |
| pip target | python -m pip --version | pip belongs to the same environment as Python |
| VS Code interpreter | Python: Select Interpreter | It selects the same environment |
| Jupyter kernel | Notebook kernel selector | It uses the same environment as the project |
Most “I installed it but cannot import it” errors are caused by one of these links pointing somewhere else.
Install Miniconda
Section titled “Install Miniconda”Why choose Miniconda?
Section titled “Why choose Miniconda?”| Tool | Description | Recommendation |
|---|---|---|
| Miniconda | Lightweight, installs only the core components, and lets you install other packages as needed | ⭐⭐⭐⭐⭐ |
| Anaconda | A full bundle, preinstalled with 250+ packages, uses 3GB+ | ⭐⭐⭐ |
| venv + pip | Built into Python, lightweight but with fewer features | ⭐⭐⭐ |
Miniconda is the best choice: it is lightweight enough, can manage Python versions, can create virtual environments, and is widely used in the AI community.
macOS installation
Section titled “macOS installation”# Download the installation script (Apple Silicon / M1/M2/M3)curl -O https://repo.anaconda.com/miniconda/Miniconda3-latest-MacOSX-arm64.sh
# For Intel Mac, use this# curl -O https://repo.anaconda.com/miniconda/Miniconda3-latest-MacOSX-x86_64.sh
# Run the installerbash Miniconda3-latest-MacOSX-arm64.shDuring installation:
- Read the license: press
qto skip, typeyesto agree - Installation path: press Enter to use the default path
- Initialize conda: type
yes
After installation, close the terminal and reopen it.
Ubuntu/Linux installation
Section titled “Ubuntu/Linux installation”# Downloadcurl -O https://repo.anaconda.com/miniconda/Miniconda3-latest-Linux-x86_64.sh
# Installbash Miniconda3-latest-Linux-x86_64.sh
# Follow the prompts, and choose yes to initialize at the endClose the terminal and reopen it.
Windows installation
Section titled “Windows installation”- Download the installer: Miniconda Windows Installer
- Double-click to run it, then keep clicking Next
- Check “Add Miniconda3 to my PATH environment variable” (so it is convenient to use in PowerShell)
- After installation, restart PowerShell
Verify installation
Section titled “Verify installation”conda --version# Output similar to: conda 24.x.x
python --version# Output similar to: Python 3.12.xIf you see version numbers, the installation was successful.
Configure a domestic mirror for faster downloads (strongly recommended for users in China)
Section titled “Configure a domestic mirror for faster downloads (strongly recommended for users in China)”The default conda channels are overseas, so downloads can be slow. Configure the Tsinghua mirror:
# Add Tsinghua mirrorsconda config --add channels https://mirrors.tuna.tsinghua.edu.cn/anaconda/pkgs/mainconda config --add channels https://mirrors.tuna.tsinghua.edu.cn/anaconda/pkgs/freeconda config --add channels https://mirrors.tuna.tsinghua.edu.cn/anaconda/cloud/pytorchconda config --set show_channel_urls yesAlso configure the Tsinghua mirror for pip (if you have not done so before):
pip config set global.index-url https://pypi.tuna.tsinghua.edu.cn/simpleVirtual environment operations
Section titled “Virtual environment operations”Create an environment
Section titled “Create an environment”# Create an environment named ai-basic with Python 3.11conda create -n ai-basic python=3.11
# conda will list the packages to be installed; type y to confirm-n ai-basic is the environment name. You can name it however you like, but it is recommended to use the project name or purpose.
Activate an environment
Section titled “Activate an environment”conda activate ai-basicAfter activation, the environment name appears at the front of your terminal prompt:
(ai-basic) zhangsan@MacBook ~ $This means you are now inside the ai-basic environment. Any packages installed in this environment belong only to this environment.
Install packages in the environment
Section titled “Install packages in the environment”# Check the current environmentconda info --envs# The one with * is the currently active environment
# Install packages with pip (recommended in most cases)pip install numpy pandas matplotlib
# Install packages with conda (some special packages are better installed with conda)conda install scipy
# View which packages are installed in the current environmentpip list# orconda listExample: create different environments for different projects
Section titled “Example: create different environments for different projects”# Project A: traditional machine learningconda create -n ml-project python=3.11conda activate ml-projectpip install numpy pandas scikit-learn matplotlib seaborn jupyter
# Project B: deep learningconda create -n dl-project python=3.11conda activate dl-projectpip install torch torchvision numpy matplotlib tensorboard
# Project C: LLM applicationconda create -n llm-project python=3.11conda activate llm-projectpip install openai langchain chromadb fastapiThree projects, three separate environments, no interference.
Switch environments
Section titled “Switch environments”# Switch to the ml-project environmentconda activate ml-project
# Switch to the dl-project environmentconda activate dl-project
# Exit the current environment (return to the base environment)conda deactivateView all environments
Section titled “View all environments”conda env list# orconda info --envsOutput:
# conda environments:#base /Users/zhangsan/miniconda3ai-basic /Users/zhangsan/miniconda3/envs/ai-basicml-project * /Users/zhangsan/miniconda3/envs/ml-projectdl-project /Users/zhangsan/miniconda3/envs/dl-projectllm-project /Users/zhangsan/miniconda3/envs/llm-projectThe * indicates the currently active environment.
Delete an environment
Section titled “Delete an environment”# Delete an environment you no longer needconda env remove -n ai-basic
# Confirm it has been deletedconda env listconda install vs pip install
Section titled “conda install vs pip install”This is one of the most common questions beginners ask. A simple rule of thumb:
| Situation | Use | Reason |
|---|---|---|
| Most Python packages | pip install | pip has the widest package coverage and the fastest updates |
| CUDA-related packages | conda install | conda can automatically handle CUDA dependencies |
| System-level libraries (such as MKL) | conda install | pip cannot install system-level libraries |
| Not sure which one to use | Try pip install first | pip is more general-purpose |
Exporting and importing environments
Section titled “Exporting and importing environments”Scenario: share your project environment
Section titled “Scenario: share your project environment”After finishing a project, you may want your teammates (or your future self) to quickly recreate the same environment.
Method 1: pip freeze (most common)
Section titled “Method 1: pip freeze (most common)”# Export all packages in the current environment to requirements.txtpip freeze > requirements.txtrequirements.txt looks like this:
numpy==1.26.4pandas==2.2.0scikit-learn==1.4.0matplotlib==3.8.2torch==2.1.2Anyone who gets it can restore the environment with one command:
# Create a new environmentconda create -n restored-env python=3.11conda activate restored-env
# Install all dependenciespip install -r requirements.txt
Method 2: conda env export
Section titled “Method 2: conda env export”# Export the full environment (including packages installed by conda and pip)conda env export > environment.ymlRestore:
conda env create -f environment.ymlWhich one should you use?
Section titled “Which one should you use?”| File | Suitable for | Advantages | Disadvantages |
|---|---|---|---|
requirements.txt | Most projects | Simple, universal, cross-platform | Does not include Python version information |
environment.yml | Projects with conda-specific packages | Complete, includes Python version | May vary across platforms |
Recommendation: Put a requirements.txt file in every project. This is the standard practice in the Python community.
Evidence to Keep
Section titled “Evidence to Keep”Keep this page’s proof of learning as a small evidence card:
- Environment
- Python/Node/editor/notebook version and selected interpreter/kernel
- Verification
- one command or notebook cell proving the setup works
- Project Folder
- where dependencies, scripts, and notebooks live
- Failure Check
- wrong interpreter, missing package, stale kernel, or editor path mismatch
- Expected Output
- setup screenshot or terminal output plus one fallback note
Common troubleshooting
Section titled “Common troubleshooting”Problem 1: conda activate does not work
Section titled “Problem 1: conda activate does not work”CommandNotFoundError: Your shell has not been properly configured to use 'conda activate'.Solution:
# Initialize conda (choose according to your shell)conda init zsh     # macOS defaultconda init bash    # Linux default
# Then restart the terminal
Problem 2: command not found: python
Section titled “Problem 2: command not found: python”You installed Miniconda, but typing python says it cannot be found.
# Check whether the conda environment is activatedconda activate base
# If it still does not work, check PATHwhich pythonecho $PATH
Problem 3: Package installation times out
Section titled “Problem 3: Package installation times out”pip install torch# Stuck for a long time or reports timeoutSolution: make sure you have configured a domestic mirror, or specify one manually:
pip install torch -i https://pypi.tuna.tsinghua.edu.cn/simpleProblem 4: Version conflicts
Section titled “Problem 4: Version conflicts”ERROR: pip's dependency resolver found conflictsSuggested approach:
# Option 1: Create a brand-new environment and install packages one by oneconda create -n fresh python=3.11conda activate freshpip install PackageApip install PackageB  # If there is a conflict, it will tell you where it is
# Option 2: Downgrade the conflicting package to a compatible versionpip install "PackageA>=1.0,<2.0"
Problem 5: Package installed, but import fails
Section titled “Problem 5: Package installed, but import fails”import torch# ModuleNotFoundError: No module named 'torch'The most common reason is that the environment where you installed the package is not the same as the one where you are running the code.
# Check the current environmentconda info --envs   # See which one has *
# Check which environment has the package installedconda activate the_environment_you_think_has_torchpip list | grep torch
# Confirm the Python pathwhich python# It should point to your conda environment directory
Hands-on exercise: build your first learning environment
Section titled “Hands-on exercise: build your first learning environment”# 1. Create an environment dedicated to this courseconda create -n ai-course python=3.11conda activate ai-course
# 2. Install the basic packages needed for Station 1pip install requests beautifulsoup4 fastapi uvicorn
# 3. Install the data analysis packages needed for Station 2pip install numpy pandas matplotlib seaborn jupyter
# 4. Verify installationpython -c "import numpy as npimport pandas as pdprint(f'NumPy version: {np.__version__}')print(f'Pandas version: {pd.__version__}')print('✅ Environment setup successful!')"
# 5. Export environment configurationpip freeze > requirements.txtcat requirements.txt
# 6. View the environment listconda env listIf you see ✅ Environment setup successful! at the end, your Python environment is ready.
Operation guide and checkpoints
conda env listshould showai-course, and it should have the active marker when the environment is activated.- The verification command should print NumPy and Pandas versions plus the setup success message.
pip freeze > requirements.txtshould create a dependency record. It may contain more packages than the ones you installed directly because dependencies are included too.- If imports fail, compare
which python,python -m pip --version, and the Python interpreter selected in VS Code. - Avoid installing course packages globally when this lesson expects a dedicated conda environment.
Command quick reference
Section titled “Command quick reference”| Command | Purpose |
|---|---|
conda create -n name python=3.11 | Create a new environment |
conda activate name | Activate an environment |
conda deactivate | Exit the current environment |
conda env list | List all environments |
conda env remove -n name | Delete an environment |
pip install package_name | Install a Python package |
pip list | View installed packages |
pip freeze > requirements.txt | Export dependency list |
pip install -r requirements.txt | Install dependencies from a file |