
10.6.4 Hands-on: Build a Reproducible Vision Mini Pipeline
This workshop turns Chapter 10 into a follow-along project. You will not download a dataset or call a cloud model. Instead, one Python script will create a small synthetic image dataset and then run a complete vision loop:
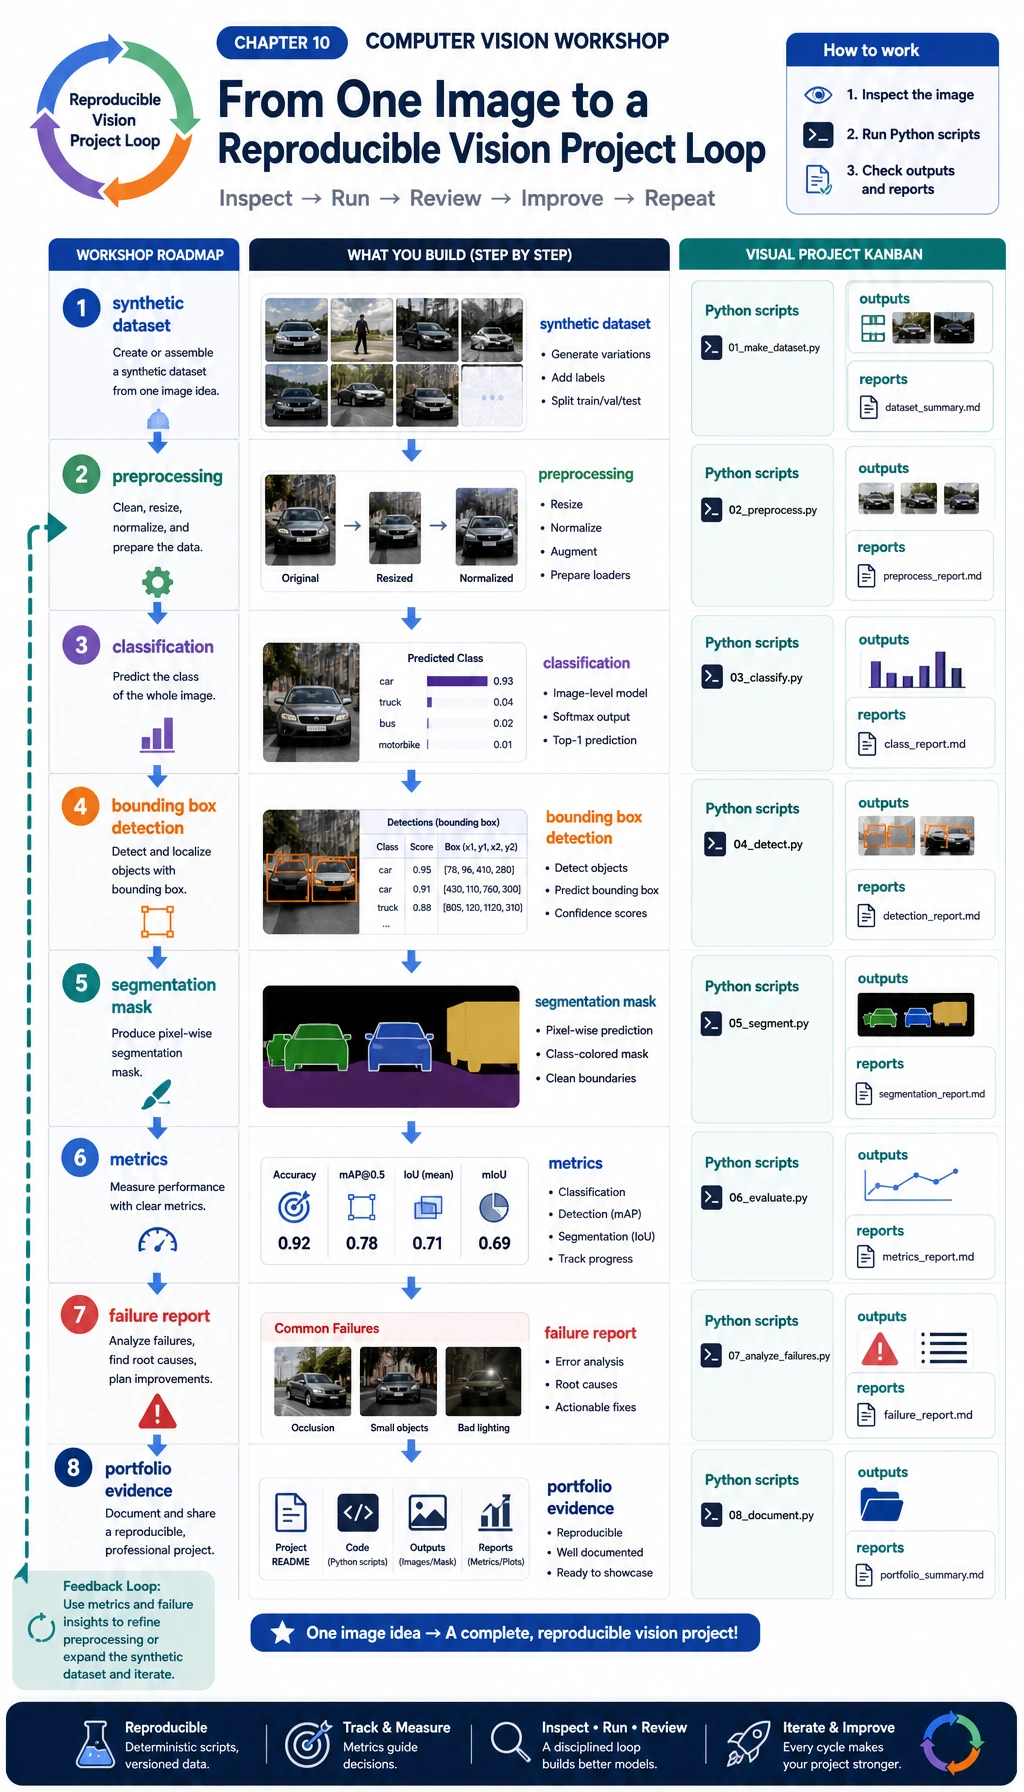
You will build four pieces that appear in real vision projects:
- Classification: decide whether an image contains a circle, square, or triangle.
- Detection: draw a bounding box around the foreground object.
- Segmentation: create a mask for the foreground region.
- Evaluation: save metrics, prediction images, and failure cases.
This example intentionally uses opencv-python and numpy instead of a deep learning model. The reason is practical: beginners can run it offline, see every intermediate file, and understand the project structure before replacing the simple classifier with a CNN, YOLO detector, or segmentation model.
What You Will Build
Section titled “What You Will Build”By the end, your folder will contain:
cv_workshop_run/ data/ labels.csv train_circle_00.png train_circle_00_mask.png ... outputs/ test_circle_00_prediction.png ... reports/ metrics.json predictions.csv failure_cases.mdRead this as a portfolio habit:
data/proves what the model saw.outputs/proves what the model predicted.reports/proves how you evaluated and debugged it.
Step 0: Understand the Data We Will Generate
Section titled “Step 0: Understand the Data We Will Generate”First look at the data flow. A vision project starts before training: image, label, mask, bounding box, split, and hard examples must all be visible.
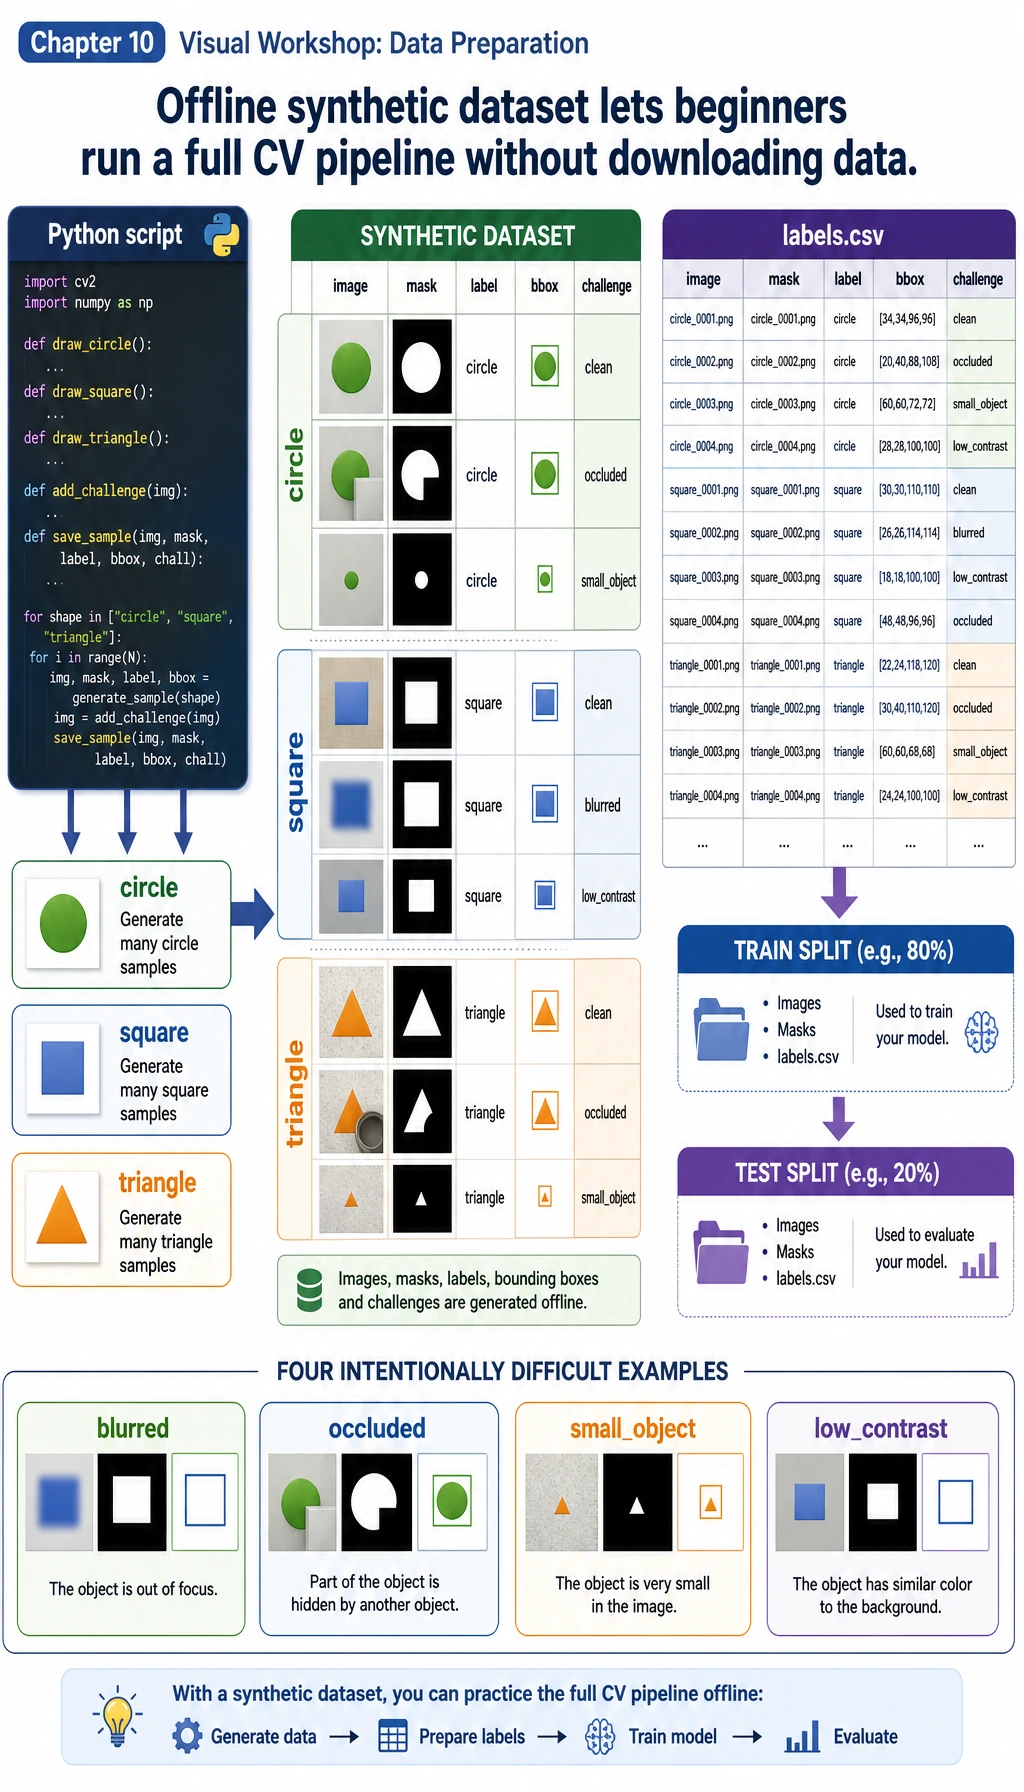
In this workshop:
imageis the input PNG.labelis the class:circle,square, ortriangle.maskis the pixel-level foreground answer.bboxmeans bounding box:x1, y1, x2, y2.challengemarks harder samples such asoccluded,small_object, orlow_contrast.
The important idea is not that the data is synthetic. The important idea is that the whole project is reproducible. You can run it again and get the same structure, metrics, and failure report.
Step 1: Create a Clean Folder
Section titled “Step 1: Create a Clean Folder”mkdir cv-workshopcd cv-workshoppython -m venv .venvsource .venv/bin/activatepip install opencv-python numpyOn Windows PowerShell, activate the environment with:
.\.venv\Scripts\Activate.ps1If you already have Python packages installed globally, you can skip the virtual environment. For a portfolio project, however, using a virtual environment makes your work easier to reproduce.
Step 2: Save the Complete Script
Section titled “Step 2: Save the Complete Script”Create a file named vision_workshop.py and paste this code:
from __future__ import annotations
import csvimport jsonimport mathimport shutilfrom dataclasses import dataclassfrom pathlib import Path
import cv2import numpy as np
ROOT = Path("cv_workshop_run")DATA_DIR = ROOT / "data"OUTPUT_DIR = ROOT / "outputs"REPORT_DIR = ROOT / "reports"IMAGE_SIZE = 128LABELS = ["circle", "square", "triangle"]RNG = np.random.default_rng(42)

@dataclassclass Sample:    image_path: Path    mask_path: Path    label: str    split: str    box: tuple[int, int, int, int]    challenge: str

def reset_workspace() -> None:    if ROOT.exists():        shutil.rmtree(ROOT)    DATA_DIR.mkdir(parents=True)    OUTPUT_DIR.mkdir(parents=True)    REPORT_DIR.mkdir(parents=True)

def add_background_noise(img: np.ndarray, amount: int = 18) -> np.ndarray:    noise = RNG.integers(0, amount, img.shape, dtype=np.uint8)    return cv2.add(img, noise)

def draw_shape(label: str, index: int, split: str, challenge: str = "normal") -> tuple[np.ndarray, np.ndarray, tuple[int, int, int, int]]:    img = np.zeros((IMAGE_SIZE, IMAGE_SIZE, 3), dtype=np.uint8)    img[:] = (18, 24, 32)    img = add_background_noise(img)    mask = np.zeros((IMAGE_SIZE, IMAGE_SIZE), dtype=np.uint8)
    margin = 24    cx = int(RNG.integers(margin + 8, IMAGE_SIZE - margin - 8))    cy = int(RNG.integers(margin + 8, IMAGE_SIZE - margin - 8))    size = int(RNG.integers(24, 39))    color = (        int(RNG.integers(80, 240)),        int(RNG.integers(80, 240)),        int(RNG.integers(80, 240)),    )
    if challenge == "low_contrast":        color = (55, 65, 75)    if challenge == "small_object":        size = 17    if challenge == "edge_touching":        cx, cy = 25, 25
    if label == "circle":        cv2.circle(img, (cx, cy), size, color, -1)        cv2.circle(mask, (cx, cy), size, 255, -1)    elif label == "square":        x1, y1, x2, y2 = cx - size, cy - size, cx + size, cy + size        cv2.rectangle(img, (x1, y1), (x2, y2), color, -1)        cv2.rectangle(mask, (x1, y1), (x2, y2), 255, -1)    elif label == "triangle":        pts = np.array(            [[cx, cy - size], [cx - size, cy + size], [cx + size, cy + size]],            dtype=np.int32,        )        cv2.fillPoly(img, [pts], color)        cv2.fillPoly(mask, [pts], 255)    else:        raise ValueError(label)
    if challenge == "occluded":        cv2.rectangle(img, (cx - size, cy - 8), (cx + size, cy + 8), (18, 24, 32), -1)        cv2.rectangle(mask, (cx - size, cy - 8), (cx + size, cy + 8), 0, -1)    if challenge == "blurred":        img = cv2.GaussianBlur(img, (7, 7), 0)
    ys, xs = np.where(mask > 0)    box = (int(xs.min()), int(ys.min()), int(xs.max()), int(ys.max()))    return img, mask, box

def create_dataset() -> list[Sample]:    samples: list[Sample] = []    challenge_plan = {        ("test", "circle", 0): "low_contrast",        ("test", "square", 1): "occluded",        ("test", "triangle", 2): "small_object",    }
    for split, count in [("train", 12), ("test", 5)]:        for label in LABELS:            for i in range(count):                challenge = challenge_plan.get((split, label, i), "normal")                img, mask, box = draw_shape(label, i, split, challenge)                image_path = DATA_DIR / f"{split}_{label}_{i:02d}.png"                mask_path = DATA_DIR / f"{split}_{label}_{i:02d}_mask.png"                cv2.imwrite(str(image_path), img)                cv2.imwrite(str(mask_path), mask)                samples.append(Sample(image_path, mask_path, label, split, box, challenge))
    with (DATA_DIR / "labels.csv").open("w", newline="", encoding="utf-8") as handle:        writer = csv.writer(handle)        writer.writerow(["image_path", "mask_path", "label", "split", "x1", "y1", "x2", "y2", "challenge"])        for s in samples:            writer.writerow([s.image_path.name, s.mask_path.name, s.label, s.split, *s.box, s.challenge])
    return samples

def segment_foreground(img: np.ndarray) -> np.ndarray:    gray = cv2.cvtColor(img, cv2.COLOR_BGR2GRAY)    blurred = cv2.GaussianBlur(gray, (5, 5), 0)    _, mask = cv2.threshold(blurred, 0, 255, cv2.THRESH_BINARY + cv2.THRESH_OTSU)    if np.mean(mask == 255) > 0.55:        mask = cv2.bitwise_not(mask)    kernel = np.ones((3, 3), dtype=np.uint8)    return cv2.morphologyEx(mask, cv2.MORPH_OPEN, kernel)

def largest_box(mask: np.ndarray) -> tuple[int, int, int, int] | None:    contours, _ = cv2.findContours(mask, cv2.RETR_EXTERNAL, cv2.CHAIN_APPROX_SIMPLE)    if not contours:        return None    c = max(contours, key=cv2.contourArea)    x, y, w, h = cv2.boundingRect(c)    return (x, y, x + w - 1, y + h - 1)

def box_iou(a: tuple[int, int, int, int], b: tuple[int, int, int, int]) -> float:    ax1, ay1, ax2, ay2 = a    bx1, by1, bx2, by2 = b    ix1, iy1 = max(ax1, bx1), max(ay1, by1)    ix2, iy2 = min(ax2, bx2), min(ay2, by2)    iw, ih = max(0, ix2 - ix1 + 1), max(0, iy2 - iy1 + 1)    inter = iw * ih    area_a = (ax2 - ax1 + 1) * (ay2 - ay1 + 1)    area_b = (bx2 - bx1 + 1) * (by2 - by1 + 1)    union = area_a + area_b - inter    return inter / union if union else 0.0

def mask_iou(pred: np.ndarray, truth: np.ndarray) -> float:    p = pred > 0    t = truth > 0    inter = np.logical_and(p, t).sum()    union = np.logical_or(p, t).sum()    return float(inter / union) if union else 0.0

def extract_features(img: np.ndarray) -> np.ndarray:    mask = segment_foreground(img)    contours, _ = cv2.findContours(mask, cv2.RETR_EXTERNAL, cv2.CHAIN_APPROX_SIMPLE)    if not contours:        return np.zeros(7, dtype=np.float32)
    c = max(contours, key=cv2.contourArea)    area = cv2.contourArea(c)    perimeter = cv2.arcLength(c, True)    x, y, w, h = cv2.boundingRect(c)    extent = area / max(1, w * h)    aspect = w / max(1, h)    circularity = 4 * math.pi * area / max(1.0, perimeter * perimeter)    edges = cv2.Canny(cv2.cvtColor(img, cv2.COLOR_BGR2GRAY), 60, 160)    edge_density = float((edges > 0).mean())    hsv = cv2.cvtColor(img, cv2.COLOR_BGR2HSV)    foreground = mask > 0    mean_sat = float(hsv[:, :, 1][foreground].mean()) if foreground.any() else 0.0    mean_val = float(hsv[:, :, 2][foreground].mean()) if foreground.any() else 0.0    area_ratio = area / (IMAGE_SIZE * IMAGE_SIZE)    return np.array(        [area_ratio, extent, aspect, circularity, edge_density, mean_sat / 255, mean_val / 255],        dtype=np.float32,    )

def train_centroid_classifier(samples: list[Sample]) -> dict[str, np.ndarray]:    grouped_features: dict[str, list[np.ndarray]] = {label: [] for label in LABELS}    for s in samples:        if s.split != "train":            continue        img = cv2.imread(str(s.image_path))        grouped_features[s.label].append(extract_features(img))    return {label: np.mean(rows, axis=0) for label, rows in grouped_features.items()}

def predict_label(feature: np.ndarray, centroids: dict[str, np.ndarray]) -> tuple[str, float]:    distances = {label: float(np.linalg.norm(feature - center)) for label, center in centroids.items()}    label = min(distances, key=distances.get)    sorted_distances = sorted(distances.values())    margin = sorted_distances[1] - sorted_distances[0] if len(sorted_distances) > 1 else 0.0    confidence = float(1 / (1 + sorted_distances[0]) * min(1.0, 0.55 + margin * 3))    return label, confidence

def draw_prediction(    img: np.ndarray,    truth_box: tuple[int, int, int, int],    pred_box: tuple[int, int, int, int] | None,    label: str,    pred: str,) -> np.ndarray:    canvas = img.copy()    x1, y1, x2, y2 = truth_box    cv2.rectangle(canvas, (x1, y1), (x2, y2), (0, 190, 0), 2)    if pred_box:        px1, py1, px2, py2 = pred_box        cv2.rectangle(canvas, (px1, py1), (px2, py2), (0, 0, 255), 2)    cv2.putText(canvas, f"true={label} pred={pred}", (8, 18), cv2.FONT_HERSHEY_SIMPLEX, 0.45, (255, 255, 255), 1)    return canvas

def evaluate(samples: list[Sample], centroids: dict[str, np.ndarray]) -> dict[str, object]:    rows: list[dict[str, object]] = []    confusion = {label: {pred: 0 for pred in LABELS} for label in LABELS}
    for s in samples:        if s.split != "test":            continue
        img = cv2.imread(str(s.image_path))        truth_mask = cv2.imread(str(s.mask_path), cv2.IMREAD_GRAYSCALE)        pred_mask = segment_foreground(img)        pred_box = largest_box(pred_mask)        feature = extract_features(img)        pred, confidence = predict_label(feature, centroids)        confusion[s.label][pred] += 1
        box_score = box_iou(s.box, pred_box) if pred_box else 0.0        mask_score = mask_iou(pred_mask, truth_mask)        annotated = draw_prediction(img, s.box, pred_box, s.label, pred)        out_name = s.image_path.stem + "_prediction.png"        cv2.imwrite(str(OUTPUT_DIR / out_name), annotated)
        rows.append(            {                "image": s.image_path.name,                "label": s.label,                "prediction": pred,                "confidence": round(confidence, 3),                "box_iou": round(box_score, 3),                "mask_iou": round(mask_score, 3),                "challenge": s.challenge,                "output": out_name,            }        )
    correct = sum(row["label"] == row["prediction"] for row in rows)    failures = [        row        for row in rows        if row["label"] != row["prediction"]        or row["confidence"] < 0.78        or row["box_iou"] < 0.75        or row["mask_iou"] < 0.82    ]    metrics = {        "classification_accuracy": round(correct / len(rows), 3),        "correct": correct,        "total": len(rows),        "mean_box_iou": round(float(np.mean([r["box_iou"] for r in rows])), 3),        "mean_mask_iou": round(float(np.mean([r["mask_iou"] for r in rows])), 3),        "failure_cases": len(failures),        "confusion": confusion,    }
    with (REPORT_DIR / "metrics.json").open("w", encoding="utf-8") as handle:        json.dump(metrics, handle, indent=2)    with (REPORT_DIR / "predictions.csv").open("w", newline="", encoding="utf-8") as handle:        writer = csv.DictWriter(handle, fieldnames=list(rows[0].keys()))        writer.writeheader()        writer.writerows(rows)    with (REPORT_DIR / "failure_cases.md").open("w", encoding="utf-8") as handle:        handle.write("# Failure Cases\n\n")        if not failures:            handle.write("No failure case was triggered. Add harder real images before treating the project as reliable.\n")        for row in failures:            handle.write(                f"- `{row['image']}`: true={row['label']}, pred={row['prediction']}, "                f"confidence={row['confidence']}, box_iou={row['box_iou']}, "                f"mask_iou={row['mask_iou']}, challenge={row['challenge']}\n"            )
    return metrics

def main() -> None:    reset_workspace()    samples = create_dataset()    centroids = train_centroid_classifier(samples)    metrics = evaluate(samples, centroids)
    print("STEP 1: dataset")    print(f"images: {len(samples)}")    print(f"labels_csv: {DATA_DIR / 'labels.csv'}")    print()    print("STEP 2: evaluation")    print(f"classification_accuracy: {metrics['classification_accuracy']:.3f} ({metrics['correct']}/{metrics['total']})")    print(f"mean_box_iou: {metrics['mean_box_iou']:.3f}")    print(f"mean_mask_iou: {metrics['mean_mask_iou']:.3f}")    print(f"failure_cases: {metrics['failure_cases']}")    print()    print("STEP 3: files to inspect")    print(f"predictions_csv: {REPORT_DIR / 'predictions.csv'}")    print(f"failure_report: {REPORT_DIR / 'failure_cases.md'}")    print(f"prediction_images: {OUTPUT_DIR}")

if __name__ == "__main__":    main()
Step 3: Run It
Section titled “Step 3: Run It”python vision_workshop.pyYou should see output similar to this:
STEP 1: datasetimages: 51labels_csv: cv_workshop_run/data/labels.csv
STEP 2: evaluationclassification_accuracy: 1.000 (15/15)mean_box_iou: 0.909mean_mask_iou: 0.997failure_cases: 7
STEP 3: files to inspectpredictions_csv: cv_workshop_run/reports/predictions.csvfailure_report: cv_workshop_run/reports/failure_cases.mdprediction_images: cv_workshop_run/outputs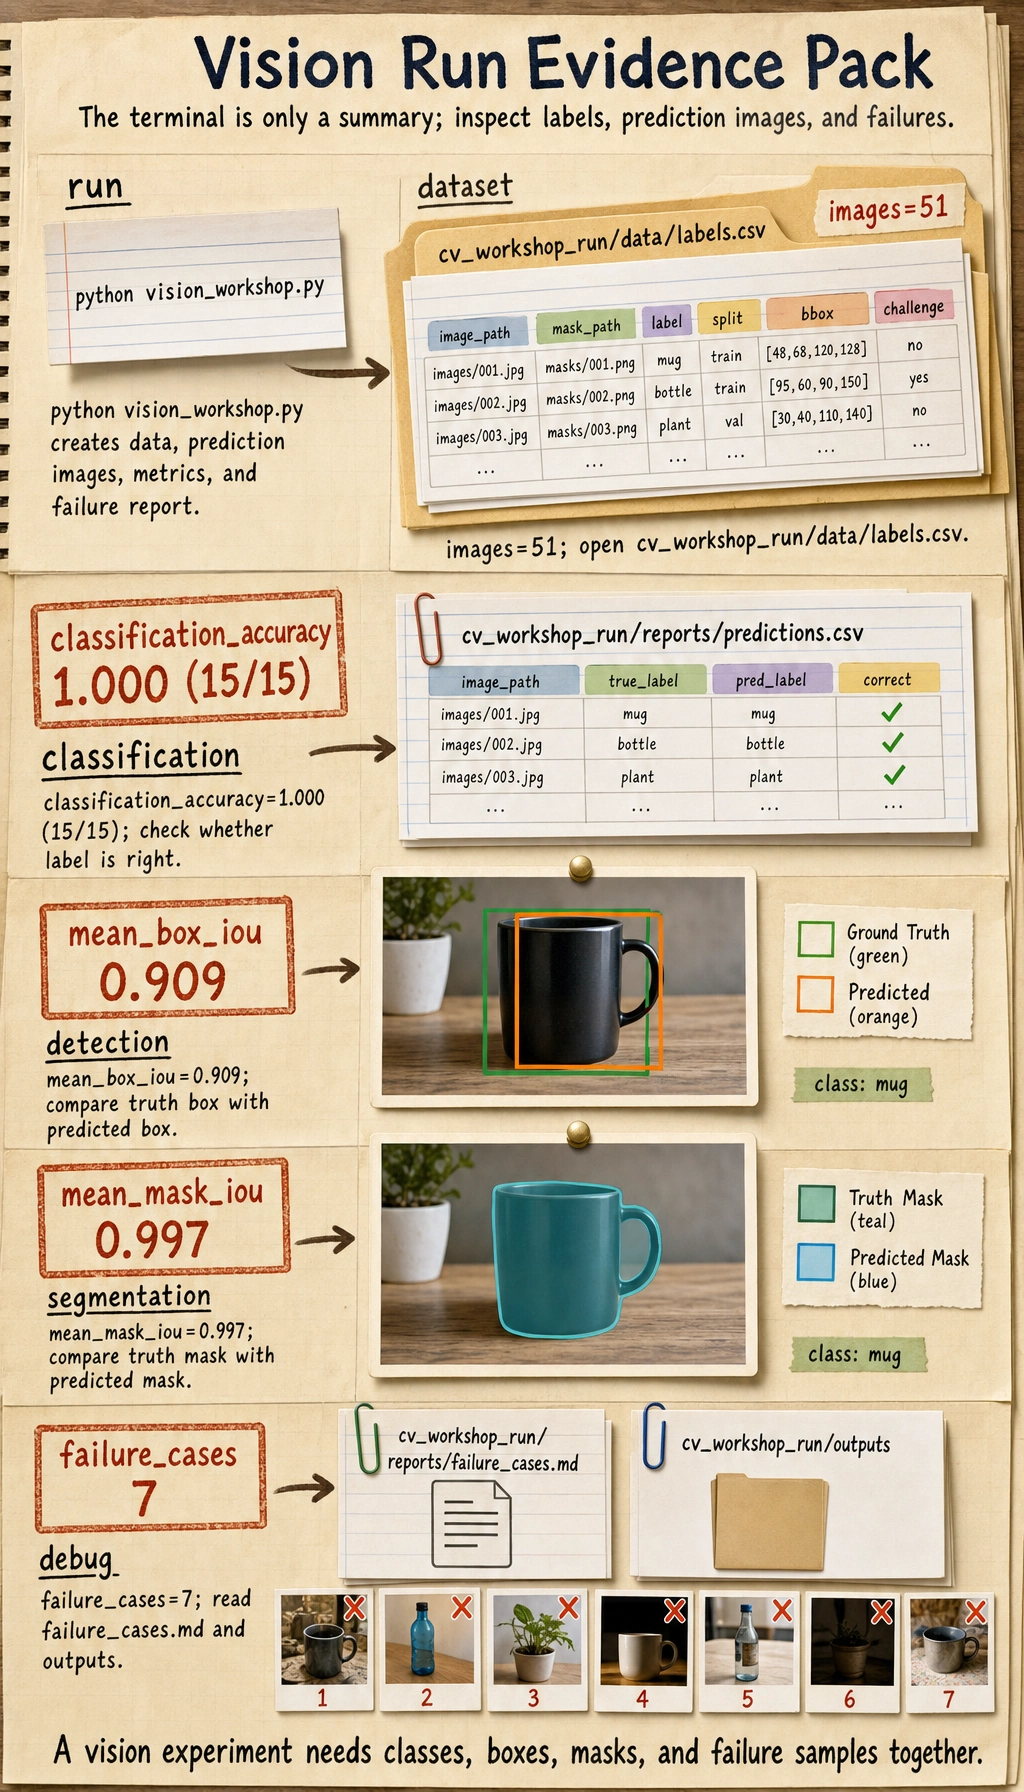
The exact decimals can differ slightly across OpenCV builds, but the folder structure and report files should be the same.
Step 4: Inspect the Dataset
Section titled “Step 4: Inspect the Dataset”Open cv_workshop_run/data/labels.csv. Each row is one sample. The important columns are:
| Column | Meaning |
|---|---|
image_path | Input image filename |
mask_path | Ground-truth mask filename |
label | Class label |
split | train or test |
x1, y1, x2, y2 | Ground-truth bounding box |
challenge | Whether this is a normal or hard sample |
This one CSV already connects three task types:
- classification uses
label; - detection uses
x1, y1, x2, y2; - segmentation uses
mask_path.
Step 5: Read the Model Pipeline in Plain English
Section titled “Step 5: Read the Model Pipeline in Plain English”The script is small, but it contains the same logic as a real project:
create_dataset()creates images, masks, labels, and boxes.segment_foreground()uses grayscale, blur, Otsu thresholding, and morphology to find the object region.largest_box()turns the segmentation mask into a bounding box.extract_features()converts the object into numeric features.train_centroid_classifier()builds one prototype feature vector per class.predict_label()chooses the nearest class prototype.evaluate()saves metrics, prediction images, and failure cases.
This is not meant to beat a deep learning model. It is meant to show the project skeleton. Later, you can replace:
- the centroid classifier with a CNN or pretrained classifier;
largest_box()with a YOLO-style detector;segment_foreground()with a segmentation model.
Step 6: Understand the Metrics
Section titled “Step 6: Understand the Metrics”Before trusting a vision project, check more than one metric:
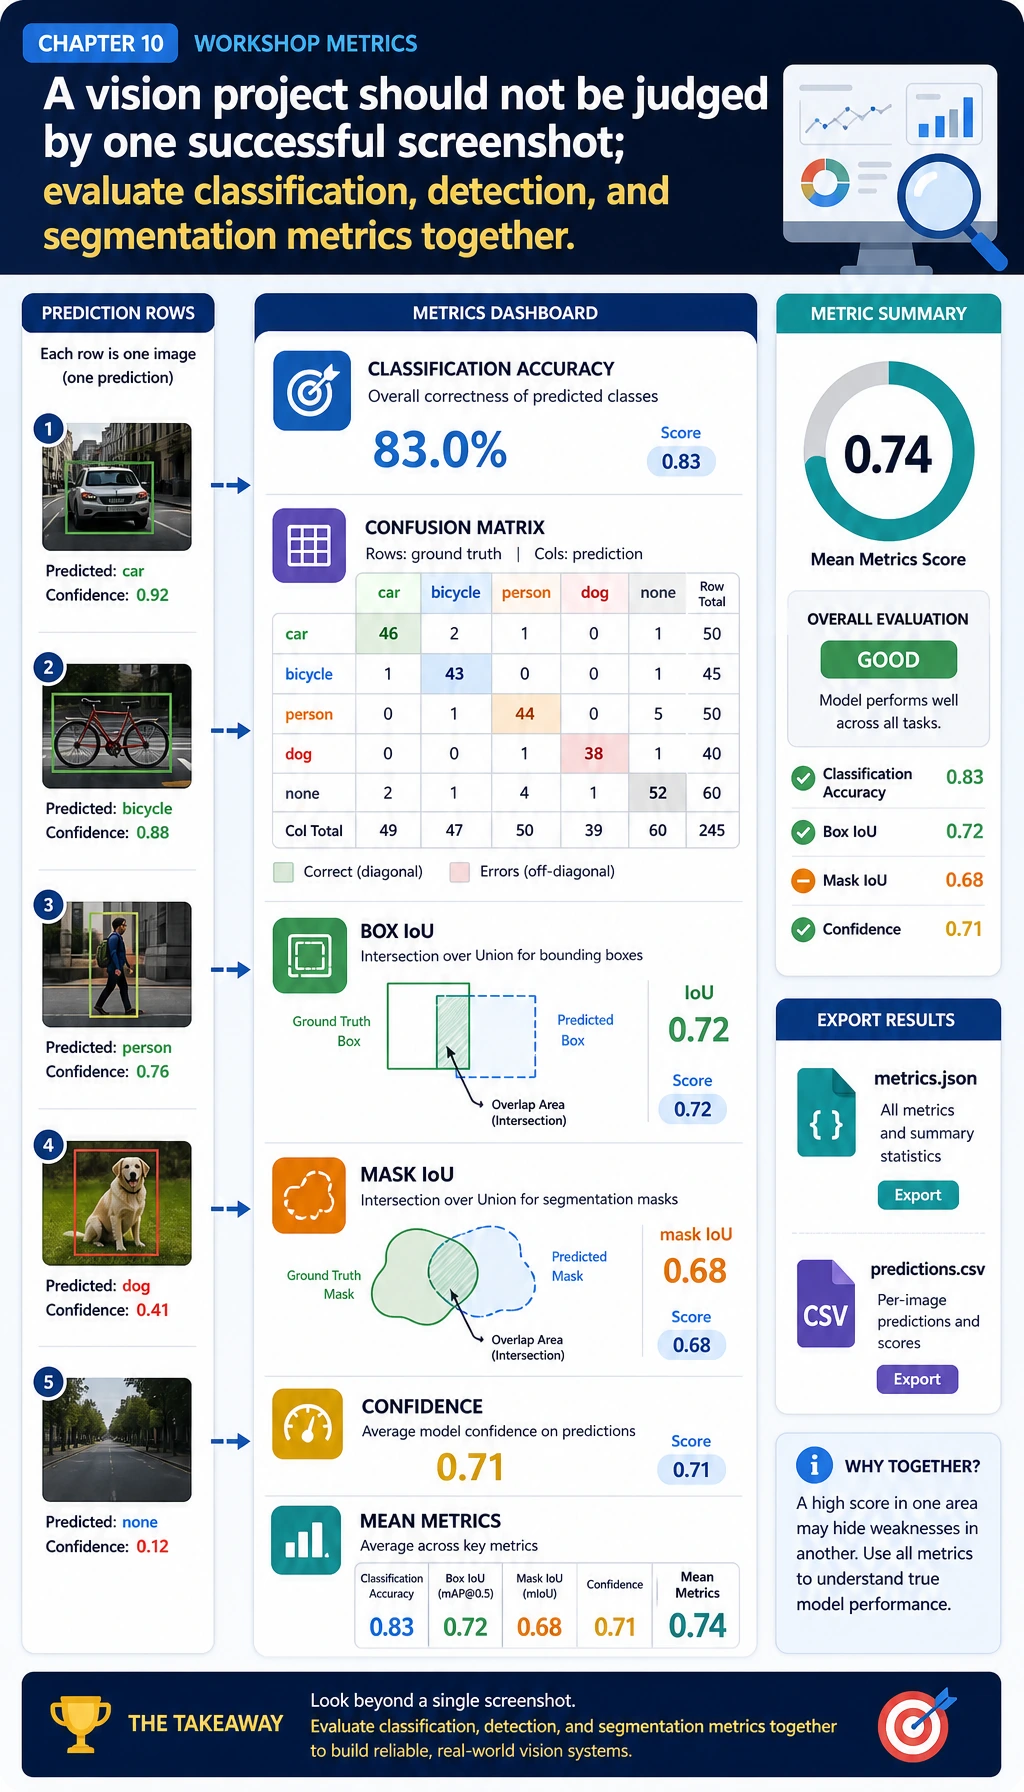
| Metric | What it checks | Why it matters |
|---|---|---|
classification_accuracy | Whether the class label is correct | Useful for classification, but not enough for detection or segmentation |
confusion | Which classes are mixed up | Helps you find class-level mistakes |
box_iou | Whether the predicted box overlaps the true box | Core idea behind detection evaluation |
mask_iou | Whether the predicted mask overlaps the true mask | Core idea behind segmentation evaluation |
confidence | How certain the simple classifier is | Helps find suspicious cases even when the label is correct |
Why can classification_accuracy be 1.000 while failure_cases is still greater than zero? Because a vision project can get the label right but still have a weak box, weak mask, or low confidence. In real projects, that difference matters.
Step 7: Inspect Prediction Images
Section titled “Step 7: Inspect Prediction Images”Open files in cv_workshop_run/outputs/.
Each output image has:
- a green box for the ground truth;
- a red box for the predicted box;
- a text label showing
true=... pred=....
If a red box and green box do not overlap well, the classification may still be correct, but detection quality is not good enough.
Step 8: Read the Failure Report
Section titled “Step 8: Read the Failure Report”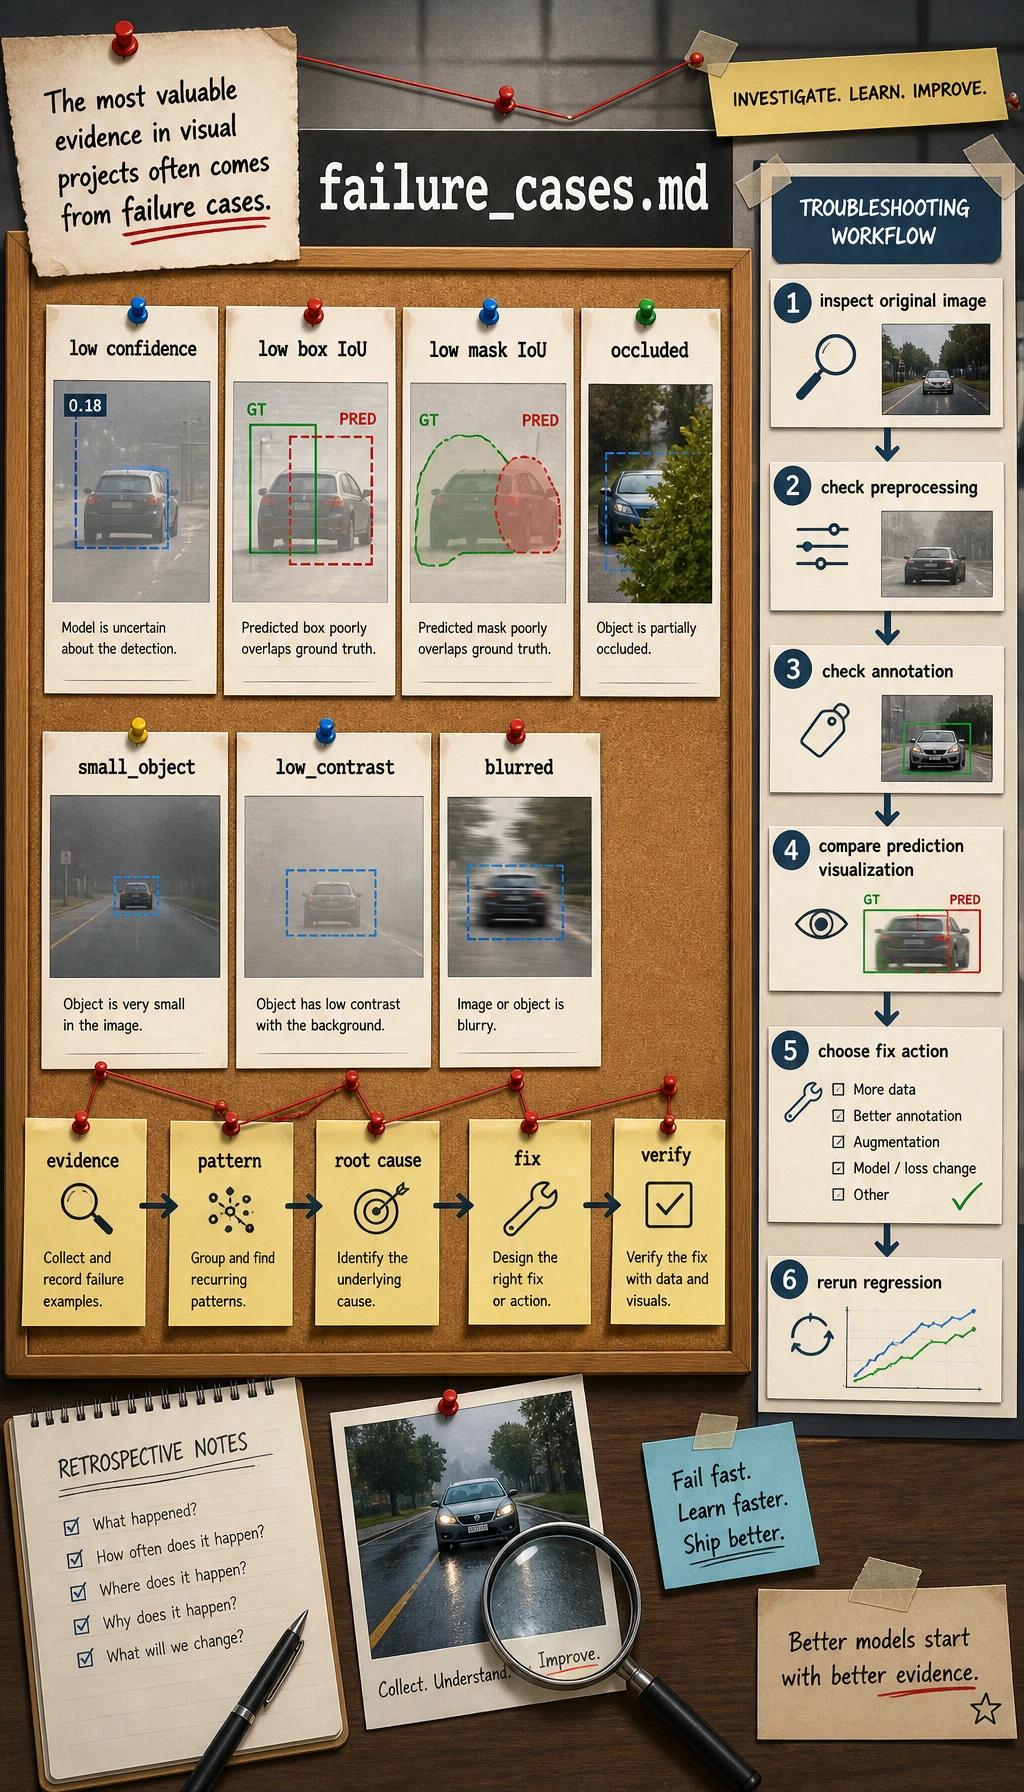
Open:
cv_workshop_run/reports/failure_cases.mdA useful failure report should not only say “wrong.” It should say what evidence made the sample suspicious:
- low confidence;
- low box IoU;
- low mask IoU;
- occlusion;
- small object;
- low contrast;
- blur or edge-touching objects.
When a beginner says “the model is bad,” ask a more precise question:
- Is the image unclear?
- Is the annotation wrong?
- Is the object too small?
- Is preprocessing destroying the signal?
- Is the metric threshold too strict?
Step 9: Common Errors and Fixes
Section titled “Step 9: Common Errors and Fixes”-
ModuleNotFoundError: No module named 'cv2'OpenCV is not installed in the current Python environment. Activate the environment, then runpip install opencv-python numpy. -
Output folder is empty The script did not run from the folder you expected. Run
pwdorcdinto the project folder, then run again. -
All masks look empty Thresholding may have failed because contrast is too low. Inspect original images, adjust contrast, or try a different segmentation method.
-
Accuracy is high but the failure report is not empty Labels may be correct while boxes, masks, or confidence still have issues. Treat this as normal and inspect the failure cases.
-
Metrics change after editing the script Random generation, thresholds, or image operations changed. Keep the random seed and record script changes in the README.
Step 10: Practice Tasks
Section titled “Step 10: Practice Tasks”Try these changes one by one:
- Add a fourth class named
star. - Change
challenge_planso more test samples areblurredoroccluded. - Lower the failure threshold for
box_ioufrom0.75to0.60, then comparefailure_cases.md. - Save side-by-side images showing original, mask, and prediction.
- Replace the centroid classifier with a small CNN or a pretrained classifier after you finish this baseline.
Operation guide and checkpoints
- When you add
star, update the label list, sample generation, and any metric or report text that assumes three classes. Re-run the script and compare the new failures, not just the final accuracy. - For
challenge_plan, keep the same model and split, then increase blur and occlusion in a controlled way. The goal is to see which failure mode grows first. - When you lower the
box_iouthreshold, readfailure_cases.mdas a debugging aid, not as a score target. Watch for false positives and false negatives shifting in opposite directions. - The side-by-side image should keep the same scale and ordering for every sample so it can be inspected quickly. Original, mask, and prediction are the minimum useful trio.
- Only replace the centroid baseline after you can describe what it gets wrong. A small CNN or pretrained classifier is the next step, not the first step.
Expected_output: a short comparison note that names one change, one metric shift, and one failure example.
Completion Standard
Section titled “Completion Standard”You can consider this workshop complete when you have:
- run
python vision_workshop.py; - opened
labels.csv; - inspected at least three prediction images;
- read
metrics.jsonandpredictions.csv; - written one short explanation of a failure sample.
If you can explain why one project needs image files, annotations, prediction visualizations, metrics, and failure analysis together, you have crossed the most important line in Chapter 10: you are no longer only “running a model”; you are building a reproducible vision project.
Evidence to Keep
Section titled “Evidence to Keep”Keep this page’s proof of learning as a small evidence card:
- Task Output
- classification label, detection box, segmentation mask, OCR text, or video event
- Artifacts
- original image, processed image, prediction overlay, metrics file, and failure samples
- Metric
- accuracy/F1, mAP, IoU, Dice, latency, or scenario-specific review score
- Failure Check
- data quality, label error, preprocessing mismatch, threshold, or deployment constraint
- Expected Output
- a reproducible run folder with visual outputs and a short failure report