
6.2.8 Practical Tips
Learning Objectives
Section titled “Learning Objectives”- Write device-safe code for CPU, CUDA, and Apple MPS.
- Fix common randomness sources for repeatable debugging.
- Use gradient clipping when gradients explode.
- Use AMP on CUDA when available, with a safe fallback elsewhere.
- Save and restore checkpoints.
- Follow a debugging order when loss does not improve.
Debug Order First
Section titled “Debug Order First”When training is broken, check simple engineering issues before redesigning the model.
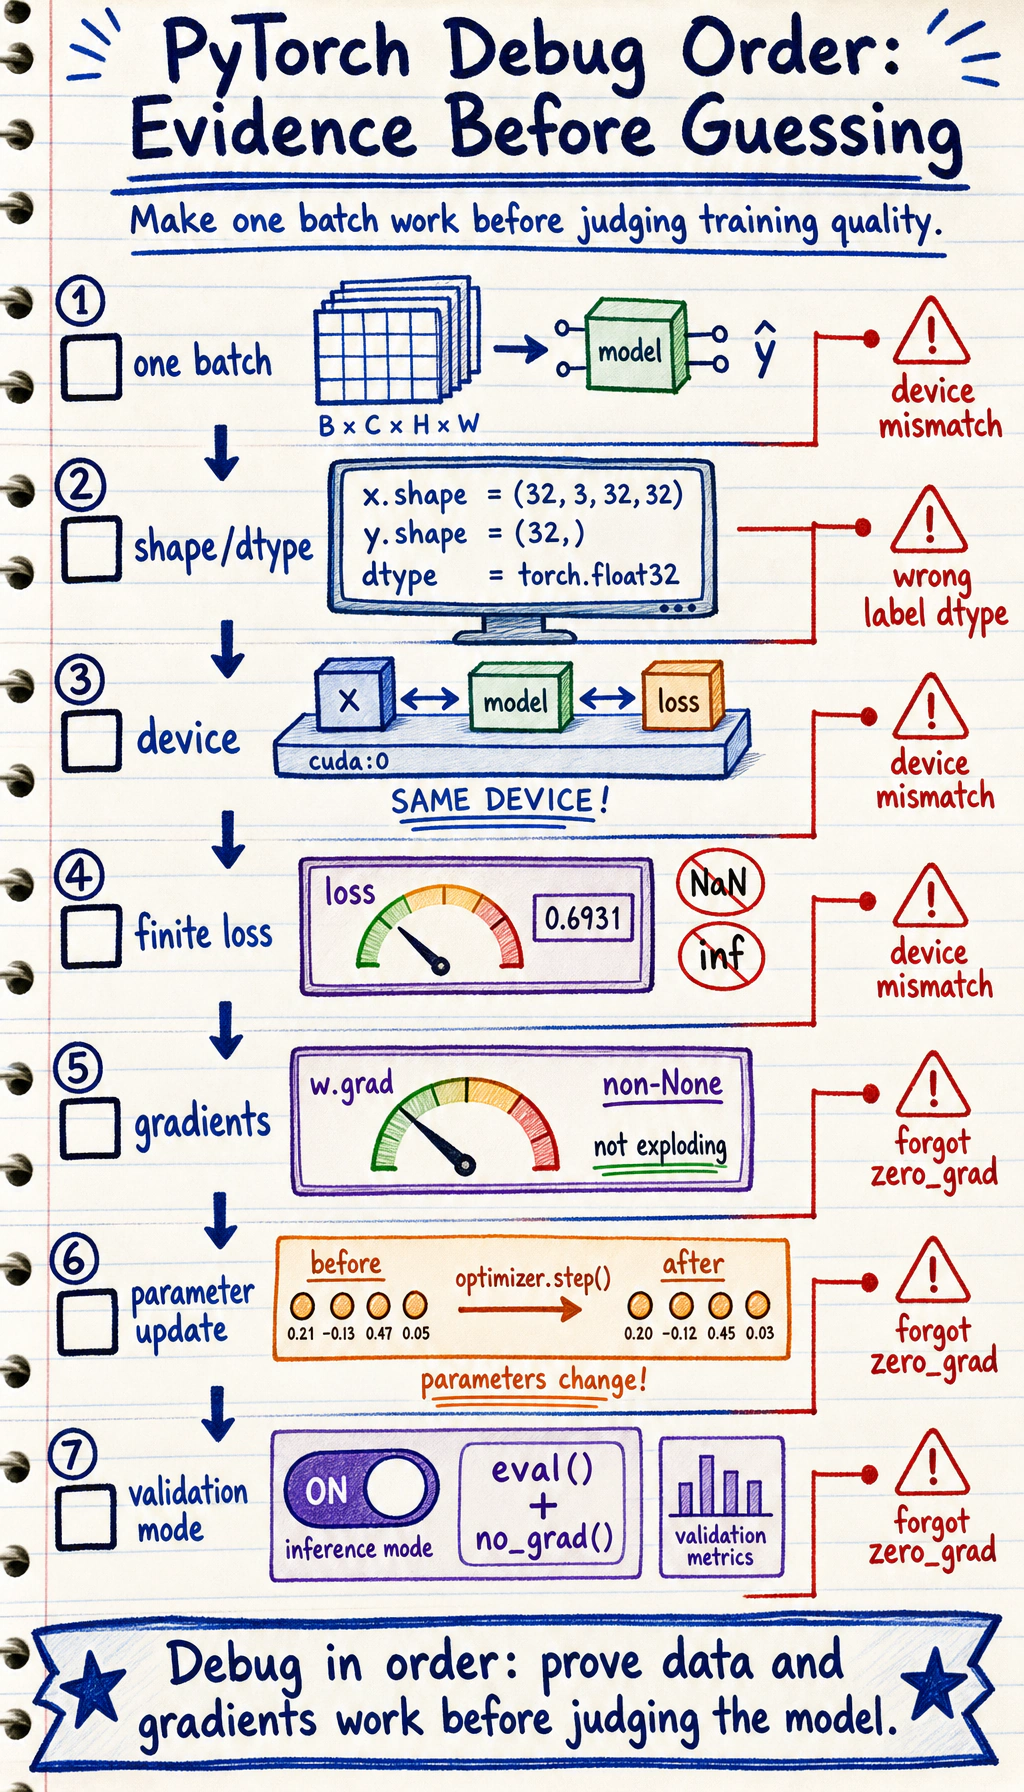
Use this order:
- Is one batch loaded correctly?
- Do shape and dtype match the model and loss?
- Are model and data on the same device?
- Is the loss finite?
- Are gradients non-
Noneand not exploding? - Are parameters updated after
optimizer.step()? - Are validation and prediction wrapped in
eval()andno_grad()?
Lab 1: Device and Seed
Section titled “Lab 1: Device and Seed”This lab runs on CPU, CUDA, or Apple Silicon MPS.
import random
import numpy as npimport torch
if torch.cuda.is_available():    device = torch.device("cuda")elif torch.backends.mps.is_available():    device = torch.device("mps")else:    device = torch.device("cpu")

def set_seed(seed=42):    random.seed(seed)    np.random.seed(seed)    torch.manual_seed(seed)    if torch.cuda.is_available():        torch.cuda.manual_seed_all(seed)

print("device_seed_lab")print("device:", device)
set_seed(42)a = torch.randn(3)set_seed(42)b = torch.randn(3)
print("same random:", torch.equal(a, b))print("sample:", a)
Example output:
device_seed_labdevice: mpssame random: Truesample: tensor([0.3367, 0.1288, 0.2345])Your device line may show cpu, cuda, or mps.
Reproducibility note:
- Seeds make debugging much easier.
- Some GPU kernels and parallel details can still produce tiny differences.
- Aim for “reproducible enough to debug,” not mathematical perfection in every environment.
Lab 2: Gradient Clipping
Section titled “Lab 2: Gradient Clipping”Gradient clipping limits gradient norm before the optimizer update. It is common in RNNs, Transformers, and unstable deep networks.
import torchfrom torch import nn
torch.manual_seed(42)
model = nn.Sequential(    nn.Linear(10, 20),    nn.ReLU(),    nn.Linear(20, 1),)
x = torch.randn(32, 10)y = torch.randn(32, 1) * 50
loss = nn.MSELoss()(model(x), y)loss.backward()

def grad_norm(model):    total = 0.0    for param in model.parameters():        if param.grad is not None:            total += param.grad.norm(2).item() ** 2    return total ** 0.5

print("grad_clip_lab")before = grad_norm(model)torch.nn.utils.clip_grad_norm_(model.parameters(), max_norm=1.0)after = grad_norm(model)
print("before:", round(before, 4))print("after:", round(after, 4))
Expected output:
grad_clip_labbefore: 38.7677after: 1.0Where clipping belongs:
Do not clip before backward(), because gradients do not exist yet.
Lab 3: AMP With Safe Fallback
Section titled “Lab 3: AMP With Safe Fallback”AMP means automatic mixed precision. On CUDA GPUs, it can reduce memory use and speed up training. On CPU or MPS, this example falls back to normal precision.
import torchfrom torch import nn
if torch.cuda.is_available():    device = torch.device("cuda")elif torch.backends.mps.is_available():    device = torch.device("mps")else:    device = torch.device("cpu")
model = nn.Sequential(nn.Linear(16, 32), nn.ReLU(), nn.Linear(32, 1)).to(device)optimizer = torch.optim.Adam(model.parameters(), lr=0.01)loss_fn = nn.MSELoss()
x = torch.randn(64, 16, device=device)y = torch.randn(64, 1, device=device)
print("amp_lab")if device.type == "cuda":    scaler = torch.amp.GradScaler("cuda")    for _ in range(3):        optimizer.zero_grad()        with torch.amp.autocast("cuda"):            loss = loss_fn(model(x), y)        scaler.scale(loss).backward()        scaler.step(optimizer)        scaler.update()    print("used AMP on cuda")else:    for _ in range(3):        optimizer.zero_grad()        loss = loss_fn(model(x), y)        loss.backward()        optimizer.step()    print("used standard precision on", device.type)
Example output:
amp_labused standard precision on mpsUse AMP when:
- you train on CUDA;
- memory is tight;
- the model supports mixed precision well.
Keep normal precision when:
- you are debugging numerical problems;
- you are on CPU for a tiny example;
- you need the simplest possible baseline.
Lab 4: Save and Restore Checkpoints
Section titled “Lab 4: Save and Restore Checkpoints”Checkpoints should usually include:
model.state_dict();optimizer.state_dict();- epoch;
- best validation metric;
- configuration or label mapping when needed.
This lab uses a temporary directory so it does not leave files behind.
import osimport tempfile
import torchfrom torch import nn
model = nn.Linear(2, 1)optimizer = torch.optim.SGD(model.parameters(), lr=0.1)
print("checkpoint_lab")with tempfile.TemporaryDirectory() as tmp:    checkpoint_path = os.path.join(tmp, "demo_checkpoint.pt")
    torch.save(        {            "model_state_dict": model.state_dict(),            "optimizer_state_dict": optimizer.state_dict(),            "epoch": 5,            "best_val": 0.123,        },        checkpoint_path,    )
    new_model = nn.Linear(2, 1)    new_optimizer = torch.optim.SGD(new_model.parameters(), lr=0.1)
    ckpt = torch.load(checkpoint_path, map_location="cpu")    new_model.load_state_dict(ckpt["model_state_dict"])    new_optimizer.load_state_dict(ckpt["optimizer_state_dict"])
    print("restored epoch:", ckpt["epoch"])    print("restored best_val:", ckpt["best_val"])
Expected output:
checkpoint_labrestored epoch: 5restored best_val: 0.123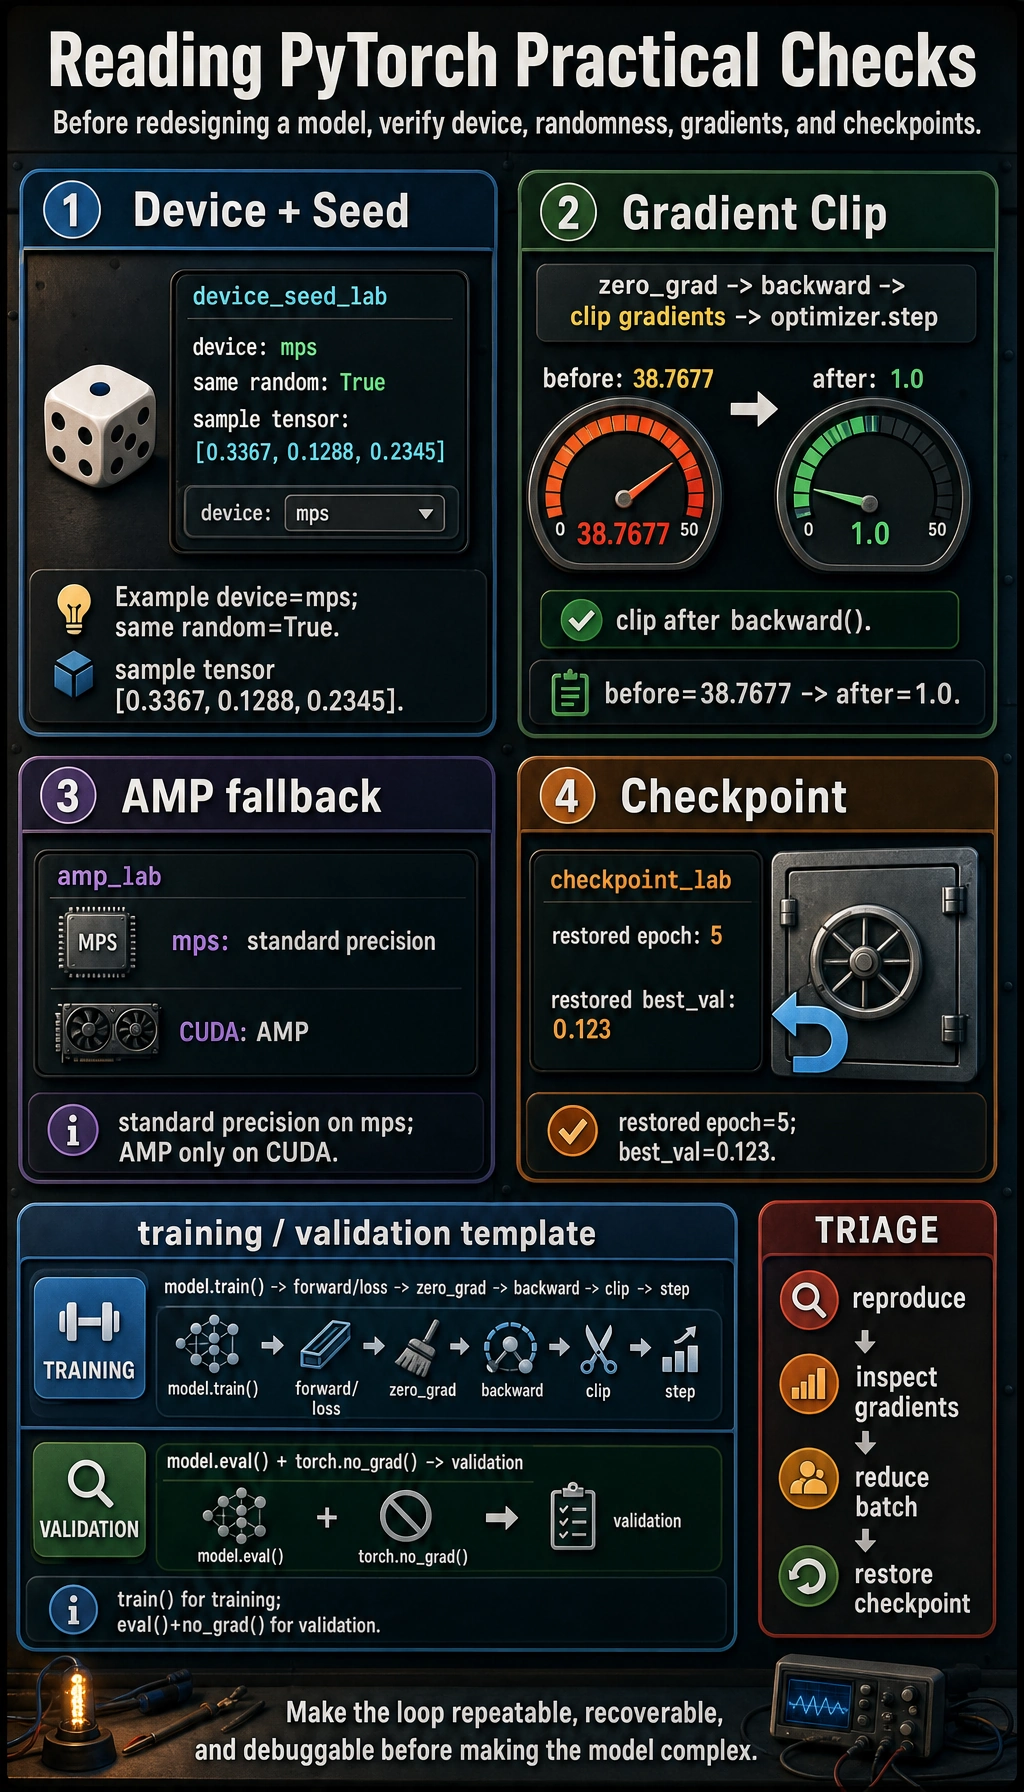
For real projects, save to a stable path such as:
checkpoints/best_model.ptEvidence to Keep
Section titled “Evidence to Keep”For every PyTorch project, keep a short run-safety note:
- Device
- cpu/cuda/mps and model/data match
- Seed
- set before debugging
- Grad Norm
- measured before and after clipping when unstable
- Precision
- AMP used only when supported, fallback works
- Checkpoint
- model_state_dict, optimizer_state_dict, epoch, best_val
- Debug Order
- batch → shape → device → loss → gradients → update → validation
Memory and Stability Triage
Section titled “Memory and Stability Triage”| Symptom | First response | Next response |
|---|---|---|
| out of memory | reduce batch_size | use AMP on CUDA, then gradient accumulation |
loss becomes nan | lower learning rate | inspect inputs, add gradient clipping |
| validation is slow | add model.eval() and torch.no_grad() | reduce validation frequency |
| training changes every run | set seeds | log config and data split |
| checkpoint cannot load | check architecture and key names | inspect state_dict().keys() |
Gradient accumulation idea:
large effective batch = several smaller forward/backward passes + one optimizer stepIt is useful when memory cannot hold the full batch at once.
Saveable Training Template
Section titled “Saveable Training Template”model.train()for batch_x, batch_y in train_loader: batch_x = batch_x.to(device) batch_y = batch_y.to(device)
pred = model(batch_x) loss = loss_fn(pred, batch_y)
optimizer.zero_grad() loss.backward() torch.nn.utils.clip_grad_norm_(model.parameters(), max_norm=1.0) optimizer.step()
model.eval()with torch.no_grad(): for batch_x, batch_y in val_loader: batch_x = batch_x.to(device) batch_y = batch_y.to(device) pred = model(batch_x) val_loss = loss_fn(pred, batch_y)This template is plain, but it prevents the most common PyTorch training mistakes.
Exercises
Section titled “Exercises”- Add device handling to your previous training loop and confirm model/data devices match.
- Print gradient norm before and after clipping in your own model.
- Add checkpoint saving for the best validation loss.
- Temporarily raise the learning rate until loss becomes unstable, then recover by lowering the learning rate and clipping gradients.
Solution approach and explanation
- Move the model, input tensors, labels, and any tensors created inside the loop to the same
device. A quick assertion or printed device note prevents many hard-to-read runtime errors. - After clipping, the norm should be capped near the threshold you set. If the norm is huge before clipping, also inspect learning rate, loss scale, and data values.
- Save at least
model.state_dict(), the best validation loss, and the epoch. For resumable training, also save optimizer state and configuration. - A too-high learning rate often causes spikes, oscillation, or
nan. Lowering the learning rate and clipping gradients can stabilize training, but it will not fix wrong labels, bad shapes, or data leakage.
Key Takeaways
Section titled “Key Takeaways”- Do not hard-code
.cuda(); choose a device and move both model and data. - Set seeds before debugging training behavior.
- Use gradient clipping after
backward()and beforestep(). - Use AMP mainly on CUDA and keep a simple fallback path.
- Save checkpoints with model state, optimizer state, epoch, and validation metric.