
10.3.4 YOLO Series
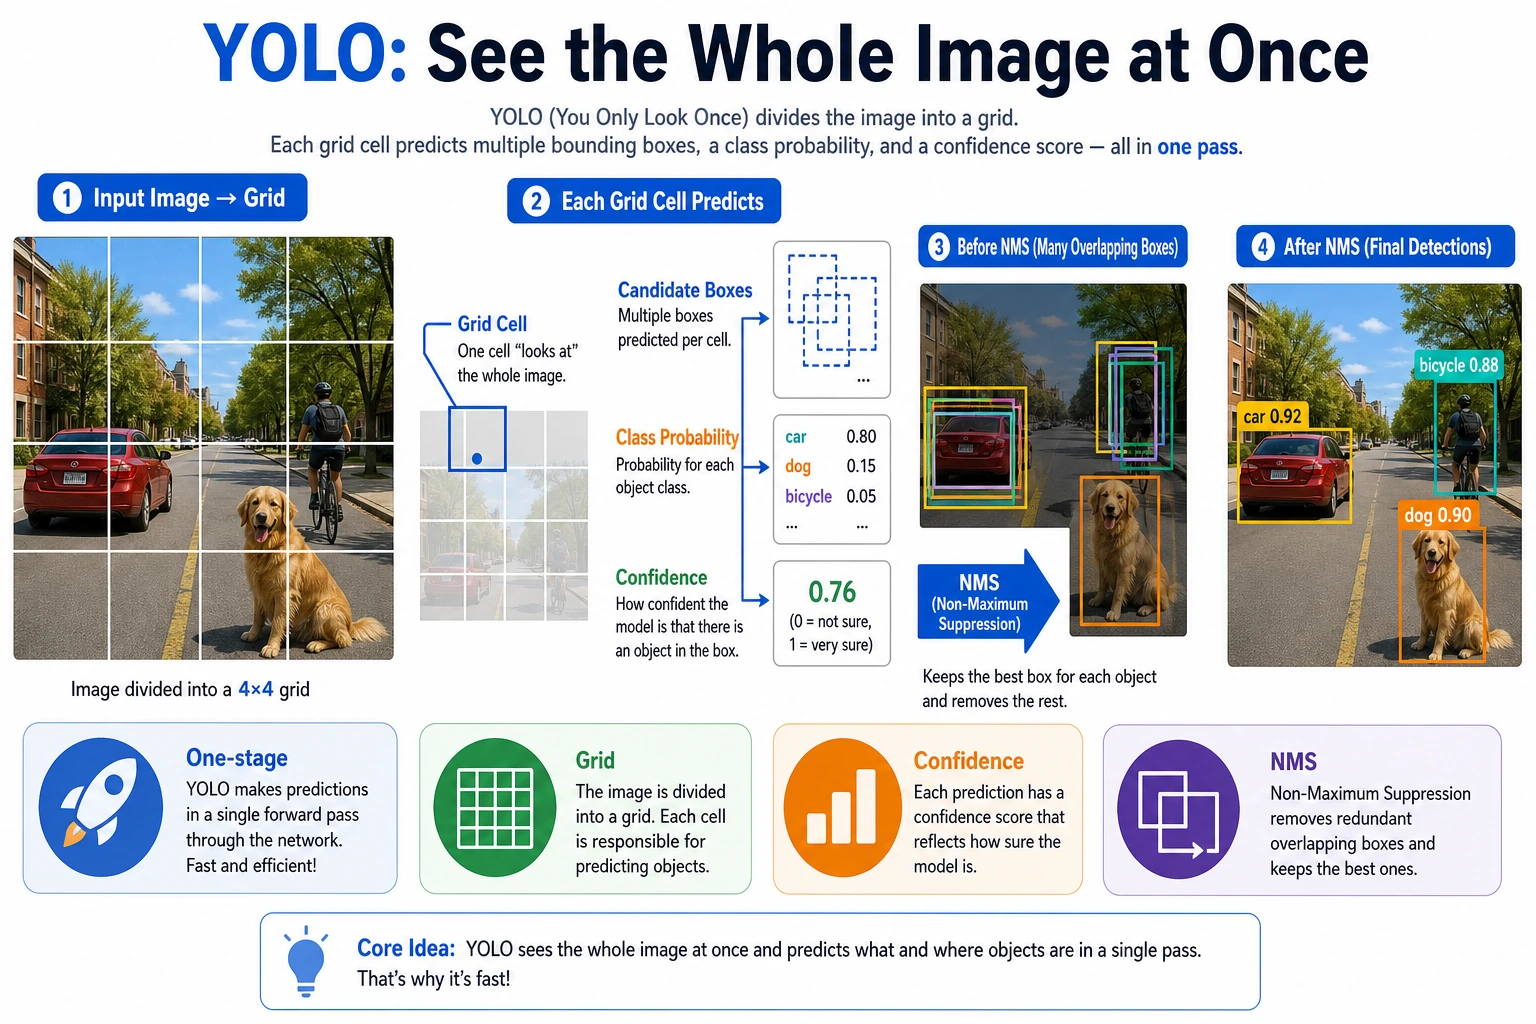
Learning Objectives
Section titled “Learning Objectives”- Understand what type of detector YOLO belongs to
- Understand the main difference between one-stage detection and two-stage detection
- Understand the basic role of confidence, box filtering, and NMS
- Build a practical judgment of YOLO’s value in engineering deployment
What is the core idea behind YOLO?
Section titled “What is the core idea behind YOLO?”One-stage detection
Section titled “One-stage detection”What YOLO tries to do is:
- No two-step process
- Directly output classes and boxes from the image in one pass
Why is this attractive?
Section titled “Why is this attractive?”Because it reduces:
- The extra proposal stage
- A more complex detection pipeline
So it is easier to achieve:
- Real-time performance
An analogy
Section titled “An analogy”Two-stage detection is like first drawing around suspicious areas, then sending someone to inspect them one by one. YOLO is more like taking one quick look and reporting at the same time:
- Where the objects are
- What they are
What does YOLO’s output roughly look like?
Section titled “What does YOLO’s output roughly look like?”You can usually think of it as a set of candidate boxes, where each candidate includes:
- Class
- Confidence
- Bounding box coordinates
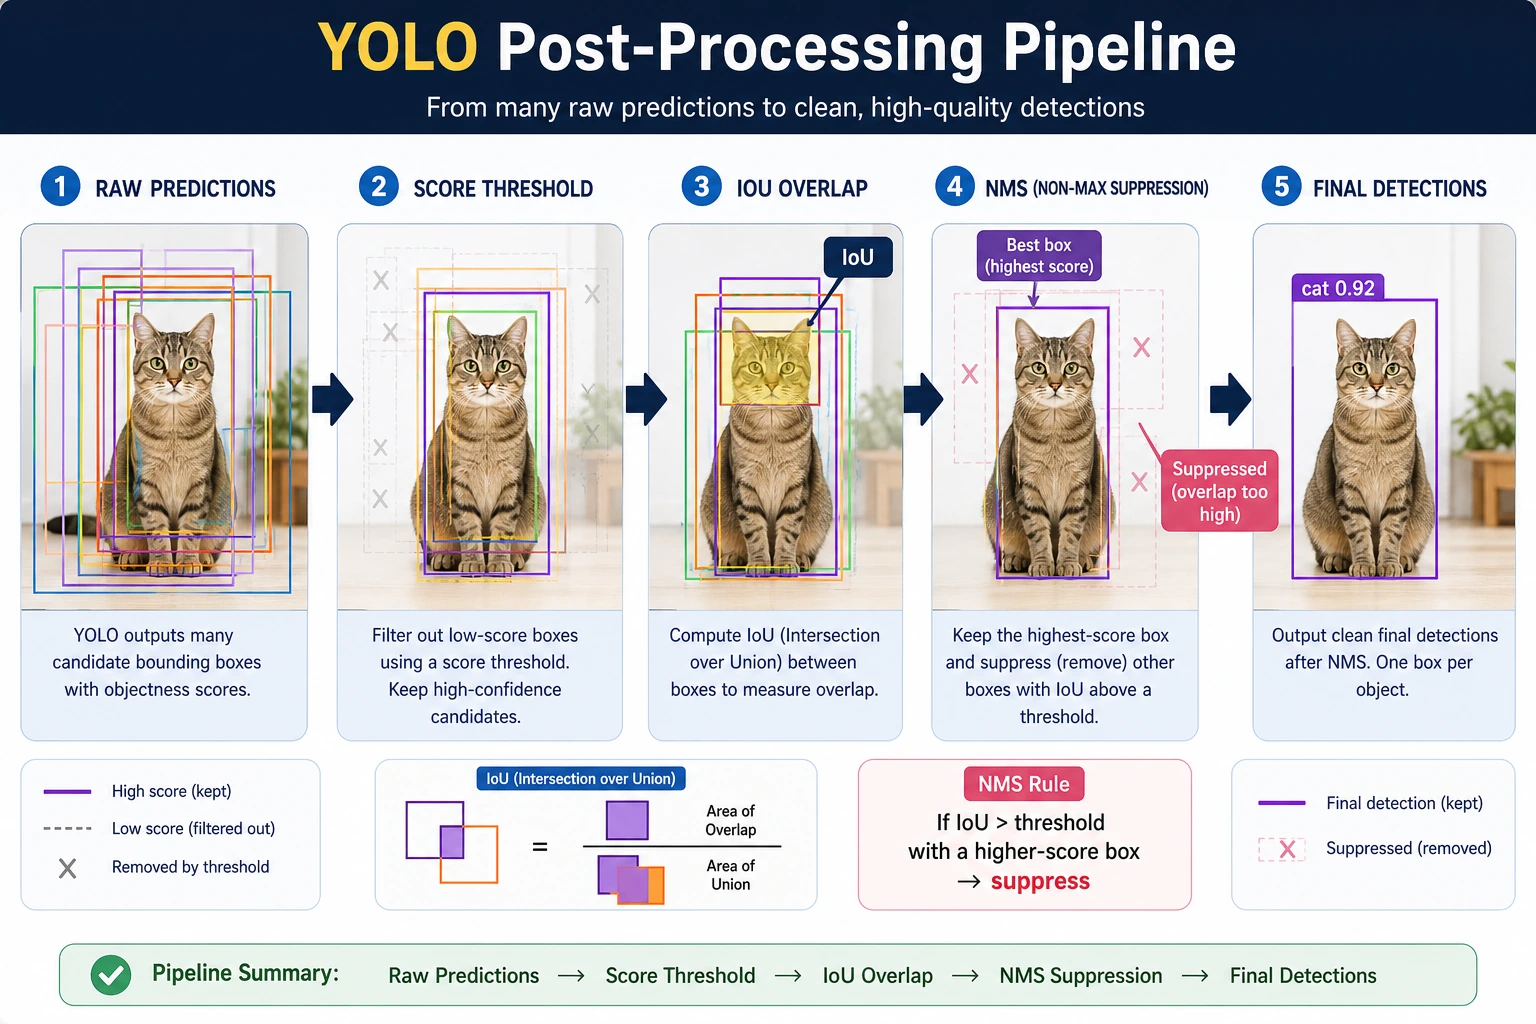
Then, through filtering and NMS, the final result is obtained.
A more beginner-friendly analogy
Section titled “A more beginner-friendly analogy”You can think of YOLO as:
- The model scans the whole image first
- Then it reports all at once: “Where something seems to be, what it seems to be, and roughly where the box is”
This is very different from two-stage detection. Two-stage detection is more like:
- First drawing suspicious regions everywhere
- Then carefully checking each region
YOLO is more like:
Scan once, then report the candidate objects as a whole.
A judgment table that beginners should remember first
Section titled “A judgment table that beginners should remember first”| Current question | First layer to inspect |
|---|---|
| Why is it fast? | The one-stage route and short inference chain |
| Why are there so many boxes? | Candidate box outputs |
| Why do the results overlap? | NMS and thresholds |
| Why do real-time projects like it? | Engineering deployment and ecosystem maturity |
This table is very suitable for beginners because it turns YOLO from a “collection of version names” back into a few concrete questions.
A minimal “candidate box output” example
Section titled “A minimal “candidate box output” example”The example below is not simulating a real YOLO network, but it helps you build one very important intuition:
- Model outputs are usually not the “final answer”
- They are a batch of candidate boxes with scores
predictions = [    {"class": "person", "score": 0.93, "box": (12, 18, 80, 160)},    {"class": "person", "score": 0.87, "box": (15, 20, 82, 158)},    {"class": "dog", "score": 0.78, "box": (120, 60, 190, 150)},]
for pred in predictions:    print(pred)
Expected output:
{'class': 'person', 'score': 0.93, 'box': (12, 18, 80, 160)}{'class': 'person', 'score': 0.87, 'box': (15, 20, 82, 158)}{'class': 'dog', 'score': 0.78, 'box': (120, 60, 190, 150)}The first two boxes are both person candidates and are close to each other. That is the setup for the NMS example below.
The most important thing to remember from this output is not the field names, but rather:
- One-stage detection often naturally produces many candidates
- Post-processing is part of the detection pipeline itself
First, run a minimal NMS intuition example
Section titled “First, run a minimal NMS intuition example”def iou(box_a, box_b): ax1, ay1, ax2, ay2 = box_a bx1, by1, bx2, by2 = box_b
inter_x1 = max(ax1, bx1) inter_y1 = max(ay1, by1) inter_x2 = min(ax2, bx2) inter_y2 = min(ay2, by2)
inter_w = max(0, inter_x2 - inter_x1) inter_h = max(0, inter_y2 - inter_y1) inter_area = inter_w * inter_h
area_a = (ax2 - ax1) * (ay2 - ay1) area_b = (bx2 - bx1) * (by2 - by1) union = area_a + area_b - inter_area return inter_area / union if union > 0 else 0.0
predictions = [ {"box": (10, 10, 30, 30), "score": 0.95}, {"box": (12, 12, 31, 31), "score": 0.88}, {"box": (60, 60, 90, 90), "score": 0.91},]
def nms(preds, iou_threshold=0.5): preds = sorted(preds, key=lambda x: x["score"], reverse=True) kept = []
while preds: best = preds.pop(0) kept.append(best) preds = [ pred for pred in preds if iou(best["box"], pred["box"]) < iou_threshold ]
return kept
print(nms(predictions))Expected output:
[{'box': (10, 10, 30, 30), 'score': 0.95}, {'box': (60, 60, 90, 90), 'score': 0.91}]The middle box is removed because it overlaps too much with the highest-scoring first box. The third box is kept because it is far away and likely represents another object.
What is the key value of this example?
Section titled “What is the key value of this example?”It shows that detection outputs are not immediately usable. In many cases, the model will produce:
- A bunch of overlapping candidate boxes
And the role of NMS is:
- Keep the few most representative ones
Why is this especially important for YOLO?
Section titled “Why is this especially important for YOLO?”Because a one-stage route like YOLO naturally produces many candidates, and post-processing is part of the whole detection pipeline.
Another minimal example: threshold filtering first
Section titled “Another minimal example: threshold filtering first”predictions = [ {"class": "person", "score": 0.93}, {"class": "person", "score": 0.48}, {"class": "dog", "score": 0.78},]
def filter_by_score(preds, threshold=0.5): return [pred for pred in preds if pred["score"] >= threshold]
print(filter_by_score(predictions, threshold=0.5))Expected output:
[{'class': 'person', 'score': 0.93}, {'class': 'dog', 'score': 0.78}]The lower-scoring person candidate is removed. In a real project, changing this threshold directly changes the balance between missed detections and false detections.
This example is very suitable for beginners because it helps you see:
- Detection systems usually do not draw boxes from all candidates directly
- They first filter with scores and rules
Why is YOLO so popular in engineering?
Section titled “Why is YOLO so popular in engineering?”Strong real-time performance
Section titled “Strong real-time performance”Many scenarios directly require:
- Real-time camera detection
- Fast response on edge devices
YOLO-style routes are very suitable for these needs.
Relatively unified structure
Section titled “Relatively unified structure”For many engineering practitioners, it is easier to implement than a complicated multi-stage pipeline.
Mature community and engineering ecosystem
Section titled “Mature community and engineering ecosystem”This makes it more likely to be tried first in real projects.
When doing a real-time detection project for the first time, why do many teams try YOLO first?
Section titled “When doing a real-time detection project for the first time, why do many teams try YOLO first?”Because YOLO often satisfies several very practical conditions at once:
- Easy to get started
- Short inference chain
- Many community models
- Plenty of deployment documentation
In other words, its appeal is not just accuracy, but:
It is especially easy to quickly get a version that “works in engineering.”
If you put YOLO into a project, what is the most worth showing first?
Section titled “If you put YOLO into a project, what is the most worth showing first?”What is usually most worth showing is not:
- Only one detection result image
But rather:
- Baseline detection results
- Comparison before and after threshold tuning
- Box changes before and after NMS
- False positive, missed detection, and small-object cases
This makes it easier for others to see:
- That you understand the detection pipeline
- Not just that you called an existing model
The most common pitfalls
Section titled “The most common pitfalls”Mistake 1: YOLO equals object detection
Section titled “Mistake 1: YOLO equals object detection”YOLO is an important route, but not the whole field.
Mistake 2: Faster automatically means better
Section titled “Mistake 2: Faster automatically means better”You still need to consider:
- Small-object performance
- Box localization quality
- Deployment constraints
Mistake 3: Post-processing is not important
Section titled “Mistake 3: Post-processing is not important”Post-processing such as NMS and threshold settings directly affects the final experience.
The safest default sequence for a first YOLO project
Section titled “The safest default sequence for a first YOLO project”When you first put YOLO into a project, the safer sequence is usually:
- First define the class boundaries and annotation rules clearly
- First run a baseline with the default model and default thresholds
- First look at false positives, missed detections, and small-object performance
- Then adjust thresholds and NMS
- Finally consider switching to a larger model or more complex augmentation
This sequence is important because the mistake many beginners make is:
- Switching models right away
- Without understanding what the baseline is actually getting wrong
A troubleshooting order beginners can copy directly
Section titled “A troubleshooting order beginners can copy directly”If a YOLO project does not perform well, a more stable troubleshooting order is usually:
- Check the class boundaries and annotation rules first
- Then check the score threshold and NMS
- Then see which types of objects the false positives / missed detections are concentrated on
- Finally consider switching to a larger model or more complex augmentation
This is usually more effective than directly changing the version number.
Evidence to Keep
Section titled “Evidence to Keep”Keep this page’s proof of learning as a small evidence card:
- Input Image
- detection sample with ground-truth or expected objects
- Prediction
- boxes, labels, confidence scores, IoU, and threshold settings
- Metric
- precision/recall, mAP, false positives, and false negatives
- Failure Check
- small object, overlap, NMS, poor labels, or confidence threshold
- Expected Output
- annotated image plus detection metrics or error buckets
Summary
Section titled “Summary”The most important thing in this section is to build an engineering judgment:
YOLO represents a one-stage, real-time-friendly detection route. Its popularity is not just because it can detect objects, but because it is easier to quickly get detection working in engineering practice.
What you should take away from this section
Section titled “What you should take away from this section”- The most important thing about YOLO is not the version number, but the one-stage real-time route it represents
- Its output is usually a set of candidate boxes, and post-processing is part of the detection pipeline
- When doing a project for the first time, first understand the false positives and missed detections in the baseline, then talk about model upgrades
Exercises
Section titled “Exercises”- Adjust the
iou_thresholdin the example and see how the number of kept boxes changes. - Explain in your own words: why is one-stage detection easier to make real-time?
- Why is NMS important for detection tasks?
- Think about it: when might you not choose YOLO first?
Solution approach and explanation
- For NMS, a higher
iou_thresholdusually suppresses fewer overlapping boxes, so more boxes may remain. A lower threshold suppresses more aggressively. - One-stage detection is easier to make real-time because boxes and classes are predicted in one forward pass instead of through a separate proposal stage.
- NMS is important because detectors often output many overlapping boxes for the same object. NMS keeps the most credible one and removes duplicates.
- You might not choose YOLO first when strict small-object accuracy, detailed localization, heavy occlusion, or non-real-time high-precision review matters more than speed.