
1.3.2 VS Code Configuration
What this section is about
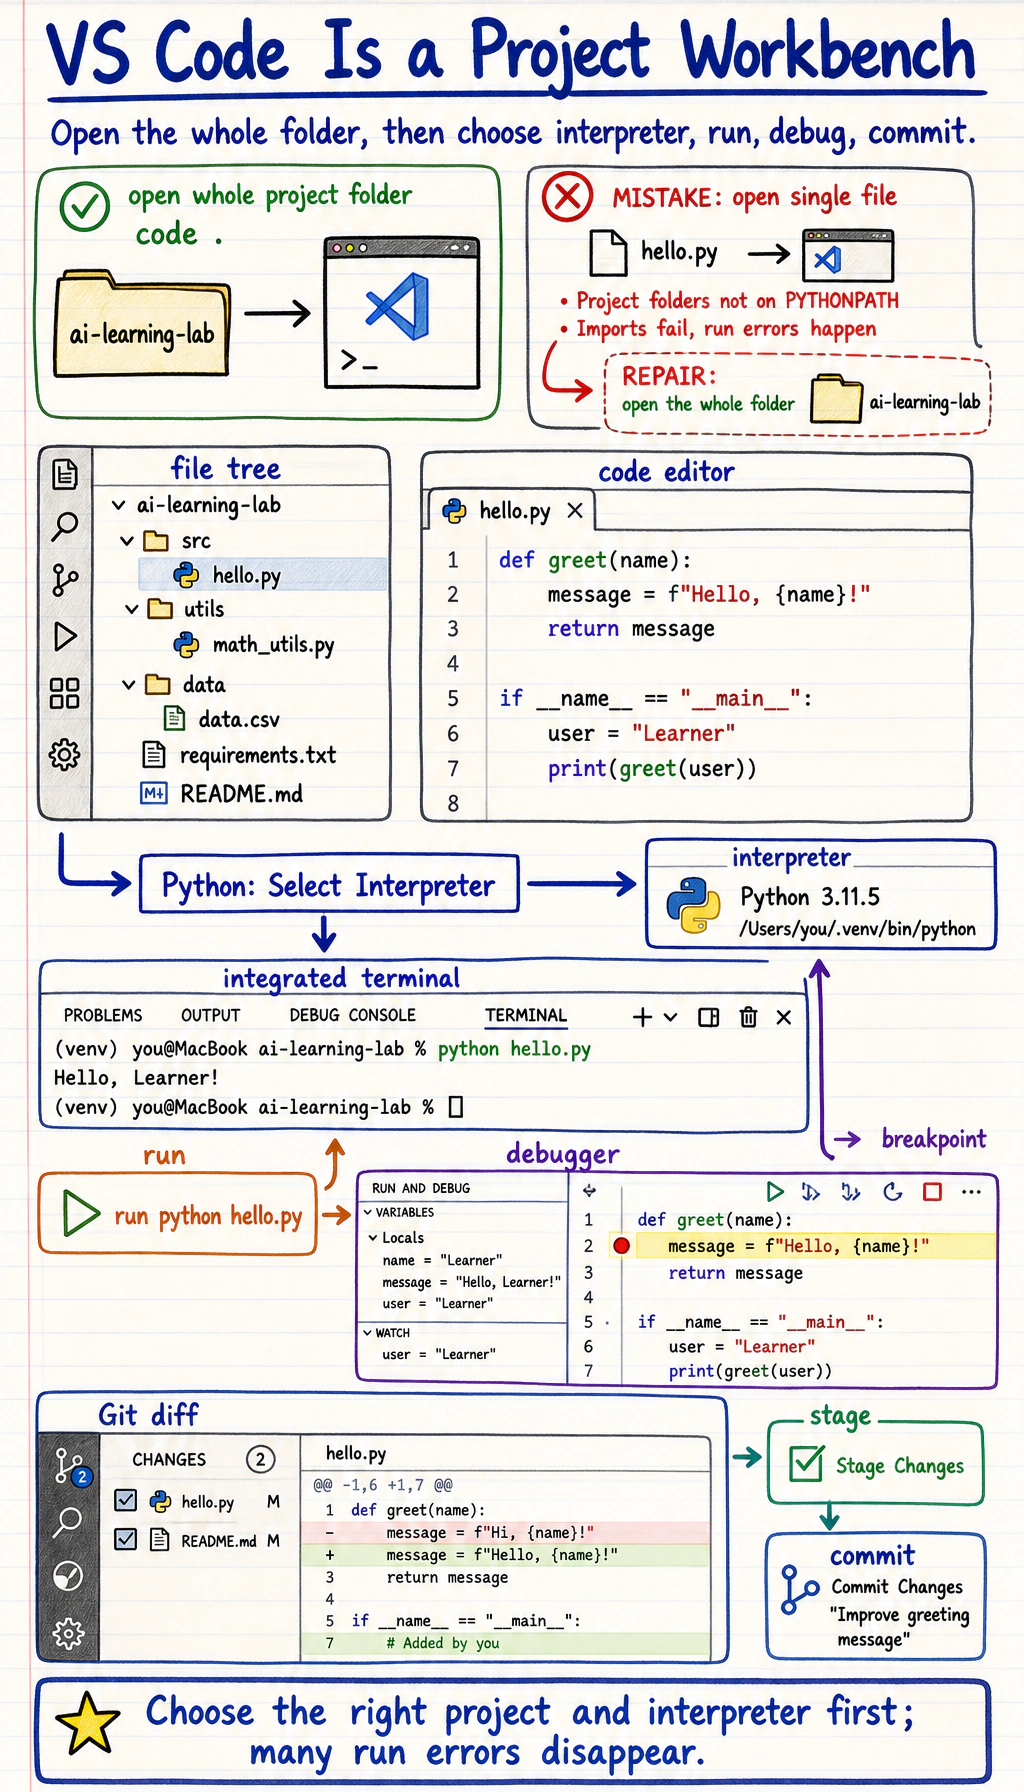
Section titled “What this section is about”In this section, we’ll configure VS Code into a development tool that works well for Python and AI learning. You’ll finish editor installation, extension setup, the built-in terminal, and common shortcut settings, so your later coding practice has a stable and convenient workspace.
Learning objectives
Section titled “Learning objectives”- Install VS Code and choose the interface language you prefer
- Install essential extensions for Python development
- Learn to use the built-in terminal in VS Code
- Master 10 of the most commonly used shortcuts
- Understand AI-assisted programming tools
Why choose VS Code?
Section titled “Why choose VS Code?”| Editor | Pros | Cons |
|---|---|---|
| VS Code | Free, lightweight, rich extensions, great AI support | For large projects, it may be less intelligent than PyCharm |
| PyCharm | Strongest Python support, convenient refactoring | Community Edition is free but limited; Professional Edition costs money |
| Vim/NeoVim | Extremely fast, geeky | Steep learning curve |
VS Code is currently the most widely used code editor in the world, and it has excellent support for Python and AI development. For beginners, it is the best choice.
Install VS Code
Section titled “Install VS Code”# Install with Homebrew (recommended)brew install --cask visual-studio-code
# Or download from the official website: https://code.visualstudio.comAfter installation, configure command-line launch:
- Open VS Code
- Press
Cmd + Shift + Pand type “shell command” - Select Shell Command: Install ‘code’ command in PATH
After that, you can use the code command in the terminal to open files and folders:
code . # Open the current folder with VS Codecode ~/projects # Open a specific foldercode hello.py # Open a specific fileWindows
Section titled “Windows”# Install with wingetwinget install Microsoft.VisualStudioCode
# Or download from the official website: https://code.visualstudio.comDuring installation, check “Add to PATH” so you can use the code command in the terminal.
Ubuntu
Section titled “Ubuntu”# Method 1: use snap (recommended)sudo snap install code --classic
# Method 2: use aptsudo apt install software-properties-common apt-transport-https wgetwget -q https://packages.microsoft.com/keys/microsoft.asc -O- | sudo apt-key add -sudo add-apt-repository "deb [arch=amd64] https://packages.microsoft.com/repos/vscode stable main"sudo apt updatesudo apt install codeInterface Language (Optional)
Section titled “Interface Language (Optional)”- Open VS Code
- Press
Ctrl + Shift + X(Cmd + Shift + Xon macOS) to open the Extensions panel - Search for the language pack you prefer, such as English Language Pack, Chinese (Simplified), or Japanese Language Pack
- Click Install
- Restart VS Code, and the interface will switch to that language
Install essential extensions
Section titled “Install essential extensions”Open the Extensions panel (the square icon on the left sidebar, or press Ctrl/Cmd + Shift + X), then search for and install the following extensions:
Must-have extensions
Section titled “Must-have extensions”| Extension | Purpose | Search keyword |
|---|---|---|
| Python | Python syntax support, debugging, running | ms-python.python |
| Pylance | Python intelligent suggestions, type checking | ms-python.vscode-pylance |
| Jupyter | Run notebooks in VS Code | ms-toolsai.jupyter |
| GitLens | Enhanced Git features, see who changed which line | eamodio.gitlens |
| Black Formatter | Format Python code consistently | ms-python.black-formatter |
Recommended extensions
Section titled “Recommended extensions”| Extension | Purpose |
|---|---|
| autoDocstring | Automatically generate Python function docstrings |
| Ruff | Fast linting and import cleanup for Python |
| indent-rainbow | Use colors to distinguish indentation levels |
| Error Lens | Show error messages directly at the end of code lines |
| Material Icon Theme | More attractive file icons |
Configure the Python interpreter
Section titled “Configure the Python interpreter”After installing the Python extension, you need to tell VS Code which Python environment to use:
- Press
Ctrl/Cmd + Shift + Pto open the Command Palette - Type Python: Select Interpreter
- Select the conda environment you created earlier (for example,
ai-course)
You should see a list of options like this:
Python 3.11.7 ('ai-course') ~/miniconda3/envs/ai-course/bin/pythonPython 3.12.1 ('base') ~/miniconda3/bin/pythonChoose the ai-course one.
Use the built-in terminal
Section titled “Use the built-in terminal”VS Code comes with a built-in terminal, so you don’t need to open a separate terminal window.
Open the terminal
Section titled “Open the terminal”Shortcut: Ctrl + ` (the key in the upper-left corner of the keyboard, below ESC)Or from the menu: Terminal → New Terminal
Example: complete the full development workflow in VS Code
Section titled “Example: complete the full development workflow in VS Code”# 1. Activate the environment in the terminalconda activate ai-course
# 2. Create a project foldermkdir my-first-projectcd my-first-project
# 3. Open this folder with VS Code (it will open in a new window)code .Then in VS Code:
- In the file explorer on the left, click the New File icon and create
hello.py - Write the code:
name = input("What is your name?")print(f"Hello, {name}! Welcome to the AI world 🤖")- Click the ▶ Run button in the upper-right corner (or press
Ctrl/Cmd + Shift + P→ “Run Python File”) - Check the output in the terminal
Terminal tips
Section titled “Terminal tips”- Multiple terminals: click the
+button in the top-right of the terminal panel to open more terminals - Split view: you can split the editor and terminal side by side, so you can write code while watching the terminal
- Terminal type: you can choose different shells such as bash, zsh, and PowerShell
Most commonly used shortcuts
Section titled “Most commonly used shortcuts”You don’t need to memorize everything. First remember the top 5, and look up the rest when you need them.
Basic operations
Section titled “Basic operations”| Action | Windows/Linux | macOS |
|---|---|---|
| Command Palette (most important!) | Ctrl + Shift + P | Cmd + Shift + P |
| Quick Open File | Ctrl + P | Cmd + P |
| Open/Close Terminal | Ctrl + ` | Ctrl + ` |
| Save | Ctrl + S | Cmd + S |
| Undo | Ctrl + Z | Cmd + Z |
Edit code
Section titled “Edit code”| Action | Windows/Linux | macOS |
|---|---|---|
| Duplicate current line | Shift + Alt + ↓ | Shift + Option + ↓ |
| Move current line | Alt + ↑/↓ | Option + ↑/↓ |
| Delete current line | Ctrl + Shift + K | Cmd + Shift + K |
| Multi-cursor editing | Alt + Click | Option + Click |
| Comment code | Ctrl + / | Cmd + / |
| Format code | Shift + Alt + F | Shift + Option + F |
Search and navigation
Section titled “Search and navigation”| Action | Windows/Linux | macOS |
|---|---|---|
| Global search | Ctrl + Shift + F | Cmd + Shift + F |
| Search within file | Ctrl + F | Cmd + F |
| Find and replace | Ctrl + H | Cmd + Option + F |
| Go to line | Ctrl + G | Ctrl + G |
Example: the power of multi-cursor editing
Section titled “Example: the power of multi-cursor editing”Suppose you need to rename 5 variable names from data1, data2… to dataset1, dataset2…:
data1 = load("file1.csv")data2 = load("file2.csv")data3 = load("file3.csv")data4 = load("file4.csv")data5 = load("file5.csv")Steps:
- Select the first
data - Press
Ctrl/Cmd + Dfive times to select alldataoccurrences one by one - Type
dataset
All 5 places are changed at the same time, and it’s done in 2 seconds.
AI-assisted programming tools
Section titled “AI-assisted programming tools”There are now many AI tools that can help you write code in VS Code. As a learner in an AI course, it’s worth knowing about them:
GitHub Copilot
Section titled “GitHub Copilot”- Automatically completes code as you type
- Press
Tabto accept suggestions - Eligible education accounts may receive free access through GitHub Education
- Extension search:
GitHub.copilot
Codeium
Section titled “Codeium”- Free AI code completion tool
- Similar to Copilot, completely free for individual users
- Extension search:
Codeium.codeium
Usage advice
Section titled “Usage advice”Recommended VS Code settings
Section titled “Recommended VS Code settings”Press Ctrl/Cmd + , to open Settings, then search for and change the following options:
| Setting | Recommended value | Reason |
|---|---|---|
| Auto Save | afterDelay | Auto-save so you never have to worry about forgetting Ctrl+S |
| Font Size | 14 or 15 | Slightly larger code font, easier on the eyes |
| Tab Size | 4 | Standard Python indentation |
| Word Wrap | on | Automatically wrap long lines |
| Minimap | off | Turn off the small map on the right to save screen space |
Or edit settings.json directly (Ctrl/Cmd + Shift + P → “Open Settings JSON”):
{ "files.autoSave": "afterDelay", "editor.fontSize": 14, "editor.tabSize": 4, "editor.wordWrap": "on", "editor.minimap.enabled": false, "python.terminal.activateEnvironment": true, "editor.formatOnSave": true, "[python]": { "editor.defaultFormatter": "ms-python.black-formatter" }, "python.analysis.typeCheckingMode": "basic"}Hands-on practice
Section titled “Hands-on practice”- Install VS Code and the essential extensions (Python, Pylance, Jupyter, GitLens)
- Create a project and open it with VS Code:
mkdir vscode-practice && cd vscode-practice && code .- Create
practice.pyand write the following code:
# Practice VS Code shortcutstasks = [    "load config",    "validate dataset",    "run smoke test",    "write metrics",    "commit changes",]
for i, task in enumerate(tasks):    print(f"{i + 1}. {task}")
# Calculate the average task label lengthavg_len = sum(len(task) for task in tasks) / len(tasks)print(f"\nAverage task label length: {avg_len:.1f} characters")- Run the code (click the ▶ button in the upper-right corner)
- Try these shortcuts:
- Use
Ctrl/Cmd + /to comment out the last two lines - Use
Alt + ↑/↓to move one line of code - Use
Ctrl/Cmd + Dto multi-select one word - Use
Ctrl/Cmd + Shift + Fto search globally for “task”
- Use
Project reference and review notes
code .should open the current project folder, not a single detached file.- The selected Python interpreter should match your course environment. Check the VS Code status bar or the command palette.
- Running
practice.pyshould print five AI project task lines and an average task label length. - If the Run button uses the wrong Python, run the file from the integrated terminal and then fix the selected interpreter.
- The shortcut practice passes when you can undo your edits and still run the script successfully.
Evidence to Keep
Section titled “Evidence to Keep”Keep this page’s proof of learning as a small evidence card:
- Environment
- Python/Node/editor/notebook version and selected interpreter/kernel
- Verification
- one command or notebook cell proving the setup works
- Project Folder
- where dependencies, scripts, and notebooks live
- Failure Check
- wrong interpreter, missing package, stale kernel, or editor path mismatch
- Expected Output
- setup screenshot or terminal output plus one fallback note