
10.1.4 Image Processing Techniques
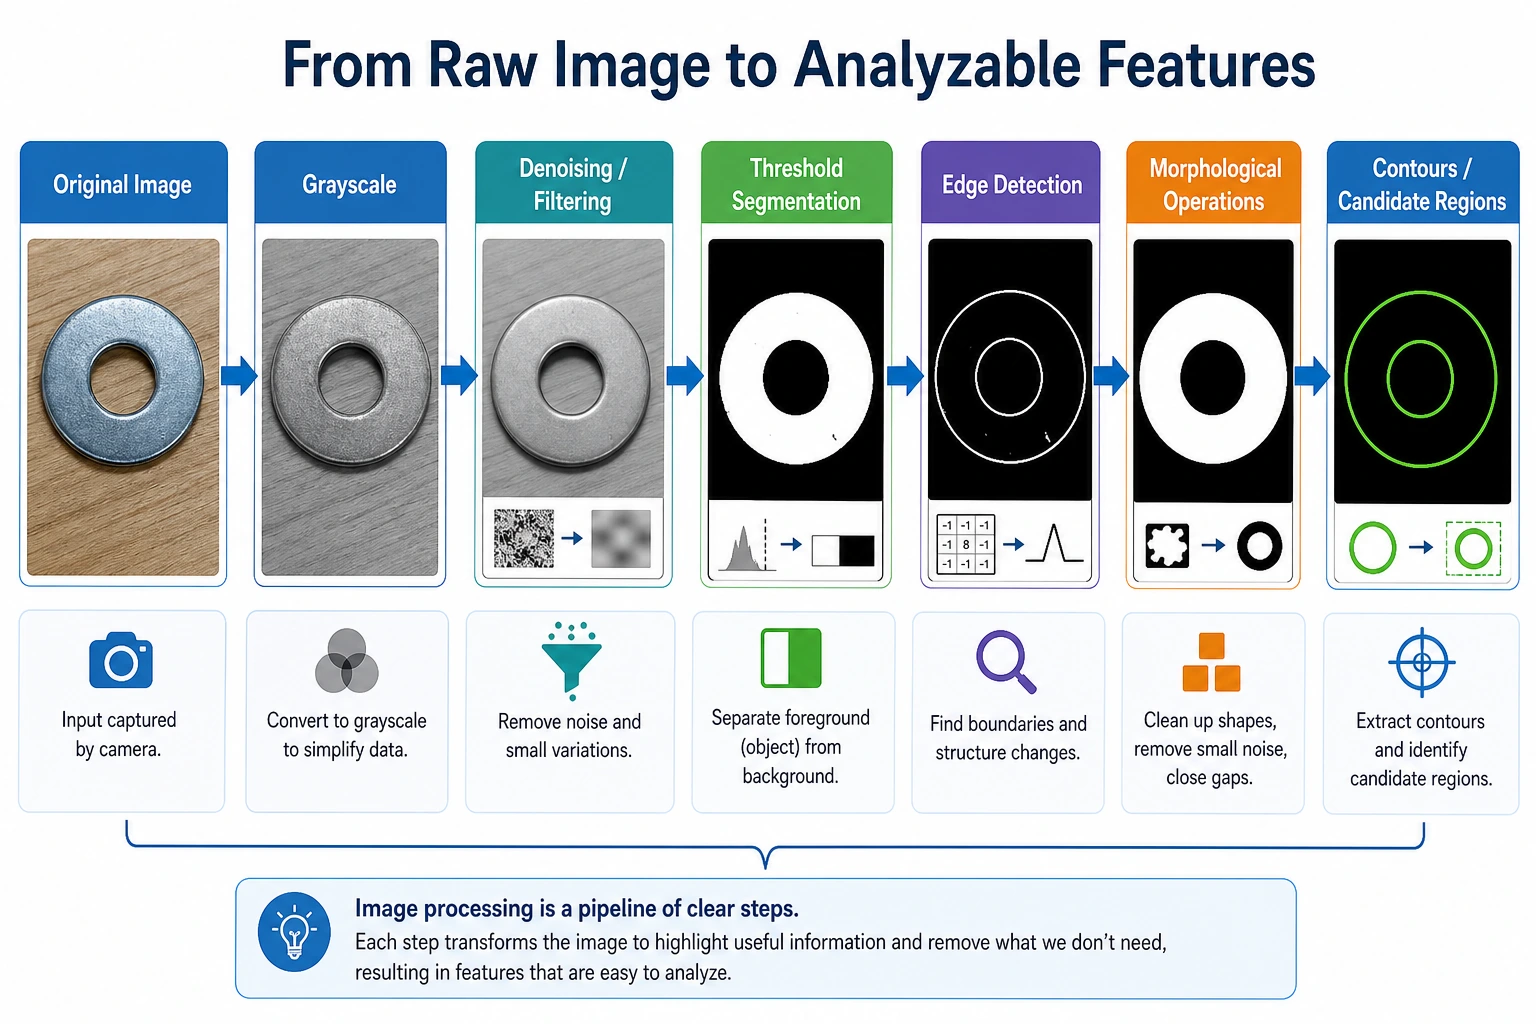
Learning Objectives
Section titled “Learning Objectives”By the end of this section, you will be able to:
- Understand what image filtering does
- Use OpenCV for smoothing, edge detection, and binarization
- Understand the intuition behind morphological operations such as dilation and erosion
- Read the basic code for classic image processing tasks
What does image processing work on?
Section titled “What does image processing work on?”Classic image processing can be understood as:
Using a set of rules to adjust pixels.
Unlike deep learning, it does not “learn rules from data”; instead, we write the rules first.
Typical tasks include:
- Noise reduction
- Blurring
- Edge extraction
- Binarization
- Contour enhancement
First, generate a test image
Section titled “First, generate a test image”To keep the example independent of external images, we will generate a simple image ourselves.
import cv2import numpy as np
img = np.zeros((240, 320), dtype=np.uint8)
# Draw a white rectangle and a gray circlecv2.rectangle(img, (30, 40), (140, 180), 255, -1)cv2.circle(img, (230, 120), 45, 180, -1)
cv2.imwrite("processing_original.png", img)print("Saved processing_original.png")
Expected output:
Saved processing_original.pngHere we use a grayscale image directly, which will make edge detection and thresholding more convenient later.
Filtering: make the image a little smoother
Section titled “Filtering: make the image a little smoother”The intuition of filtering is very similar to this:
Consider the values of the neighboring pixels around a pixel to make the image smoother.
Mean filtering
Section titled “Mean filtering”import cv2import numpy as np
img = cv2.imread("processing_original.png", cv2.IMREAD_GRAYSCALE)blurred = cv2.blur(img, (7, 7))
cv2.imwrite("processing_blur.png", blurred)print("Saved processing_blur.png")Expected output:
Saved processing_blur.pngMean filtering softens edges, but it can also lose details.
Gaussian filtering
Section titled “Gaussian filtering”import cv2
img = cv2.imread("processing_original.png", cv2.IMREAD_GRAYSCALE)gaussian = cv2.GaussianBlur(img, (7, 7), 0)
cv2.imwrite("processing_gaussian.png", gaussian)print("Saved processing_gaussian.png")Expected output:
Saved processing_gaussian.pngGaussian filtering is used more often than simple mean filtering because it feels more natural.
Edge detection: find where the changes are most obvious
Section titled “Edge detection: find where the changes are most obvious”An edge can be understood as:
A place where the brightness changes very abruptly
For example, the boundary of a white rectangle on a black background is a typical edge.
Canny edge detection
Section titled “Canny edge detection”import cv2
img = cv2.imread("processing_original.png", cv2.IMREAD_GRAYSCALE)edges = cv2.Canny(img, threshold1=50, threshold2=150)
cv2.imwrite("processing_edges.png", edges)print("Saved processing_edges.png")Expected output:
Saved processing_edges.pngHow should we understand the two thresholds?
Section titled “How should we understand the two thresholds?”You can roughly remember it like this:
- Below the low threshold: basically not an edge
- Above the high threshold: very likely an edge
- Middle range: judge again based on the neighborhood
Thresholding: convert a grayscale image into a black-and-white image
Section titled “Thresholding: convert a grayscale image into a black-and-white image”Thresholding means setting a line:
- Values greater than this become white
- Values less than this become black
import cv2
img = cv2.imread("processing_original.png", cv2.IMREAD_GRAYSCALE)_, binary = cv2.threshold(img, 100, 255, cv2.THRESH_BINARY)
cv2.imwrite("processing_binary.png", binary)print("Saved processing_binary.png")
Expected output:
Saved processing_binary.pngThis operation is commonly used for:
- Document scanning
- Foreground/background separation
- Preprocessing for contour extraction
Morphological operations: editing shapes
Section titled “Morphological operations: editing shapes”Morphological operations are especially suitable for binary images.
You can think of them as “kneading, expanding, or shrinking the white areas.”
Erosion
Section titled “Erosion”The white areas become smaller.
import cv2import numpy as np
img = cv2.imread("processing_binary.png", cv2.IMREAD_GRAYSCALE)kernel = np.ones((5, 5), np.uint8)eroded = cv2.erode(img, kernel, iterations=1)
cv2.imwrite("processing_eroded.png", eroded)print("Saved processing_eroded.png")
Expected output:
Saved processing_eroded.pngDilation
Section titled “Dilation”The white areas become larger.
import cv2import numpy as np
img = cv2.imread("processing_binary.png", cv2.IMREAD_GRAYSCALE)kernel = np.ones((5, 5), np.uint8)dilated = cv2.dilate(img, kernel, iterations=1)
cv2.imwrite("processing_dilated.png", dilated)print("Saved processing_dilated.png")
Expected output:
Saved processing_dilated.pngOpening and closing
Section titled “Opening and closing”- Opening = erosion followed by dilation, suitable for removing small noise
- Closing = dilation followed by erosion, suitable for filling small holes
import cv2import numpy as np
img = cv2.imread("processing_binary.png", cv2.IMREAD_GRAYSCALE)kernel = np.ones((5, 5), np.uint8)
opened = cv2.morphologyEx(img, cv2.MORPH_OPEN, kernel)closed = cv2.morphologyEx(img, cv2.MORPH_CLOSE, kernel)
cv2.imwrite("processing_opened.png", opened)cv2.imwrite("processing_closed.png", closed)print("Saved processing_opened.png and processing_closed.png")
Expected output:
Saved processing_opened.png and processing_closed.png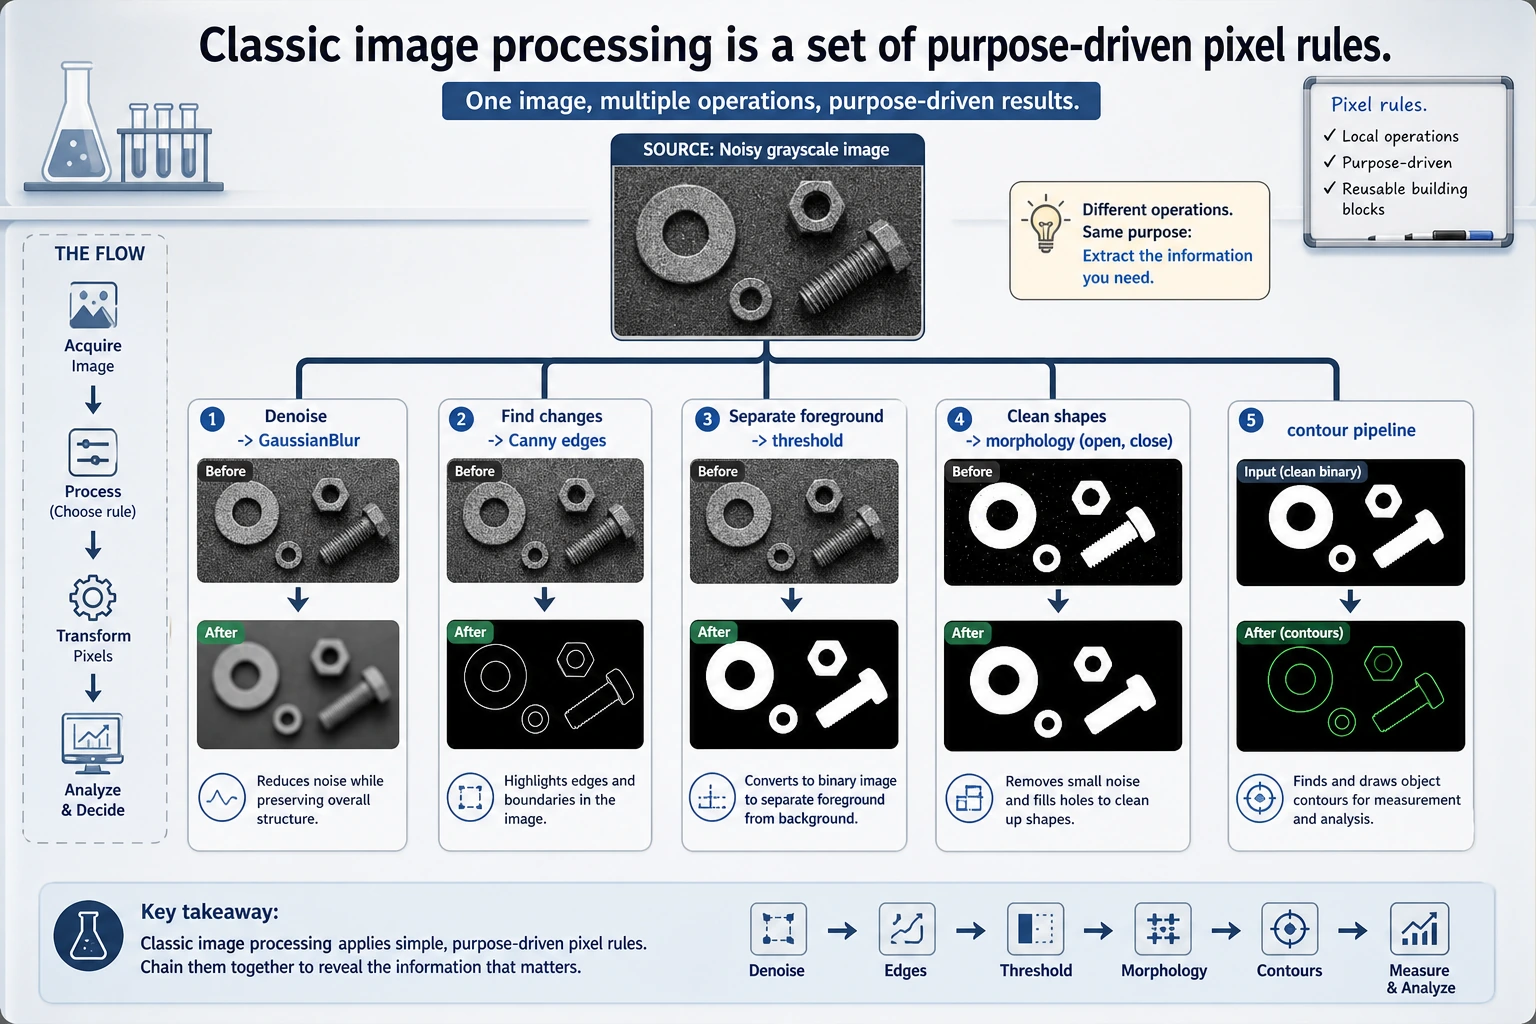
Combine these operations into a pipeline
Section titled “Combine these operations into a pipeline”In real tasks, these operations are often used together.
For example, if you want to extract a target contour, you might do this:
- Convert to grayscale
- Filter to reduce noise
- Threshold
- Clean up with morphology
- Then perform edge detection or contour analysis
Here is a complete mini pipeline:
import cv2import numpy as np
img = cv2.imread("processing_original.png", cv2.IMREAD_GRAYSCALE)
# Reduce noisesmoothed = cv2.GaussianBlur(img, (5, 5), 0)
# Threshold_, binary = cv2.threshold(smoothed, 100, 255, cv2.THRESH_BINARY)
# Fill small gaps with closingkernel = np.ones((5, 5), np.uint8)cleaned = cv2.morphologyEx(binary, cv2.MORPH_CLOSE, kernel)
# Edge extractionedges = cv2.Canny(cleaned, 50, 150)
cv2.imwrite("processing_pipeline_smoothed.png", smoothed)cv2.imwrite("processing_pipeline_binary.png", binary)cv2.imwrite("processing_pipeline_cleaned.png", cleaned)cv2.imwrite("processing_pipeline_edges.png", edges)print("The full processing pipeline results have been saved")
Expected output:
The full processing pipeline results have been saved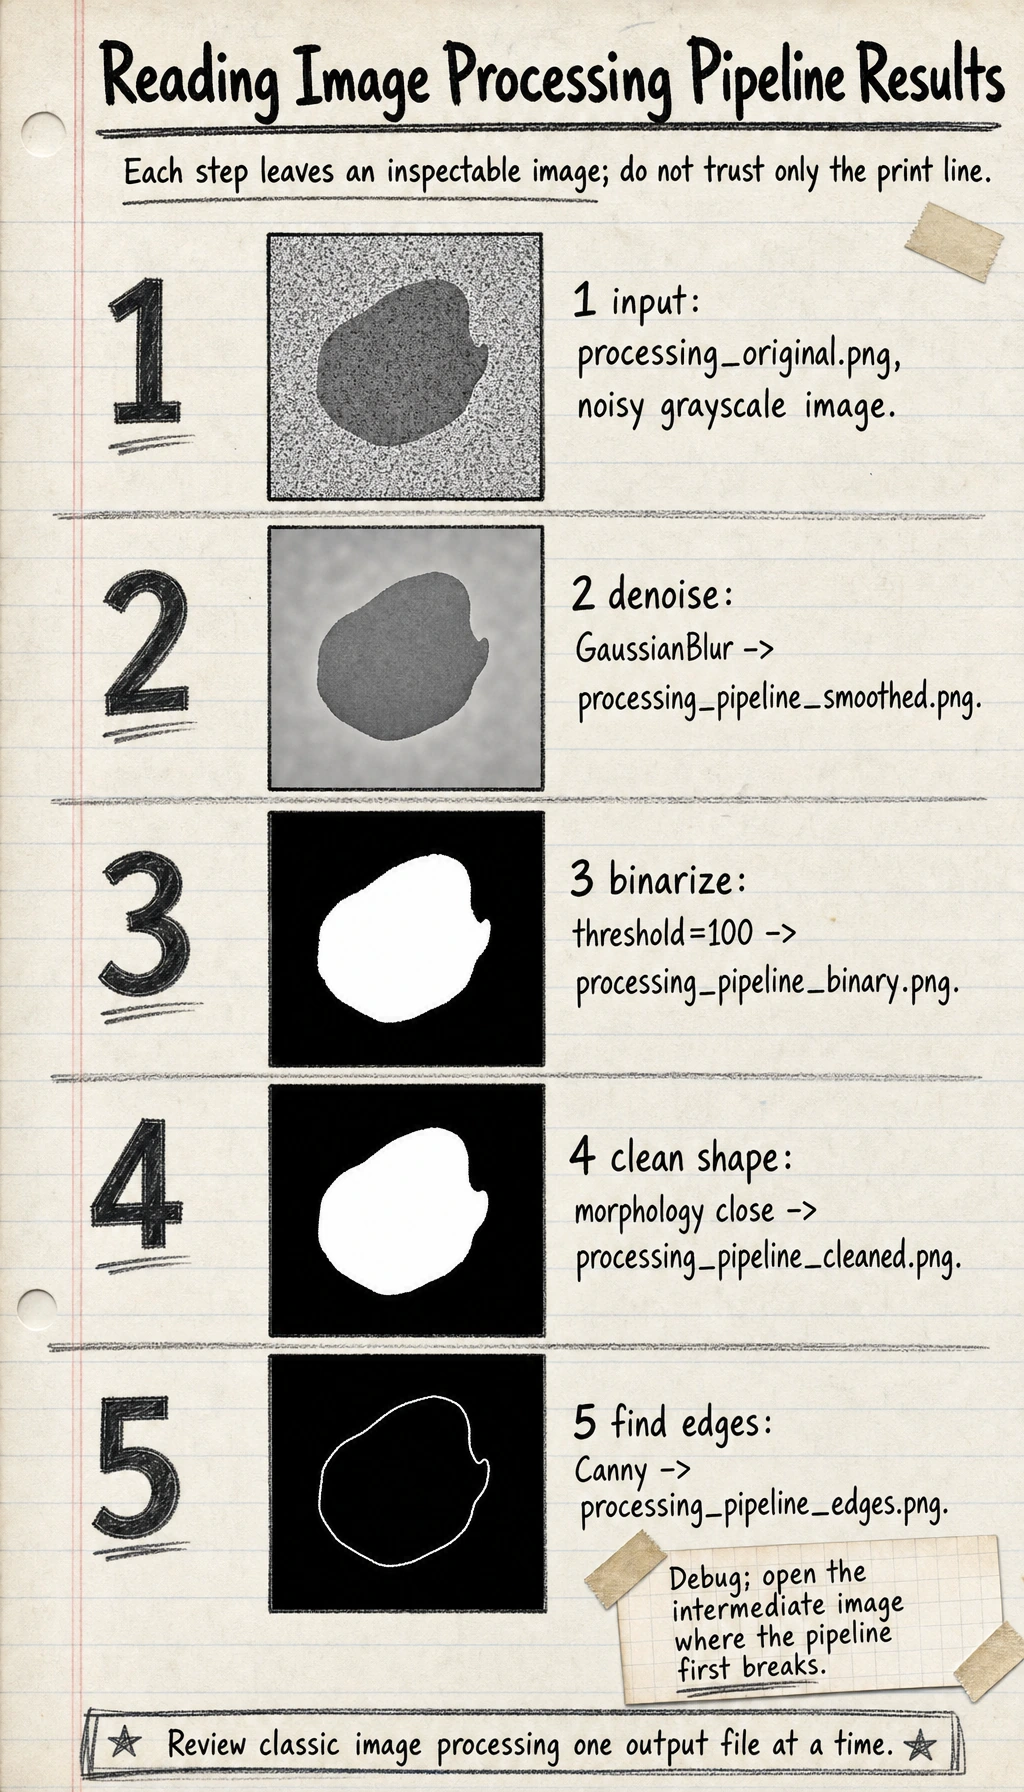
Why do we still learn these classic methods today?
Section titled “Why do we still learn these classic methods today?”Because they are still very useful:
- As preprocessing for deep learning
- For getting quick results in small projects
- To add rule-based support in industrial scenarios
- To help you build intuition about “how images are processed”
Many beginners only want to learn CNNs at first, but if you do not even understand grayscale, edges, and thresholds, your understanding of vision models will feel shaky later.
Evidence to Keep
Section titled “Evidence to Keep”Keep this page’s proof of learning as a small evidence card:
- Input Image
- source image or synthetic image used in the run
- Array Shape
- width, height, channels, dtype, and coordinate convention
- Processed Output
- grayscale, crop, edge, threshold, or saved intermediate image
- Failure Check
- channel order, resize distortion, coordinate mistake, or over-processing
- Expected Output
- before/after image plus the printed shape or pixel values
Common beginner mistakes
Section titled “Common beginner mistakes”Thinking filtering is just about “making the image look better”
Section titled “Thinking filtering is just about “making the image look better””Not only that. Filtering is often used to make later algorithms more stable.
Thinking thresholds can stay fixed forever
Section titled “Thinking thresholds can stay fixed forever”In real images, lighting changes a lot, so thresholds often need to be adjusted based on the scenario.
Learning only the API without understanding the purpose
Section titled “Learning only the API without understanding the purpose”You should always ask yourself:
- Is this step reducing noise?
- Or enhancing boundaries?
- Or cleaning up shapes?
Summary
Section titled “Summary”The core idea you should take away from this lesson is:
Classic image processing is essentially about using rules to rearrange and select pixels.
It is not the same as deep learning, but it is an important stepping stone for understanding vision tasks.
Exercises
Section titled “Exercises”- Change the threshold in
threshold()to60,120, and180, and observe how the binary image changes. - Change the kernel size for erosion and dilation from
(3, 3)to(7, 7), and observe the shape changes. - Add a small white dot to the original image and see whether opening can remove it.
Reference implementation and walkthrough
- A lower threshold usually turns more pixels white in the binary image; a higher threshold turns fewer pixels white. The important observation is not the exact picture, but the direction of change.
- A
(7, 7)kernel erodes objects more aggressively and dilates them more aggressively than(3, 3). Thin structures may disappear or become much thicker. - Opening can remove a small isolated white dot if the kernel is larger than the dot. If the dot is connected to a larger object or is too large, it may remain.