
2.3.4 Project: Quick AI API Experience
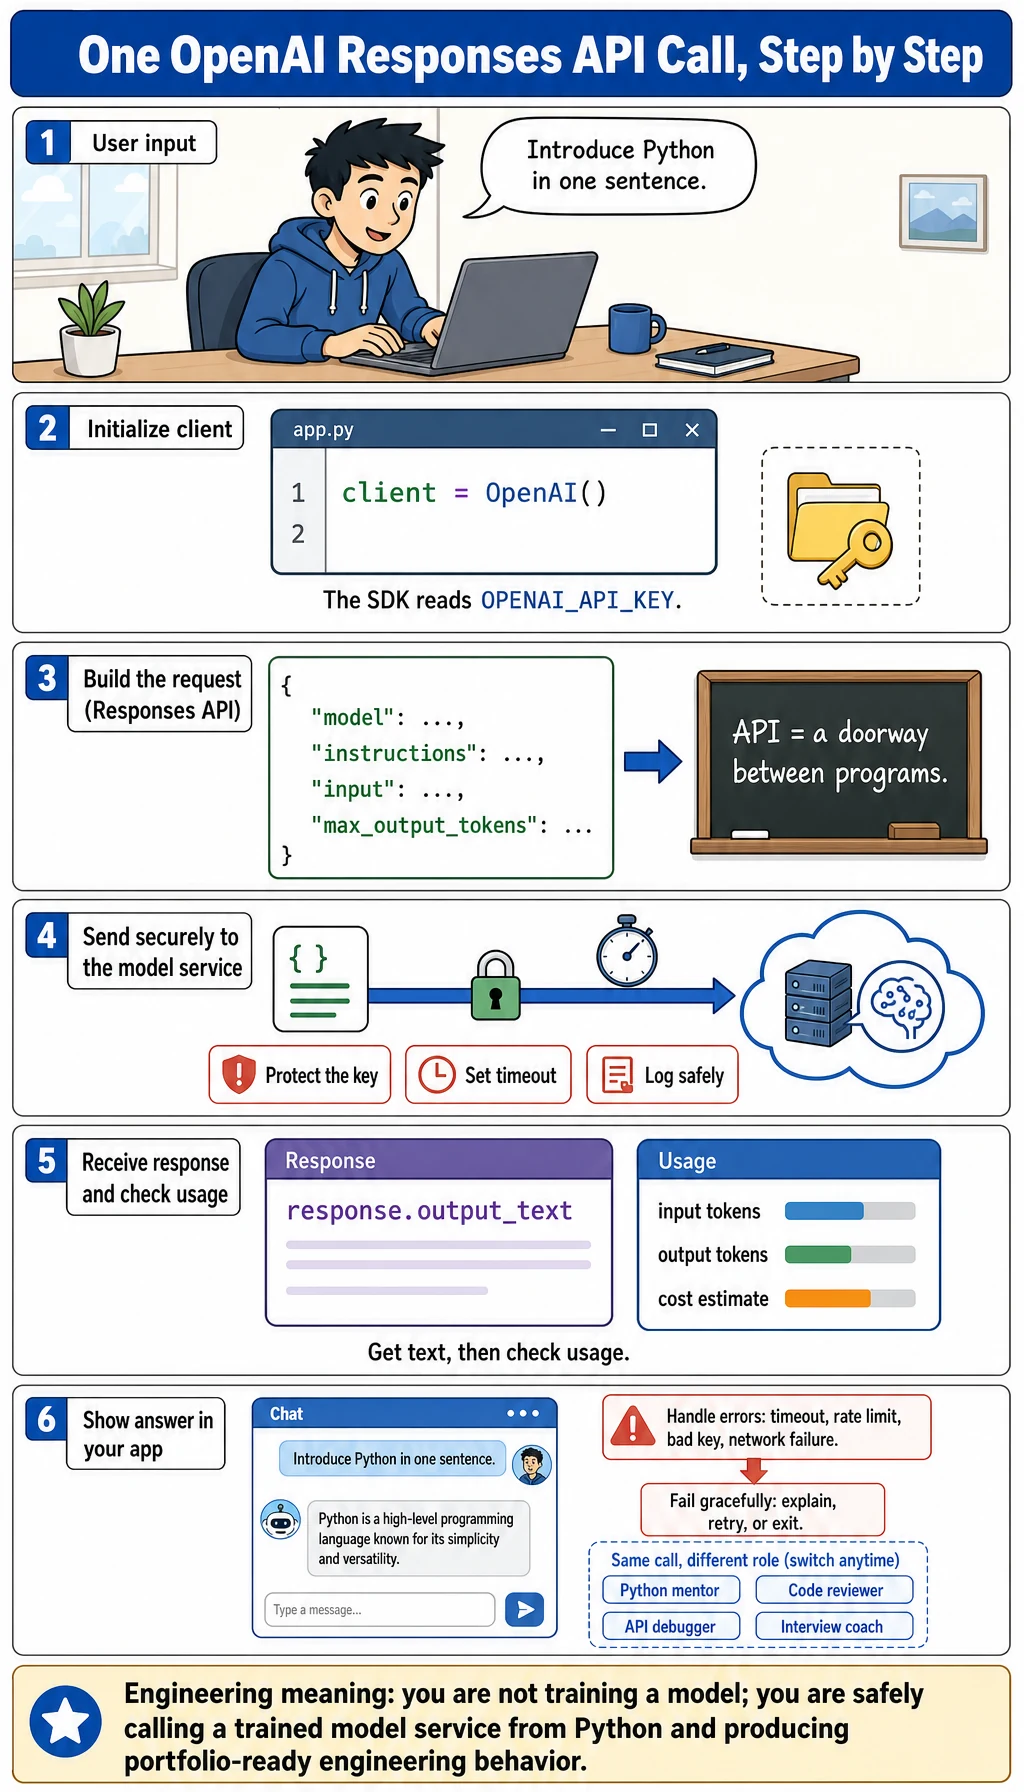
Project Overview
Section titled “Project Overview”This project lets you experience LLM capabilities early in the Python fundamentals stage. You will use an API Key to call ready-made AI services, understand the difference between “training a model” and “calling a model service,” and build a simple AI conversation program.
Project Goals
Section titled “Project Goals”- Understand what an AI API is and how it relates to AI models
- Learn how to call mainstream AI APIs such as OpenAI
- Experience AI capabilities such as conversation generation and text analysis
- Build a simple AI chatbot
What Is an AI API?
Section titled “What Is an AI API?”In the previous project, you learned how to write your own API. An AI API is someone else’s trained AI model packaged as an API for you to call.
Traditional approach: you train the model yourself (needs lots of data, GPUs, and time)API approach: directly call someone else’s model (just need an API Key and a few lines of code)Just like you do not need to grow wheat yourself to eat bread, with an AI API, you can directly use some of the most advanced AI capabilities in the world.
Common AI API Services
Section titled “Common AI API Services”| Service | Provider | Main Capabilities |
|---|---|---|
| OpenAI API | OpenAI | Conversation, text generation, code generation |
| Claude API | Anthropic | Conversation, document analysis, reasoning |
| Tongyi Qianwen API | Alibaba Cloud | Conversation, text understanding |
| Wenxin Yiyan API | Baidu | Conversation, knowledge Q&A |
| Zhipu API | Zhipu AI | Conversation, code generation |
Step 1: Get an API Key
Section titled “Step 1: Get an API Key”To use an AI API, you first need to register and obtain an API Key—it is like a key that proves you have permission to call the API.
Get an OpenAI API Key
Section titled “Get an OpenAI API Key”- Visit platform.openai.com
- Register or log in
- Go to the API Keys page
- Click “Create new secret key”
- Copy and store the Key safely (it will only be shown once)
Install the OpenAI SDK
Section titled “Install the OpenAI SDK”python -m pip install --upgrade openaiSet the API Key
Section titled “Set the API Key”# Method 1: set an environment variable (recommended)export OPENAI_API_KEY="your_api_key_here"
# Method 2: set it in code (not recommended to commit to Git)Step 2: Your First AI API Call
Section titled “Step 2: Your First AI API Call”Modern OpenAI text generation tutorials should start with the Responses API. It is the newer unified entry point for text generation, tool calling, multimodal input, and later Agent-style workflows. You may still see older tutorials using client.chat.completions.create(...); know what it is, but use client.responses.create(...) as your main learning path here.
from openai import OpenAI
# Create a client (reads OPENAI_API_KEY automatically from the environment variable)client = OpenAI()
# Send a simple text generation requestresponse = client.responses.create(    model="gpt-4o-mini",    input="Hello! Please introduce the Python language in one sentence.")
# Get the AI's replyprint(f"AI says: {response.output_text}")
Sample output:
AI says: Python is a concise, elegant, and powerful high-level programming language widely used in data analysis, AI, web development, and many other fields.Understand the Request Structure
Section titled “Understand the Request Structure”response = client.responses.create( model="gpt-4o-mini", instructions="You are a Python engineering assistant. Explain clearly and include one runnable next step.", input=[ {"role": "user", "content": "What is a list comprehension?"}, {"role": "assistant", "content": "A list comprehension is a compact way to build a list."}, {"role": "user", "content": "Can you give an example?"}, ],)
print(response.output_text)| Part | Meaning |
|---|---|
model | Which model to call. Start with a small, low-cost model for learning, then upgrade when needed. |
instructions | High-level behavior rules for the model, such as tone, role, and output style. |
input | The user content, or a list of previous user/assistant messages for manual conversation history. |
role: "user" | Message written by the user. |
role: "assistant" | Previous model reply, used when you manually include conversation history. |
output_text | A convenient SDK property that collects the model’s text output into one string. |
Step 3: Build an Interactive Chatbot
Section titled “Step 3: Build an Interactive Chatbot”"""AI chatbotUse the OpenAI Responses API to implement multi-turn conversations"""
from openai import OpenAI
def create_chatbot(system_prompt: str = "You are a friendly AI assistant."): """Create a chatbot""" client = OpenAI() history = []
print("=" * 50) print(" AI Chatbot") print(" Type 'quit' to exit, type 'clear' to clear the conversation history") print("=" * 50)
while True: user_input = input("\nYou: ").strip()
if not user_input: continue if user_input.lower() == "quit": print("Goodbye!") break if user_input.lower() == "clear": history = [] print("🧹 Conversation history cleared") continue
# Add user message history.append({"role": "user", "content": user_input})
try: # Call the API response = client.responses.create( model="gpt-4o-mini", instructions=system_prompt, input=history, temperature=0.7, # controls creativity (0=conservative, higher=more varied) max_output_tokens=800, # maximum reply length store=False, # do not store this learning conversation on the provider side )
# Get reply reply = response.output_text print(f"\nAI: {reply}")
# Add the AI reply to history as well (to enable multi-turn conversation) history.append({"role": "assistant", "content": reply})
# Show token usage usage = response.usage print(f"\n [Token usage: input={usage.input_tokens}, " f"output={usage.output_tokens}, " f"total={usage.total_tokens}]")
except Exception as e: print(f"\n❌ Call failed: {e}") history.pop() # remove the failed user message
if __name__ == "__main__": create_chatbot("You are a professional Python programming mentor. Answer questions in clear and simple language.")Step 4: Practical AI Tools
Section titled “Step 4: Practical AI Tools”Tool 1: AI Code Review Assistant
Section titled “Tool 1: AI Code Review Assistant”def review_code(code: str) -> str: """Let AI review your code""" client = OpenAI()
response = client.responses.create( model="gpt-4o-mini", instructions=( "You are a senior Python code review expert. " "Please review the user's code, point out issues, and give improvement suggestions. " "Reply in Chinese, with a clear format." ), input=f"Please review the following code:\n\n```python\n{code}\n```", temperature=0.3 # low temperature for code review, more rigorous )
return response.output_text
# Testcode = """def calc(l): s = 0 for i in range(len(l)): s = s + l[i] return s / len(l)"""
print(review_code(code))Tool 2: AI Text Summarization Tool
Section titled “Tool 2: AI Text Summarization Tool”def summarize(text: str, max_sentences: int = 3) -> str: """Let AI generate a text summary""" client = OpenAI()
response = client.responses.create( model="gpt-4o-mini", instructions=f"Summarize the core content in no more than {max_sentences} sentences. Reply in Chinese.", input=text, temperature=0.3 )
return response.output_text
# Uselong_text = """Python is a widely used high-level programming language created by Guido van Rossum and first released in 1991.Python's design philosophy emphasizes code readability and simplicity, using significant whitespace indentation to define code blocks.It supports multiple programming paradigms, including procedural, object-oriented, and functional programming.Python has a large standard library and a rich third-party library ecosystem.In fields such as AI, machine learning, data science, and web development, Python is one of the most popular programming languages."""
print(summarize(long_text))Tool 3: AI Translation Tool
Section titled “Tool 3: AI Translation Tool”def translate(text: str, target_lang: str = "English") -> str: """AI translation""" client = OpenAI()
response = client.responses.create( model="gpt-4o-mini", instructions=( f"You are a professional translator. Translate the user's text into {target_lang}. " "Return only the translation, without any explanations." ), input=text, temperature=0.3 )
return response.output_text
print(translate("Artificial intelligence is changing the world"))print(translate("Hello, how are you?", "Chinese"))Step 5: Use a Domestic AI API (Alternative)
Section titled “Step 5: Use a Domestic AI API (Alternative)”If you use a domestic AI API, the code structure is almost the same; you only need to change the API address and Key.
Zhipu AI (GLM model)
Section titled “Zhipu AI (GLM model)”python -m pip install --upgrade zhipuaiThis example uses Zhipu’s own SDK, so the method name may still look like Chat Completions. Treat it as a provider-specific interface. For OpenAI’s current text generation path in this course, continue to use the Responses API shown above.
from zhipuai import ZhipuAI
client = ZhipuAI(api_key="your_api_key")
response = client.chat.completions.create(    model="glm-4-flash",    messages=[        {"role": "user", "content": "Hello! Please introduce Python"}    ])
print(response.choices[0].message.content)
General OpenAI-Compatible Interface
Section titled “General OpenAI-Compatible Interface”Many providers are compatible with an OpenAI-style interface. Some already support client.responses.create(...); others may still only support client.chat.completions.create(...). Always check the provider’s documentation first.
from openai import OpenAI
# Use a different API serviceclient = OpenAI(    api_key="your_api_key",    base_url="https://api.your-provider.com/v1"  # replace with the corresponding service address)
# If this provider supports the Responses API:response = client.responses.create(    model="model_name",    input="Hello")print(response.output_text)
Key Parameters for Understanding AI APIs
Section titled “Key Parameters for Understanding AI APIs”| Parameter | Meaning | Suggested Value |
|---|---|---|
model | Which model to use | Start with a small, low-cost model; upgrade for harder tasks |
instructions | High-level behavior rules | Role, tone, output format, safety rules |
input | User input or conversation history | String or message list |
temperature | Creativity / randomness | 0.0-0.3 (factual), 0.7-1.0 (creative) |
max_output_tokens | Maximum output length | Set as needed |
store | Whether provider stores the response object | False for simple learning demos |
stream | Whether to stream output | True creates a typewriter effect |
Tokens and Cost
Section titled “Tokens and Cost”AI APIs are billed by Token. A Token is roughly a word or a few Chinese characters.
# Check token usageusage = response.usageprint(f"Input tokens: {usage.input_tokens}")print(f"Output tokens: {usage.output_tokens}")print(f"Total tokens: {usage.total_tokens}")Extension Challenges
Section titled “Extension Challenges”Challenge 1: Streaming Output
Section titled “Challenge 1: Streaming Output”Implement a typewriter effect (the AI reply appears one character at a time):
# Hint: use the stream=True parameter with the Responses APIstream = client.responses.create(    model="gpt-4o-mini",    input="Write a short welcome message for Python beginners.",    stream=True,)
for event in stream:    if event.type == "response.output_text.delta":        print(event.delta, end="", flush=True)
Challenge 2: Combine with FastAPI
Section titled “Challenge 2: Combine with FastAPI”Wrap the AI chatbot functionality as an API so others can use your AI bot through HTTP requests.
Challenge 3: Role Playing
Section titled “Challenge 3: Role Playing”Create AI assistants with different engineering roles (Python mentor, code reviewer, API debugging assistant, interview coach) and let the user choose one.
Challenge 4: Local Knowledge Base
Section titled “Challenge 4: Local Knowledge Base”Let the AI read a local file first (for example, your notes), then answer questions based on the file content.
Project reference and review notes
- For streaming, iterate over
response.output_text.deltaevents and print each chunk immediately so the reply appears gradually. - Wrap the chatbot in FastAPI only after the direct CLI version works, so you can compare CLI and HTTP behavior clearly.
- For role playing, build a role selector that swaps prompts or system instructions while keeping the same chat loop. Each role should produce a different engineering artifact: a clearer explanation, review comments, a debugging checklist, or interview feedback.
- For a local knowledge base, load notes or Markdown first, retrieve relevant passages, and then answer with those passages in mind. Showing the source snippet makes the answer easier to trust.
- Self-check: confirm that the API key is stored safely, multi-turn memory works, at least one practical tool works, and the key is not hard-coded.
Project Self-Check Checklist
Section titled “Project Self-Check Checklist”- Successfully obtained an API Key and stored it safely
- Can successfully call the AI API and get a reply
- Implemented multi-turn conversation
- Built at least one practical tool (code review / summarization / translation)
- Has exception handling (network errors, API errors)
- API Key is not hard-coded in the code
Stage Summary
Section titled “Stage Summary”Congratulations on completing all the learning in Python Programming Fundamentals 2! Let’s review the skills you have mastered:
| Chapter | Skills Mastered |
|---|---|
| Python Basics | Variables, data types, operators, control flow, data structures, functions, modules |
| Advanced Python | Object-oriented programming, exception handling, file operations, functional programming, generators, type annotations |
| Practical Projects | Command-line tools, web crawlers, Web APIs, AI API calls |
You now have:
- Programming thinking: you can break problems down into code logic
- Engineering ability: you can write well-structured programs with error handling
- Practical experience: you have completed 4 real projects
Recommended Version Roadmap
Section titled “Recommended Version Roadmap”| Version | Goal | Key Deliverables |
|---|---|---|
| Basic version | Get the minimum loop working | Can input, process, and output, while keeping one set of examples |
| Standard version | Form a project that can be shown | Add configuration, logging, error handling, README, and screenshots |
| Challenge version | Get close to portfolio quality | Add evaluation, comparison experiments, failed sample analysis, and a next-step roadmap |
It is recommended to finish the basic version first; do not try to make it too large or complete at the beginning. Each time you upgrade a version, be sure to write in the README: “What capabilities were added, how to verify them, and what problems still remain.”
Evidence to Keep
Section titled “Evidence to Keep”Keep this page’s proof of learning as a small evidence card:
- Project Goal
- CLI, scraper, API, AI API call, or integrated Python workshop target
- Run Command
- exact command used to start the project
- Artifact
- output file, API response, JSON record, screenshot, or README note
- Failure Check
- dependency, network, parsing, route, input validation, or API-key issue
- Expected Output
- reproducible mini project folder with run result and one failure case